What's new in CLZ Comics Web? (page 5)
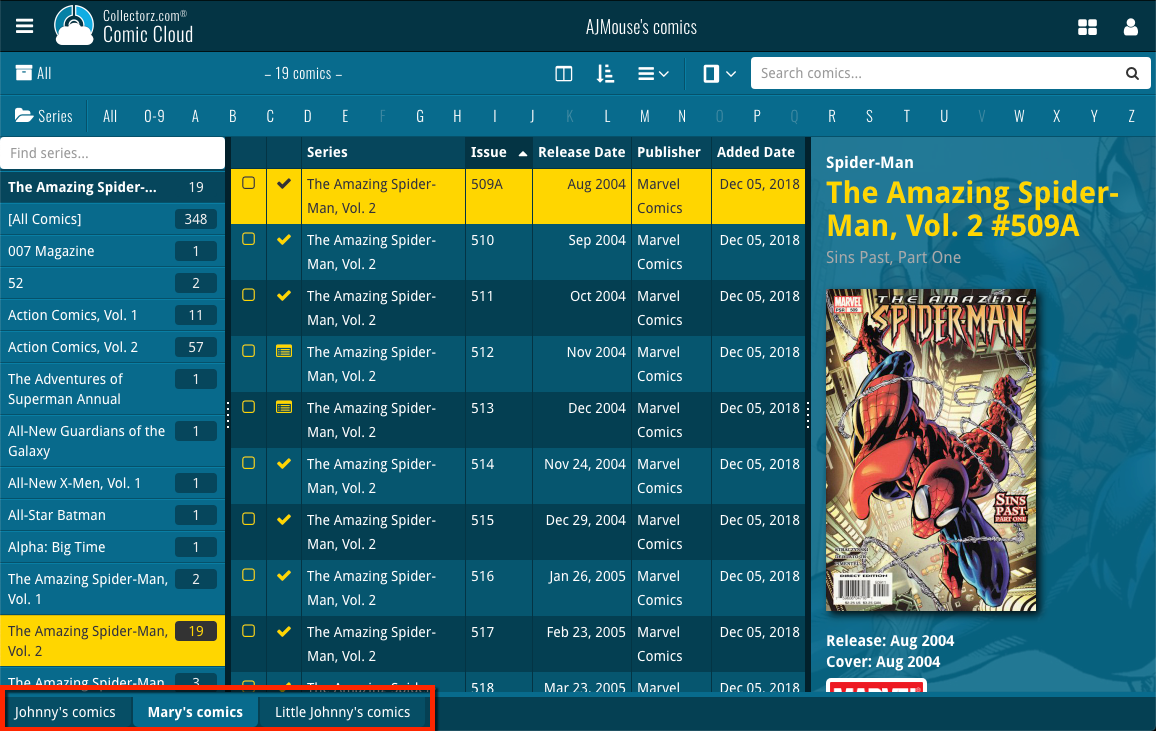
You can now manage multiple sub-collections within one account. The collections will appear as little tabs at the bottom (e.g. like in Excel), so that you can easily switch between them.
Create and manage collections
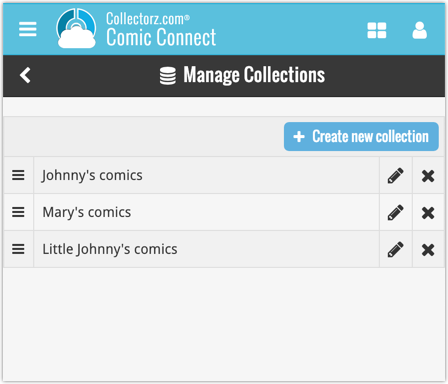
Open the menu top left and click “Manage Collections” to:
- Create new collections
- Rename existing collections
- Remove collections
- Change their order (drag and drop)
Note: the CLZ mobile app currently does not support multiple collections yet (coming soon!). For now, you CAN sync multiple collections to the mobile app, but they will appear mixed together, as ONE database.
New: Notes as a column
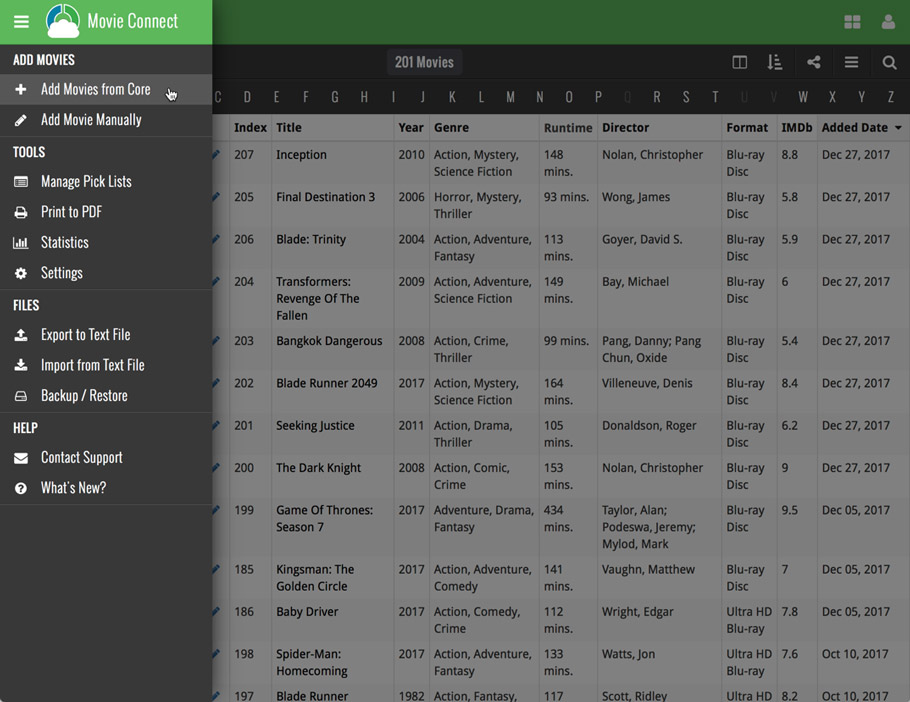
The Notes field can now be added as a column in List View:

(example screenshot from Movie Connect)
New: quick search box in the Folder Panel!
Another useful addition to your software today, as we added a Quick Search box in your folder panel.
Especially useful for those long folder lists, e.g. when using Series as the folder field. Just type a few letters of the series title and the folder list will instantly “filter down” to the matching series, while you type!
See it in action:
A nice time-saving feature was added to your Comic Connect software today:
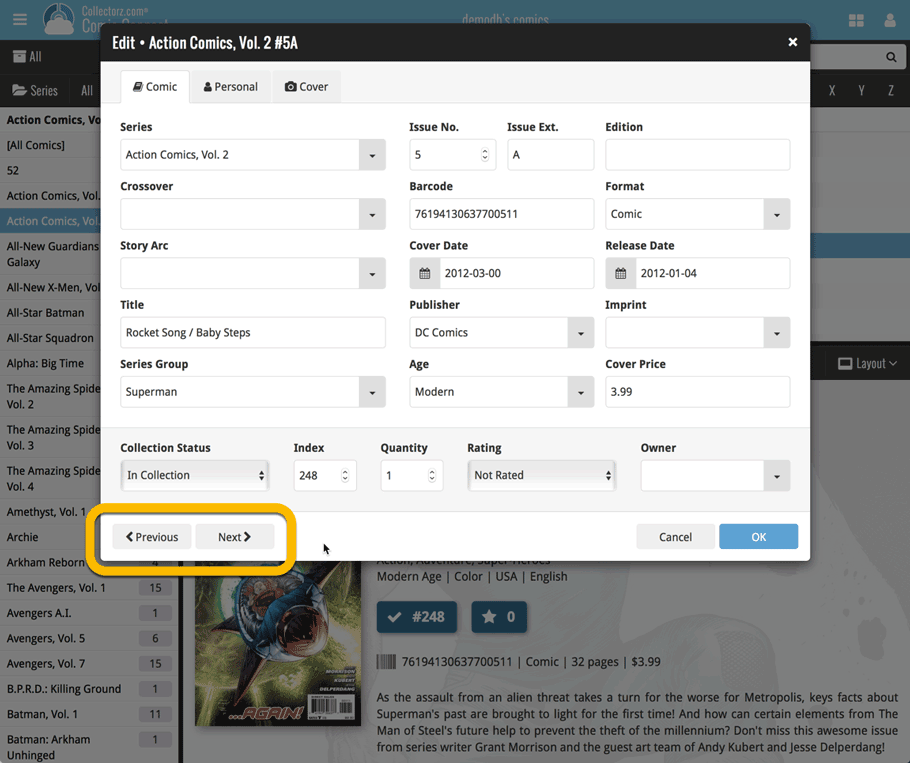
Next / Previous buttons in the Edit Comic screen
These buttons let you go through your comic list to make changes, while staying in the Edit Comic screen. Just use the Next or Previous button on the bottom left.
While doing so, the screen will keep you on the same tab and same field, making it super-easy to make changes to same field(s) for multiple comics.
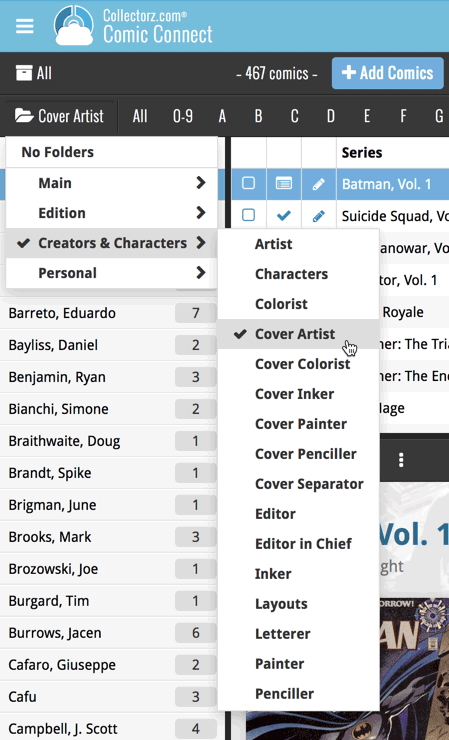
A small UI tweak today, made necessary because of the growing number of field options for the folder panel: the folder field menu is now grouped into 4 categories.
This should make it easier to find the field you are looking for.
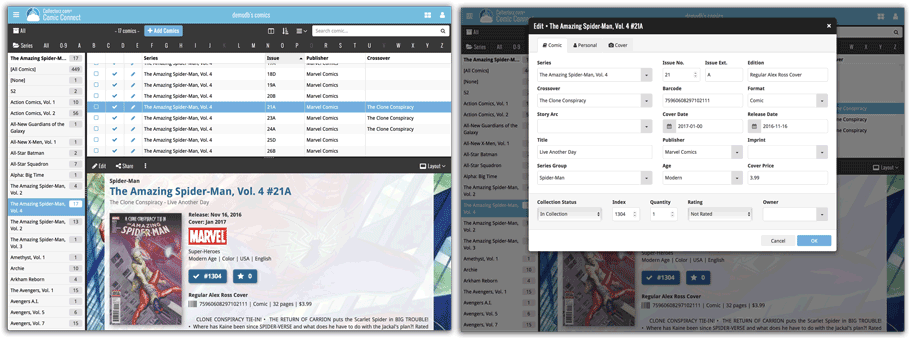
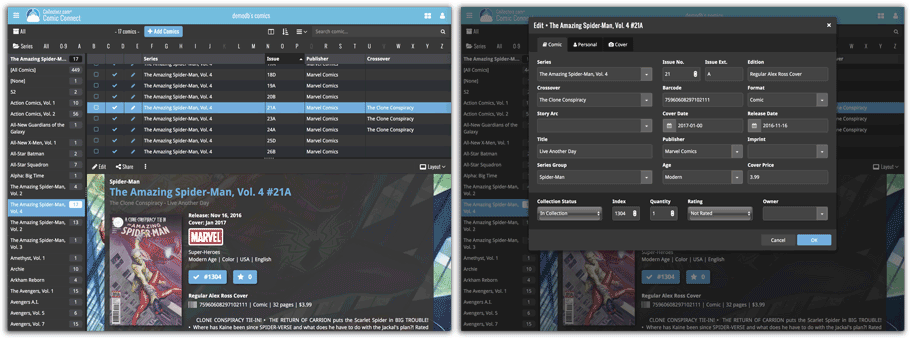
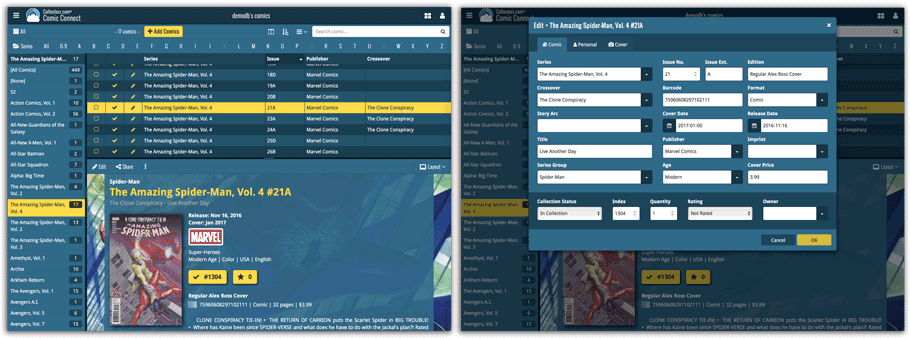
Do you like to customize your software to suit your needs or just your personal taste? Then we have big news for you today, as we have just introduced four “Skin” choices in your Comic Connect software:
- Default (the standard look, as it was before, so dark toolbars, light content)
- Dark (dark toolbars, dark content)
- Light (light toolbars, light content)
- Blue (shades of blue, with yellow highlights)
On top of that, we have given you 3 template style choices for the Comic Details area: Dark, Light and Blue. Either to match your Skin choice, or to mix to up, it’s up to you.
Both the Skin and Template selectors can be found in the Settings screen, under Customization.
Screen shots:
Default Skin:
Dark Skin:
Light Skin:
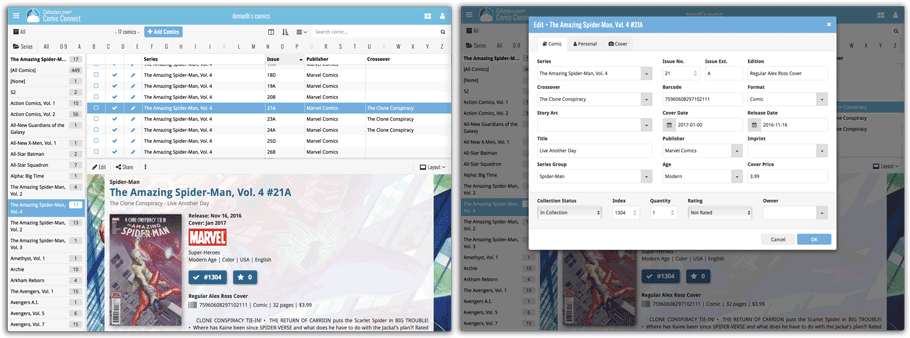
Blue Skin:
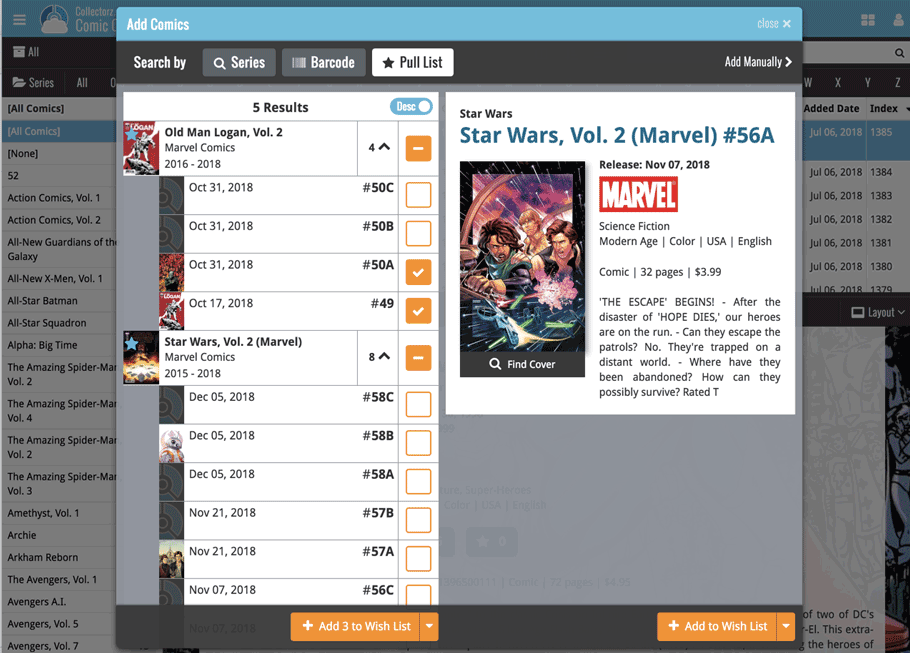
New in your Add Comics screen: a Pull List tab, a useful tool for listing your favorite comic series, so that you can easily find them when you add your weekly purchases, or for quickly adding upcoming releases to your wish list.
To add a series to your Pull List, first find it using your Series or Barcode tab. Once you found your series, hover your mouse over the series cover to reveal a white star icon. Click the star to add this series to your Pull List.
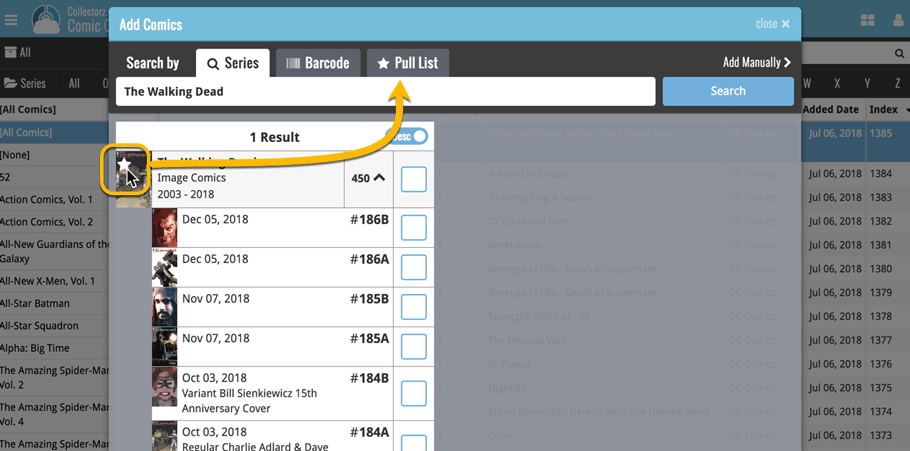
Then, click the Pull List tab to reveal the series on your Pull List! Expand a series to see which issues have been released in the last 2 weeks, or still have to be released, and if you want, add them to your wish list!
We just added 6 new folder options to your Comic Connect software, for grouping your comics in 6 different creator folders!
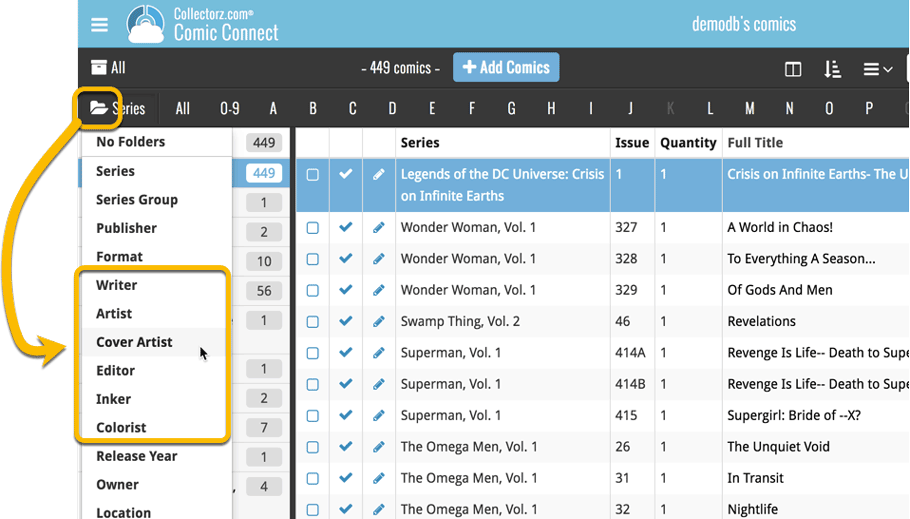
You can group your comics in folders based on:
- Writer
- Artist
- Cover Artist
- Editor
- Inker
- Colorist
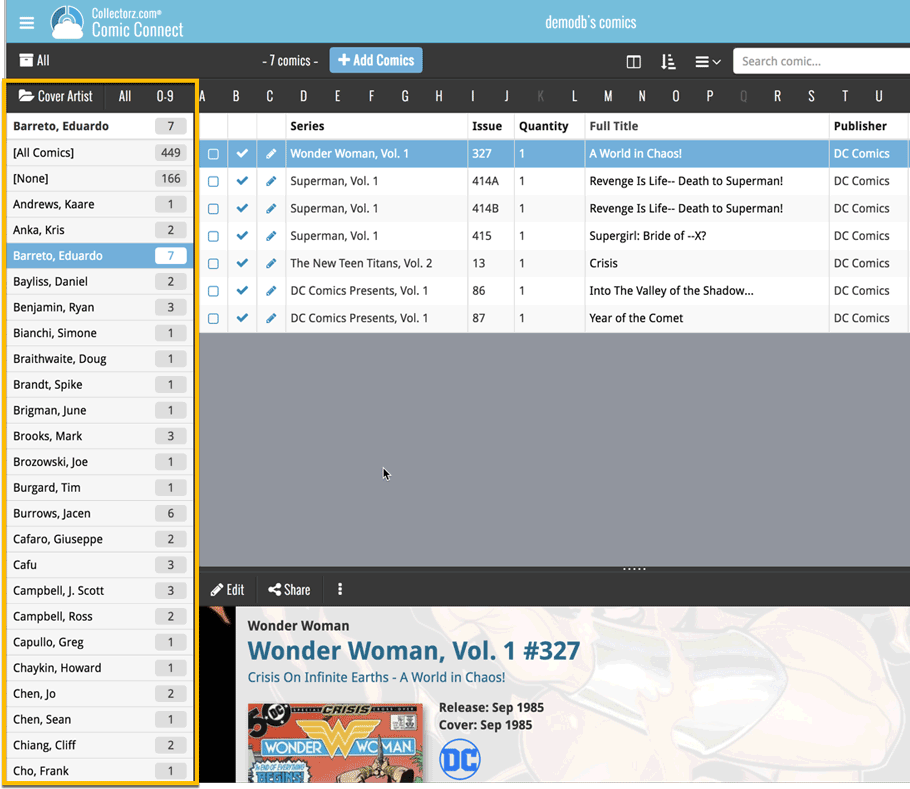
Example: Click the folder icon top left and select Cover Artist to see all your comics neatly grouped in cover artist folders. Click a cover artist to see all comics that have that person as a cover artist!
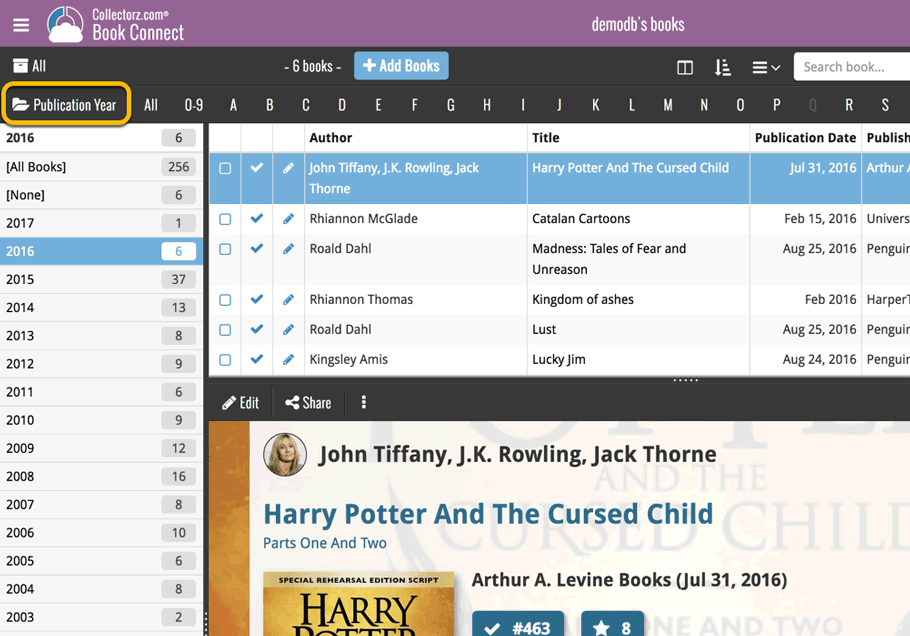
A new grouping option is now available in your Connect!
Click the folder icon top left and select Release / Publication Year to see all your items neatly grouped in a year folder. Click on a year to see all items that were released/published in that year!
This week, we added several new settings and improvements, all based on your feedback:
New setting for the List View: Wrap column content
This new “Wrap column content” setting can be found in the Settings screen. It lets you choose if text in the List View columns should wrap to multiple lines or not.
The default is YES / Checked. Uncheck this setting to keep your List View row as single rows, resulting in a cleaner list and more rows in view.
New Date Format setting
Also found in the Settings screen, this new selector lets you choose how dates are displayed, anywhere in the program where date are shown.
Choose from:
- 7 January 2018
- 07 Jan 2018
- 7 Jan 2018
- January 07, 2018
- January 7, 2018
- Jan 07, 2018
- Jan 7, 2018
- 07/01/2018
- 7/1/2018
- 07/01/18
- 7/1/18
- 01/07/2018
- 1/7/2018
- 01/07/18
- 1/7/18
- 2018-01-07
Core IDs can now be added as columns in the List View
Now available in the Column Selection screen for the List View: The Core ID fields.
E.g. for movies, add the Core Movie ID and Core Media ID fields to your lists, to quickly find movies that are not linked to our Core entry yet.
Previously, setting up for the usage of the CLZ Barry as a barcode scanner required going to your Connect Profile page and back. Not anymore.
You can now get started with CLZ Barry straight from the By Barcode/ISBN tab of your Add screen. Just click the blue text “Set your Barry ID” on the far right of the barcode box and all the setting up can be done right then and there:

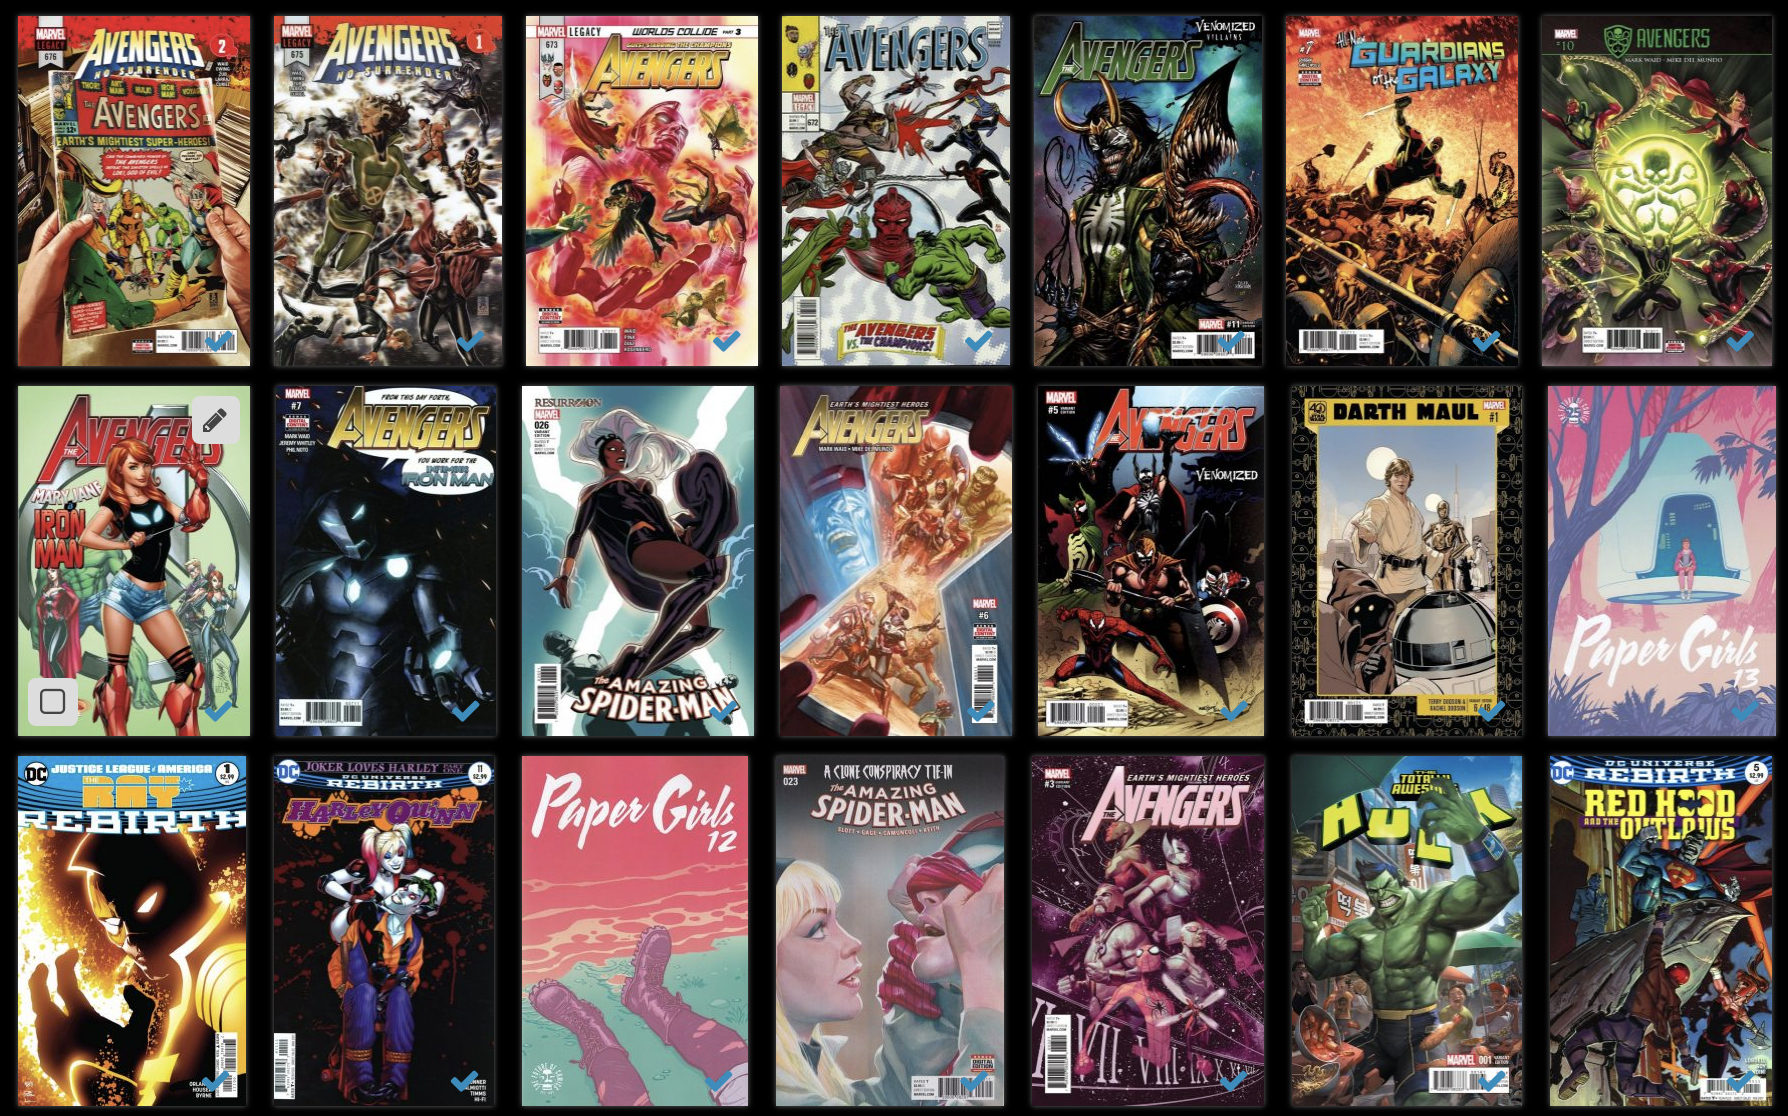
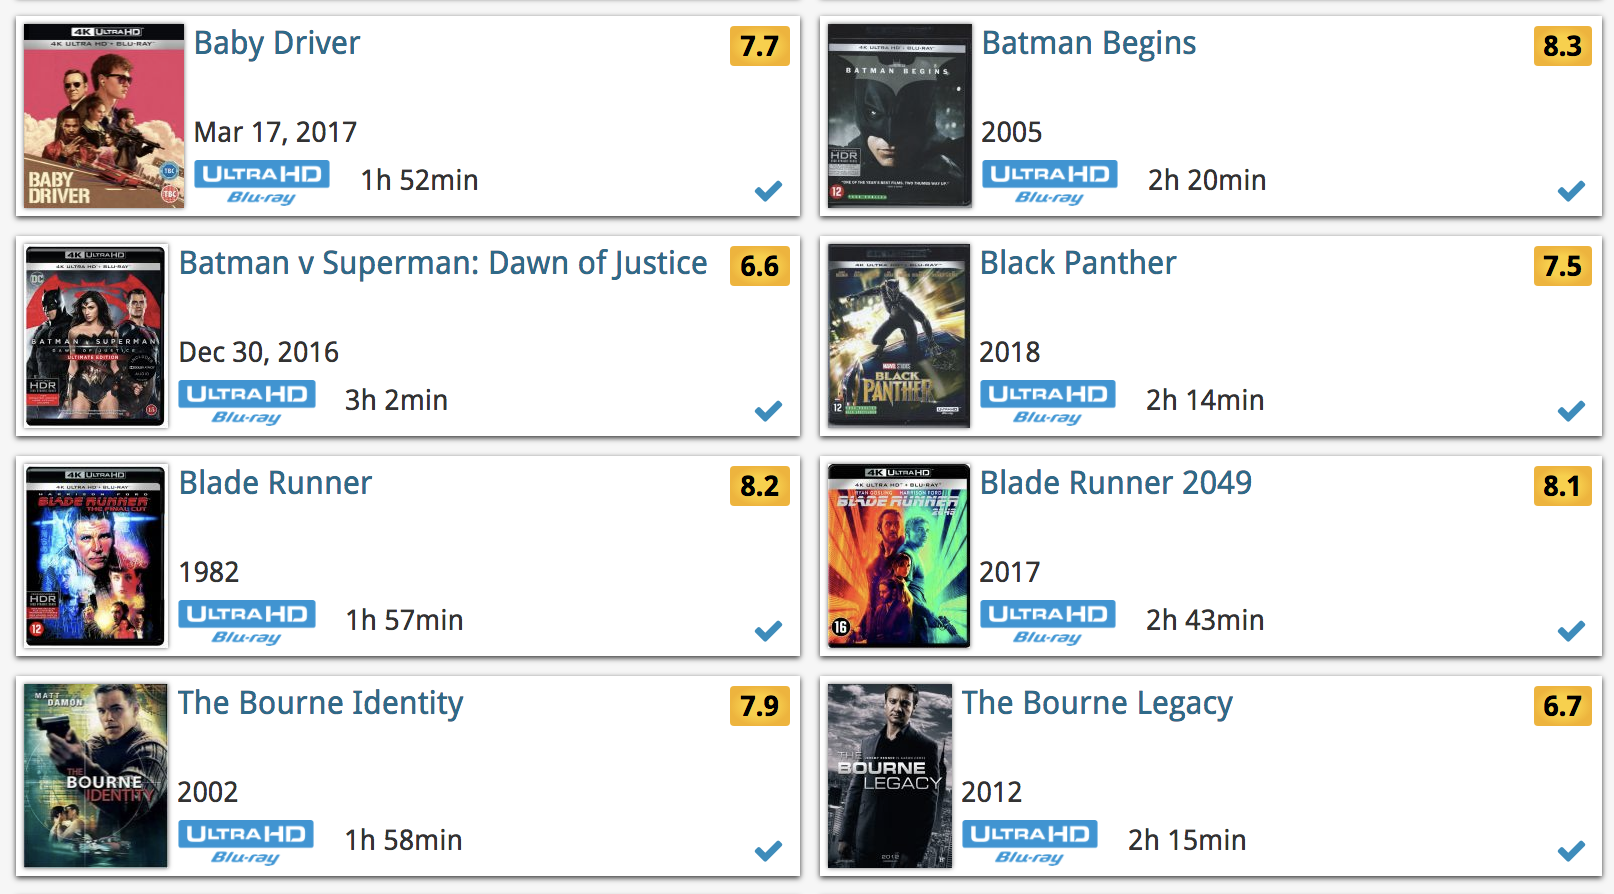
Sharper images in Cover View and Card View
This week, we have implemented several changes to the cover images that are shown in Cover View and Card View, making them much sharper/crisper, less blurry.
Also, on computers with a 4k / Ultra HD screen, both the Cover View and the Card will automatically switch to even higher quality images, with twice the resolution!
The difference is huge, check out the screen shots below. But the best way to experience the sharper images is to log in to your own account and look at your own collection!
Other improvements to Cover and Card View
At the same time, we made other improvements to the Cover and Card views, to make them look nicer and to make the scrolling experience smoother and faster:
- While scrolling, the images now load faster.
- Scrolling the view while images are loading is now smoother, less “choppy”.
- The Images view now has black background for a more classy look.
- In both Images and Card View, while scrolling, it does not first load a placeholder image anymore, it just show the background color until the actual image is loaded, also resulting in a less choppy scrolling experience.
Two updates for the Comic Connect software and the CLZ Cloud viewer today. One a big step forward in usability, the other a nice cosmetic improvement:
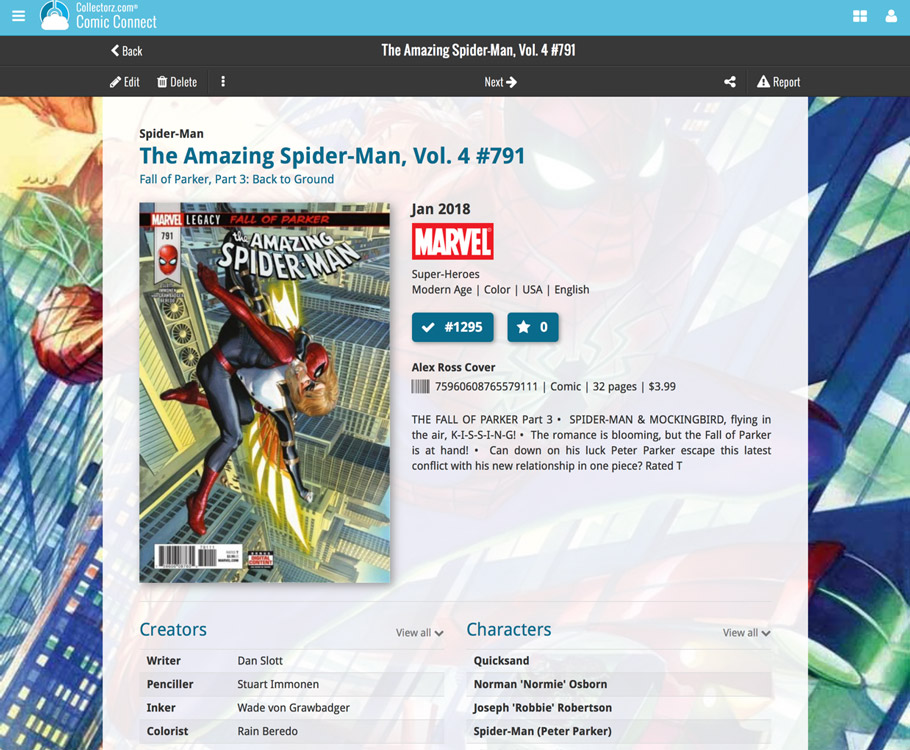
Comic Details now integrated in main screen
Up till now, when you clicked a comic entry to see its’ full details, you were taken to the comic details page, that is, a new page in your browser. One had to click “Back” to get back to the comic list again. Often resulting in an annoying back and forth clicking, each time causing you to lose your position in the list.
But not anymore! Starting with today’s update, the comic details are now integrated in a panel within the main collection view:
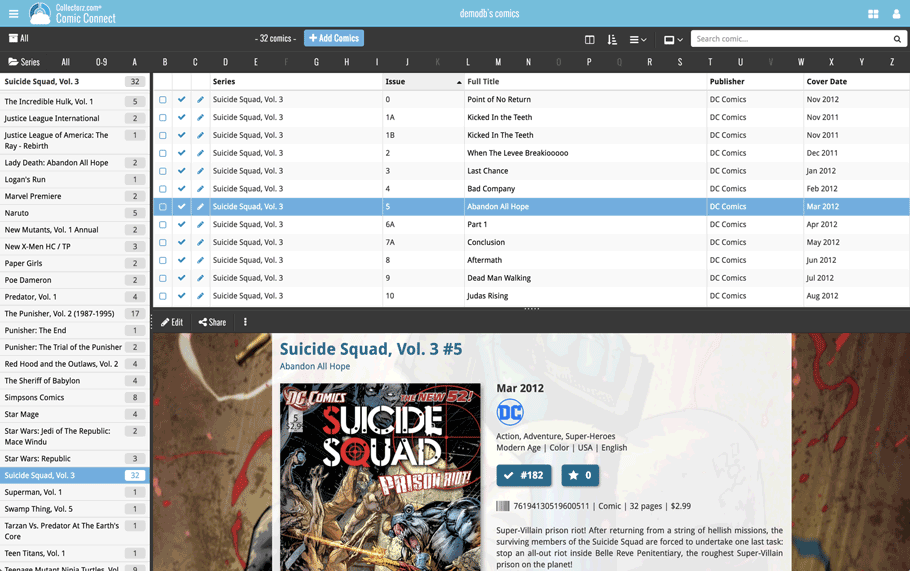
No more back and forth clicking. Just click a comic entry to see its’ details, click another one to see that comic’s details. Nice and easy, never lose your spot again.
Choose from two Layouts:
- Horizontal Split: folders on the left, list on the top right, details on bottom right
- Vertical Split: 3 panels side by side, folder, list and details
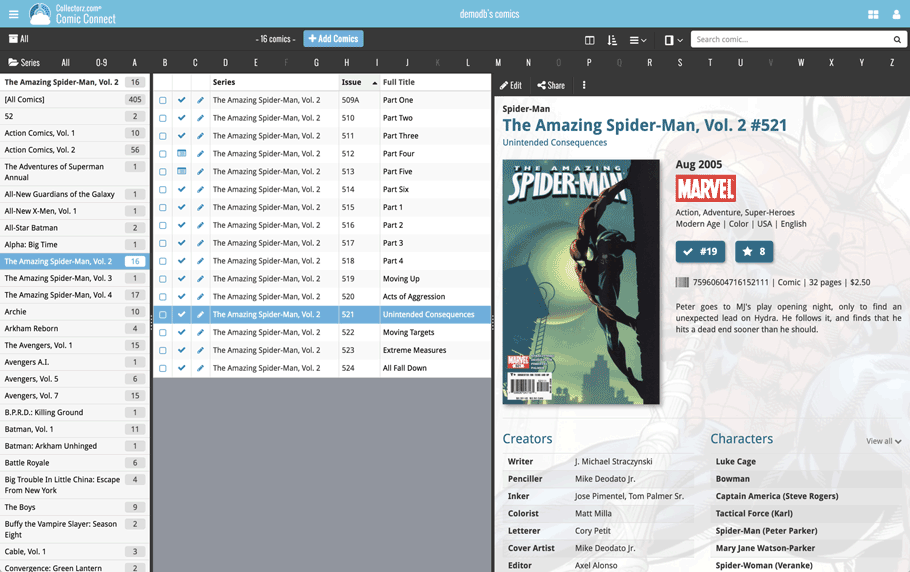
In either layout, the 3 panels are fully resizable by dragging the black “splitter bars” between the panels, so that you can customize the layout to your own liking.
The comic details panel comes with its’ own “action bar”, with the main actions you may want to take on the selected comic (Edit, Share, Delete, Duplicate, Loan and Link with Core).
Improved Cover View and Card View
At the same time, we made some small tweaks to both the Card View and Cover View, so that they’re making better use of your specific screen width. Both now use a “fully justified” layout, with the Cards auto-resizing to fit your screen width and the Covers distributing over the width, both resulting in a cleaner, less “jagged” view.
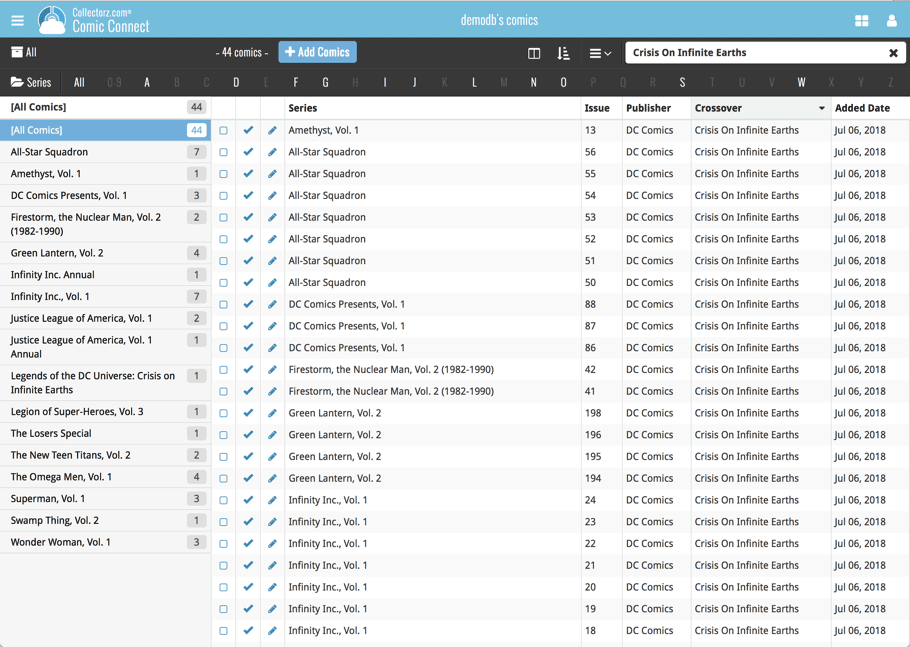
Up until today, the quick search box in Comic Connect (and the CLZ Cloud viewer for comic) only searched in the Series title, Issue title, Barcode and Tags fields. Pretty limited, but necessary for performance reasons.
However, with the new search engine we created last year, it became possible to search more fields while keeping the search super-fast. So lets use that capability!
From now on, if you use the search box, it will also search in many more fields. The complete lists of fields that are now searched:
- Series Title
- Issue Title
- Barcode
- Crossover
- Story Arc
- Series Group
- Plot
- Tags
- Notes
Example: searching for the crossover “Crisis On Infinite Earths” will return all issues that are part of that crossover:
Over the last week Joël from team Connect worked on splitting the settings into more logical places, and added new tooltips to explain what all the buttons do. The full what’s new:
Added tooltips
Hovering your mouse over the various buttons will now show tooltips to explain what the buttons do! Hover your mouse over the buttons to see what they do.
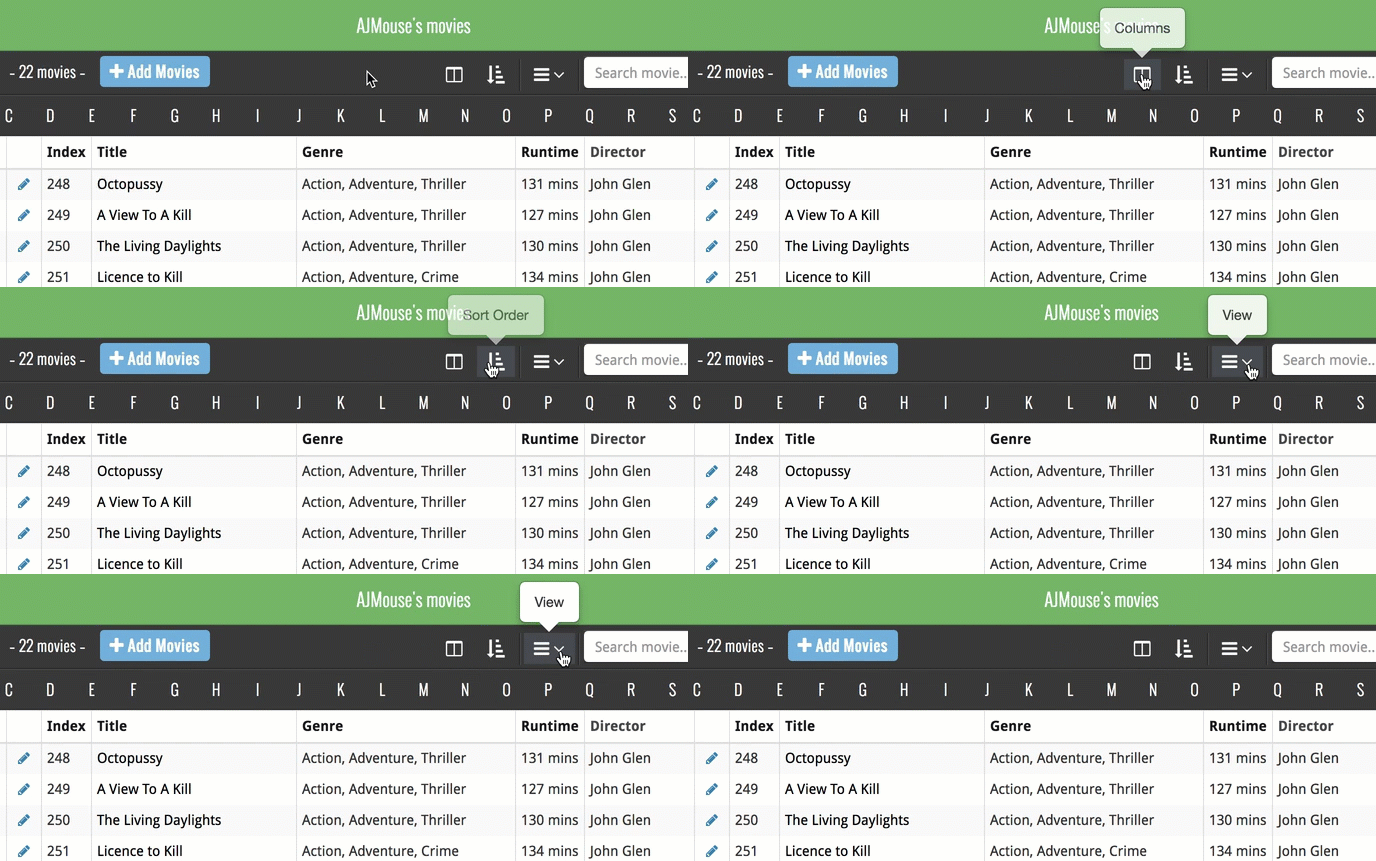
Split the settings
All settings used to be together in one screen, but they weren’t easy to find so we decided to split the settings up into their own logical pages. You can now find them by opening the menu (top left), and look for:
- Field Defaults: to set up default field values for new items
- CLZ Cloud Sharing: to set up all your CLZ Cloud sharing options
- Settings: with just the behaviour and display settings
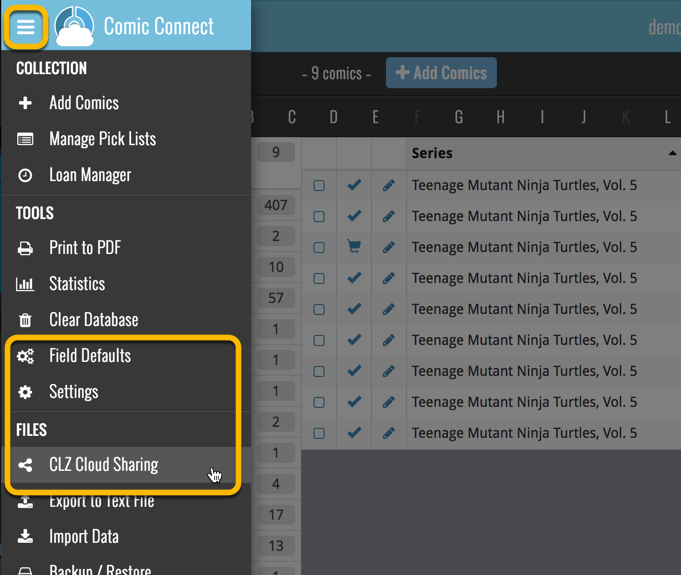
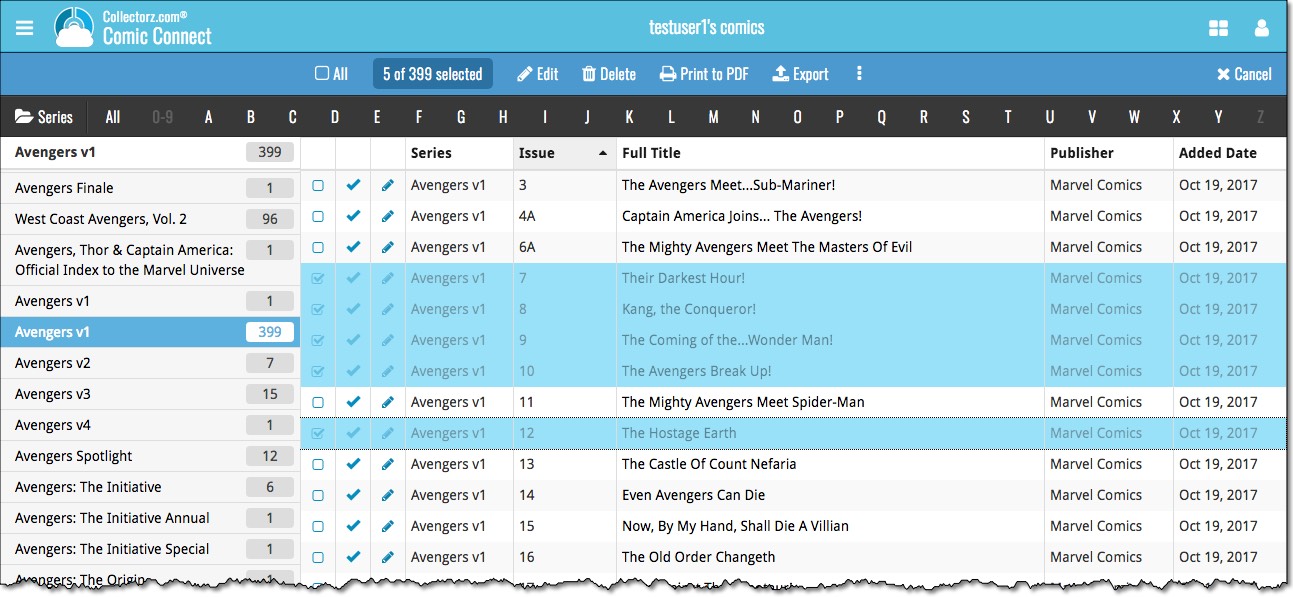
A cool user interface update for your Comic Connect software today, in which we makes it easier to select comics and easier to perform batch actions on the selected comics.
Select using checkboxes
To select comics, just click the checkboxes on the left of each comic entry in the list. Checkboxes are also available in Card View and Images View, just hover your mouse over an item.
No more need to go into “Select Mode” first. The Select Mode is automatically activated as soon as you checkbox the first comic, clearly indicated by the blue Batch Action Bar that replace the regular toolbar.
Batch Action Bar
While in Select Mode, the blue Batch Action Bar is visible, always showing you the number of selected comics. Also:
- Use the “Select all” checkbox to select all comics in the current list in one go
- Use the “x Cancel” button on the right to leave Select Mode
- And of course, use any of the action buttons (Edit, Delete, Print, Export, Duplicate and Loan) to perform an action on the selection comics
You can now loan comics in Comic Connect: just find and select a comic (or select multiple with the Select tool), and click the “Loan” button at the top!
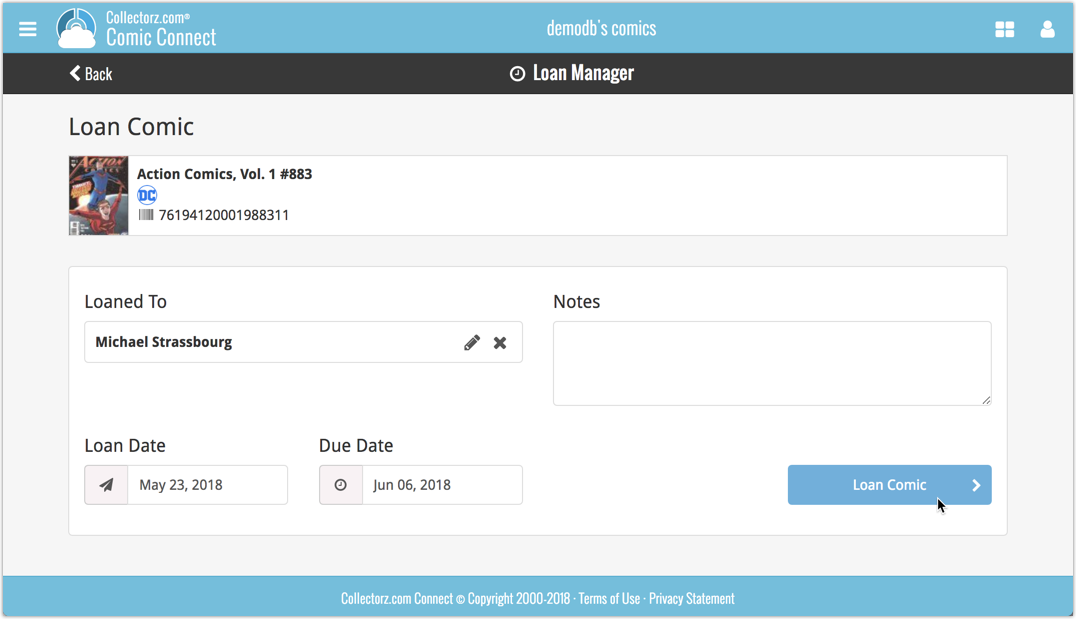
Loan Manager
Click the menu top left, and then Loan Manager to access the new Loan Manager where you can see all your loaned out items, and directly return them. Alternatively you can also use CLZ Barry to scan a barcode of a comic, find it in your outstanding loans, and return it.
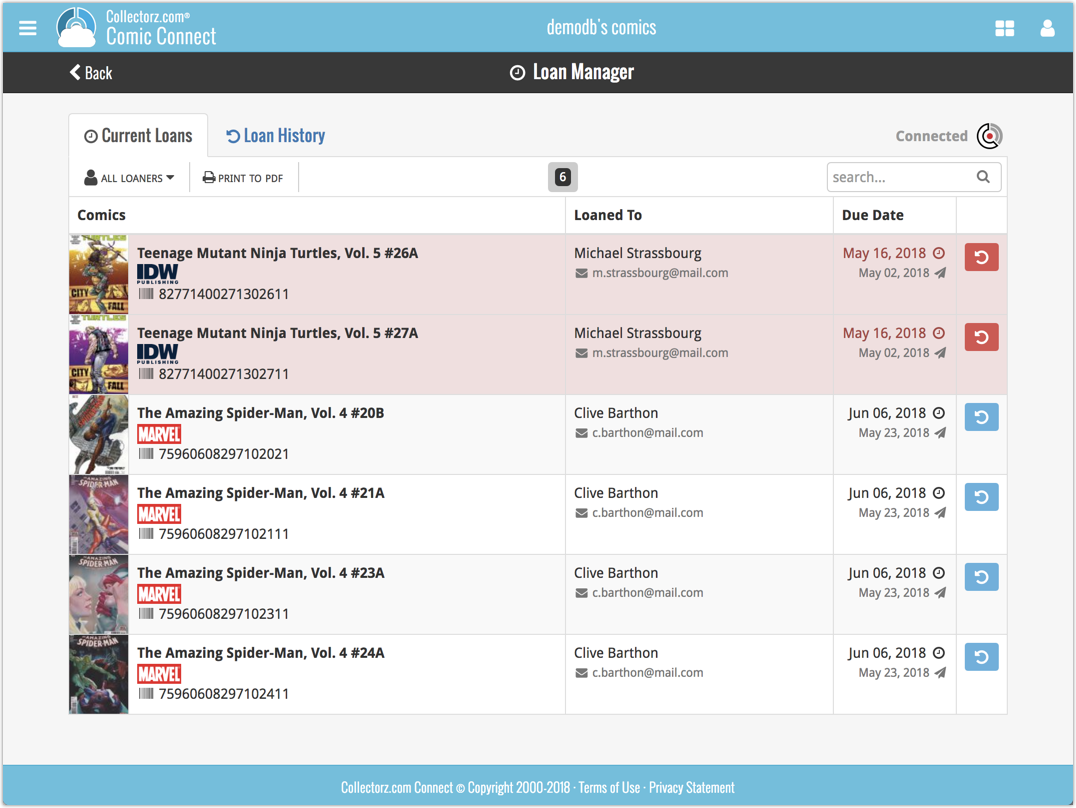
In the Loan Manager, you can click on a loaned item to modify the loan date, due date, return date, loaner and notes about the loan.
Print current loans to PDF
You can print out all your current loans to a PDF file by clicking the Print to PDF button in the Loan Manager screen.
Alternatively, you can select a loaner from the dropdown menu there, and only print out his/her current loans to a PDF file!
New:
- Loan comics by selecting a couple in your list, or by viewing the details of a comic, and then click “Loan” at the top.
- Return comics straight from the loan manager or by scanning their barcodes with CLZ Barry.
- Check outstanding loans and loan history in the Loan Manager.
- Edit outstanding or returned loans by clicking on them.
- Print out current loans to a PDF file
Coming up:
We will be adding the syncing of loan information to Comic Collector for Windows and macOS, and CLZ Comics for iOS and Android.
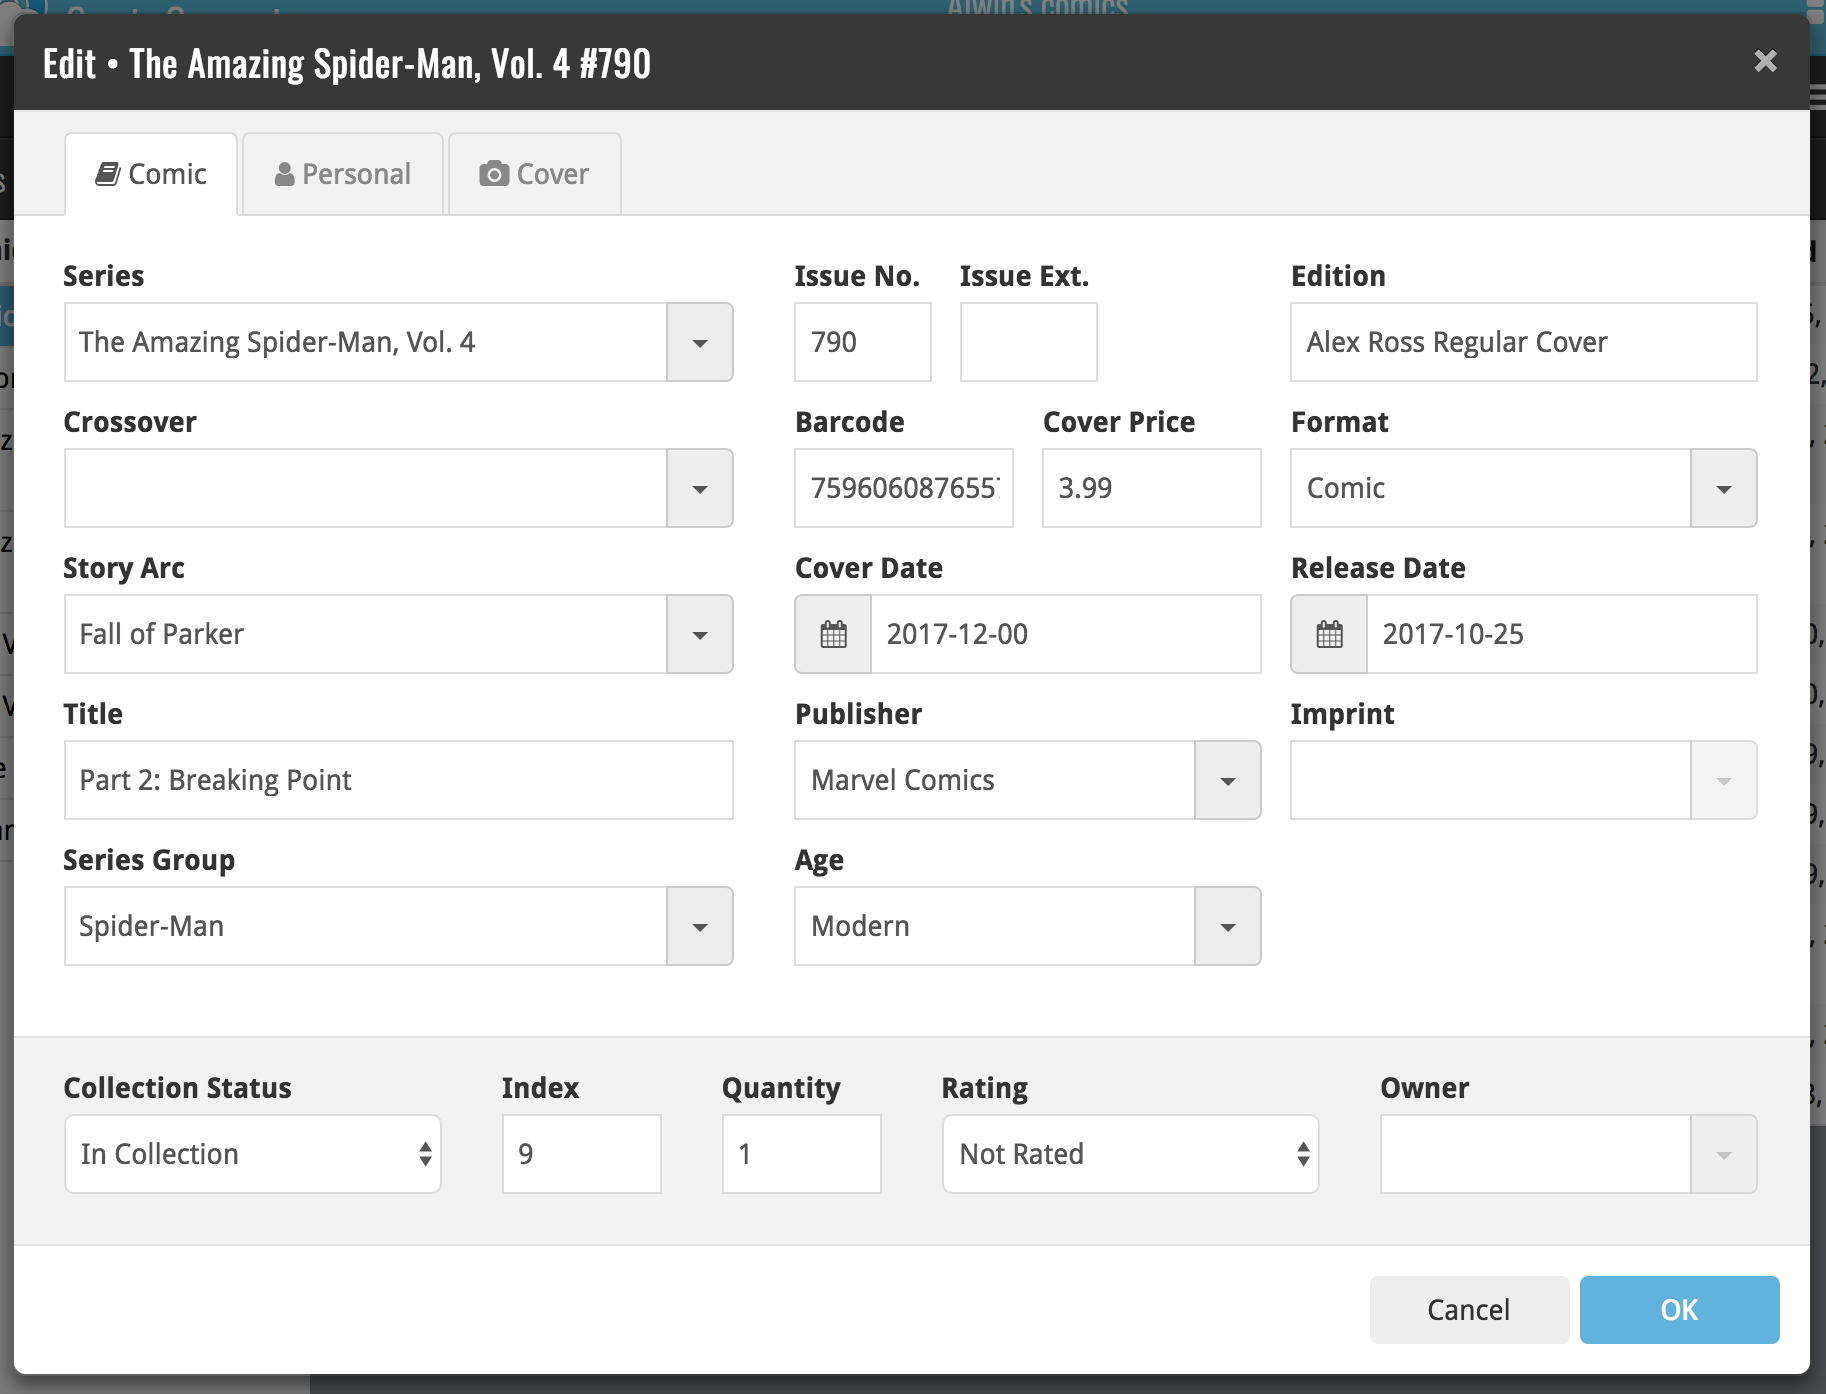
By popular demand, we have added 7 more fields to Comic Connect that used to be automatic Core fields but are now fully editable:
- Edition. Previously set automatically, now fully editable.
- Crossover. Previously set automatically, now fully editable. Also available as a folder option.
- Story Arc. Previously set automatically, now fully editable. Also available as a folder option.
- Imprint. Previously set automatically, now fully editable. Also available as a folder option.
- Age. Previously set automatically, now fully editable. Also available as a folder option.
- Cover Price. Previously set automatically, now fully editable.
- Cover Date. Previously set automatically, now fully editable.
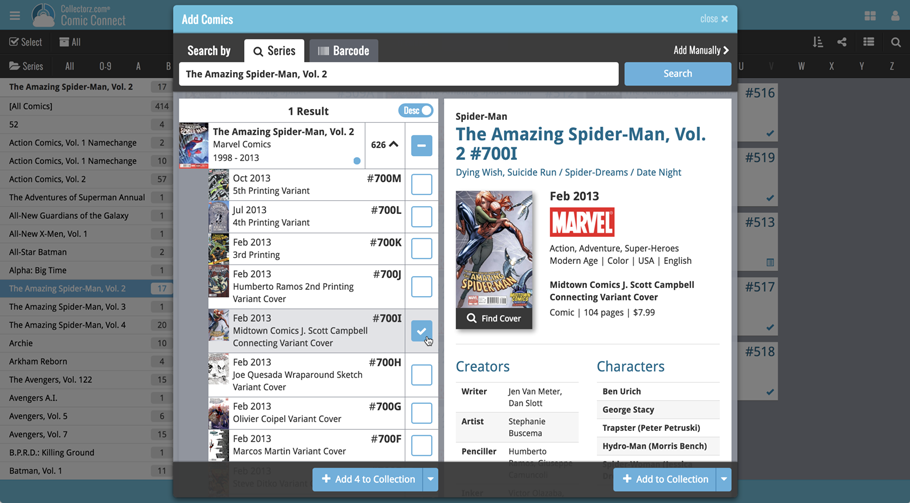
A small user interface tweak today:
The Add Comics screen is now a pop-up screen that lays over your comic list.
(previously it was a separate full screen page)
Looks cooler, feels more “snappy” and while adding comics, you can actually see the new additions appear in your comic list in the background!
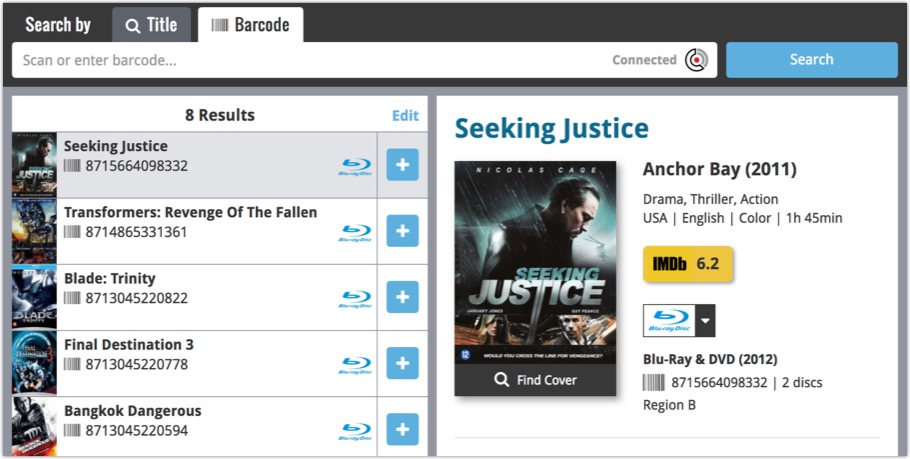
Persistent barcode queue
Barcodes scanned on the add page are now remembered! This means you can scan your barcodes into the add queue, leave the page, return later and still add the barcodes you scanned.
If you wish to remove barcodes from your queue, use the Edit button top right of the list of barcodes!
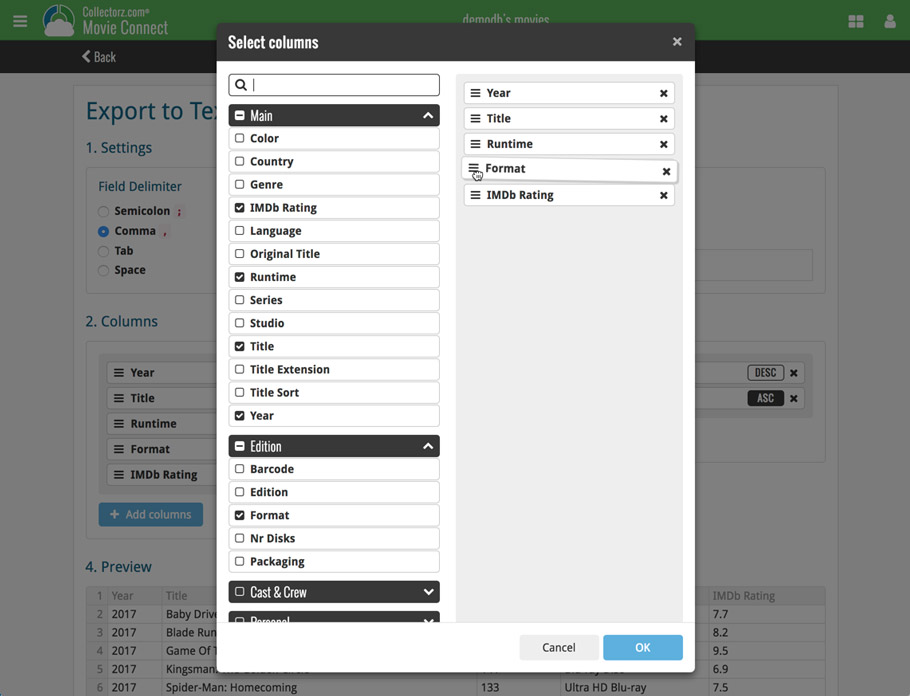
Last week we updated the field selection popup for Connect and CLZ Cloud, and this week we bring that same field selection popup to your “Export to Text” and “Print to PDF” pages.
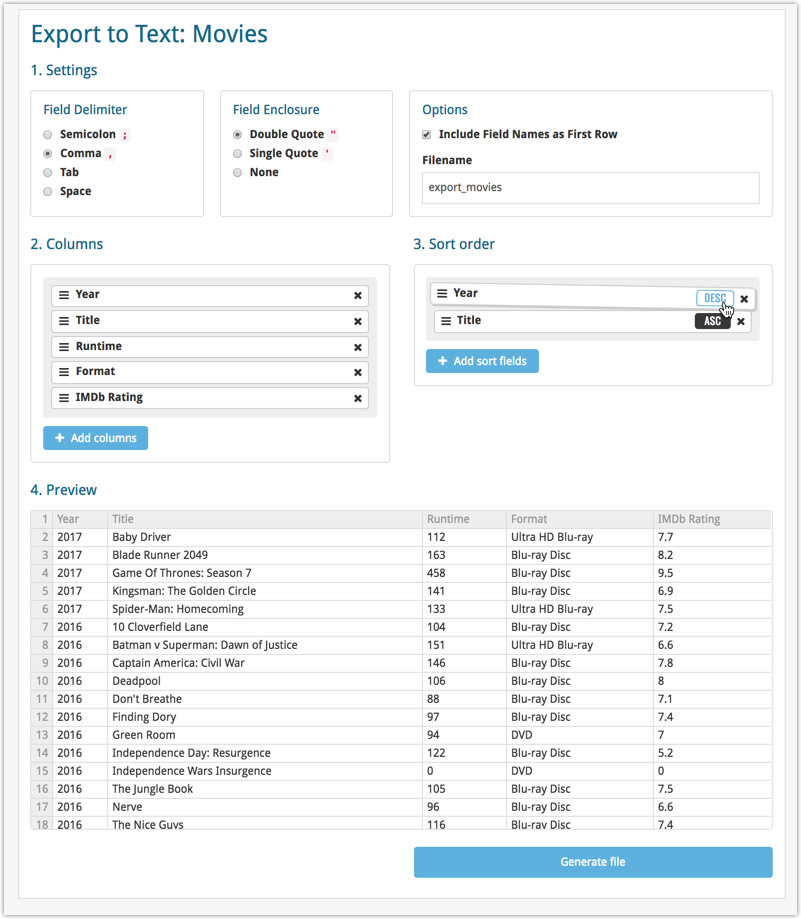
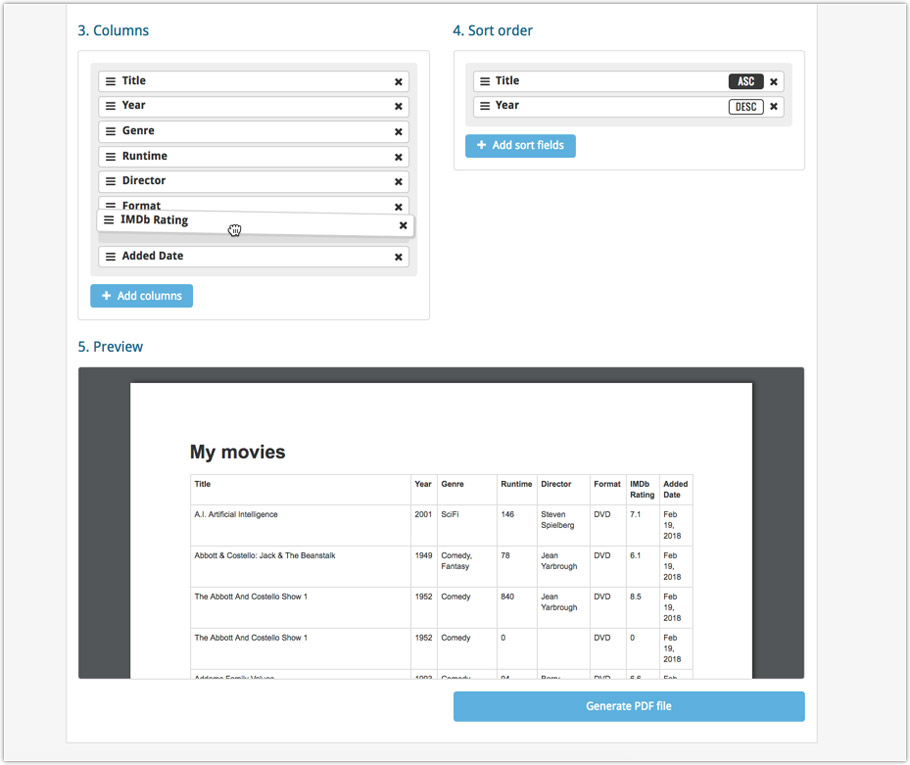
The update also includes an update Preview box for Export to Text, and an updated way for dragging/dropping fields for your columns or sort order.
Open up your Export to Text or Print to PDF screen via the menu top left in Connect.
New field selection popup:
Updated “Export to Text” page:
With new preview panel:
Updated “Print to PDF” page:
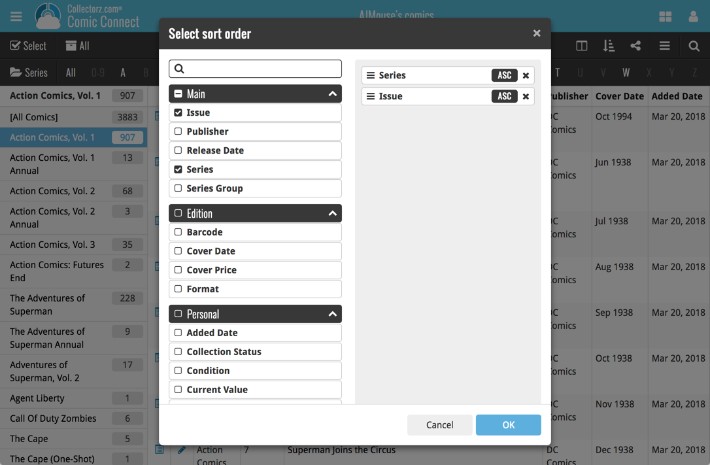
The ability to select your own Columns for the List View is an important customization feature of Comic Connect. The same holds for selecting the Sort Order fields.
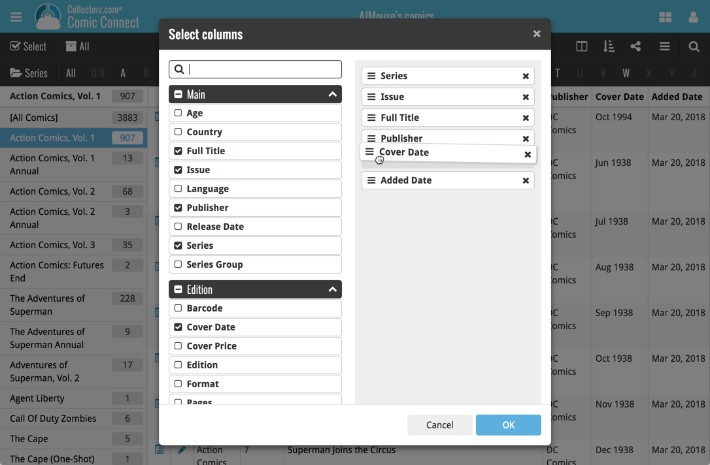
However, the “field selection” screens for doing these customizations were a bit outdated and finding a field could be tricky. So we decided to re-imagine the field selection screens to make them easier to understand, easier to use and better to use on mobile devices too.
Redesigned Field Selection screen:
- Available fields are now grouped, like the tabs in the Edit screen.
- Easily find the field you want with the search box top left.
- Use checkboxes on the left to select fields.
- Use the “x” button on the right to remove fields.
- Drag and drop fields on the right side to change the order.
- For sorting: use the ASC/DESC button to change the sort direction of that particular field.
- Works great on both your desktop and mobile browsers!
Select Columns screen:
Select Sort Order screen:
Live today in your Comic Connect software: a completely re-designed Edit Comic screen with an improved look, layout and usability!
New look and layout
We’ve moved some fields around and to have them grouped and placed more logically. You’ll notice that we’ve also updated the look of certain buttons so it’s all easier on the eye, and there’s only one big blue important “OK” button to save your changes.
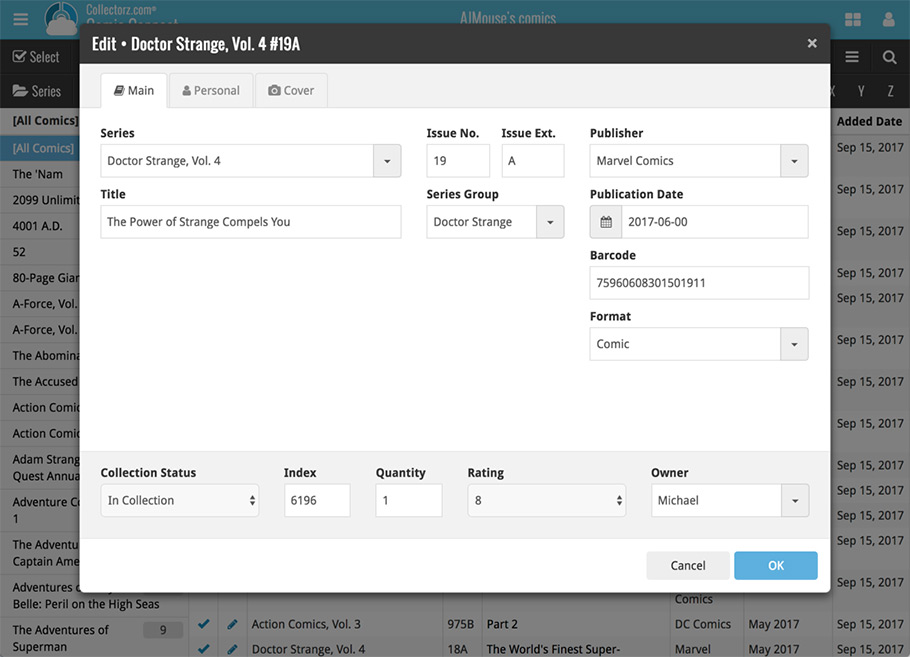
Updated dropdown and pick list fields
The pick list fields have been updated so they’ll only show options from your own collection instead of all available options in our online database. This makes it a lot faster to quickly pick something from a pick list that you used before!
You can just start typing to filter to the pick list entry you want to use, or open up the dropdown to scroll and pick.
Multi value pick list fields such as the Tags field, have a blue plus button to pick a tag from your tag list. Click it, and either start typing or just pick a tag from the list.
New Pick List fields
We’ve updated the following fields from plain text fields to “pick list” fields. This means that those fields now have a dropdown which you can click to quickly pick an existing pick list entry for that field.
The following fields haven been updated from plain text to pick list fields:
- Location
- Condition
- Purchase Store
- Owner
These field now all have a dropdown to pick an entry. You can also type into them to search or create a new entry for that field.
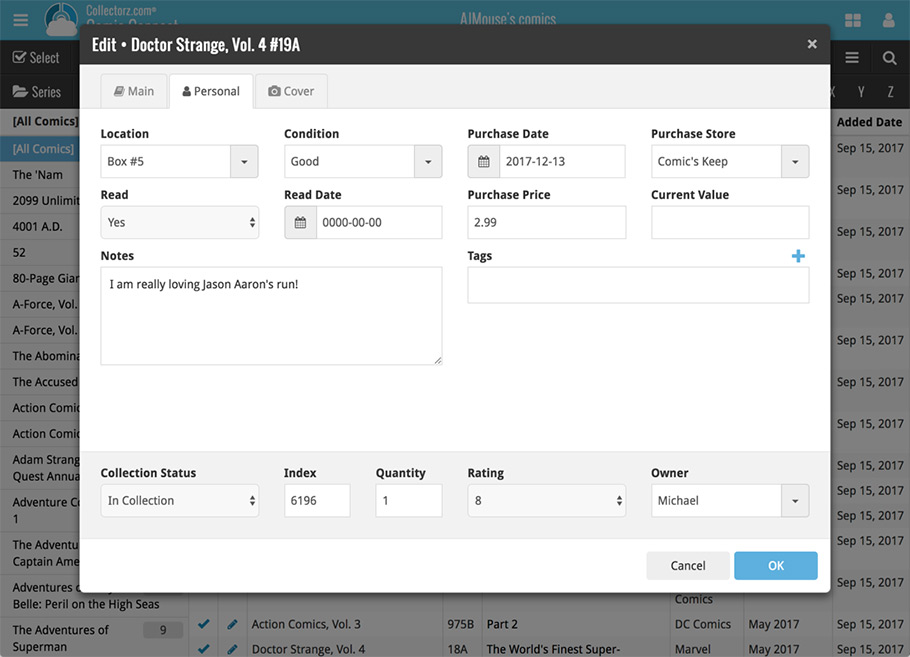
Panel with personal fields on all tabs
At the bottom of the edit screen we added a “sticky” panel that you can see on all edit tabs. This panel contains some of your most important personal fields so you can always edit them quickly.
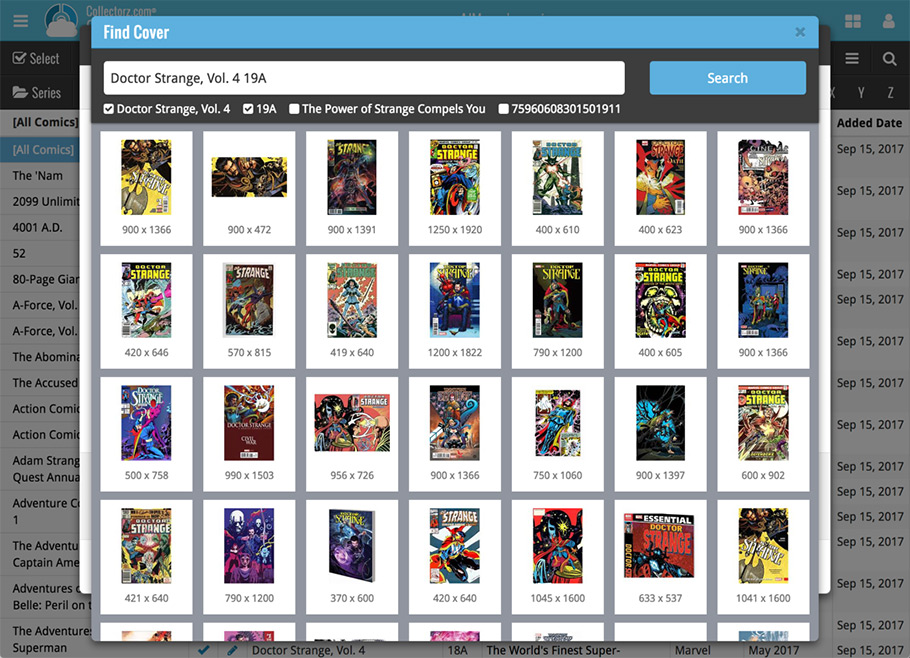
New Find Cover pop-up
The Find Cover pop-up has been updated to the latest version we introduced in the Add Screen. Check it out:
Now live in your Comic Connect software, a complete re-design of the Add Comic screen, with a new look, easier interface and new features.
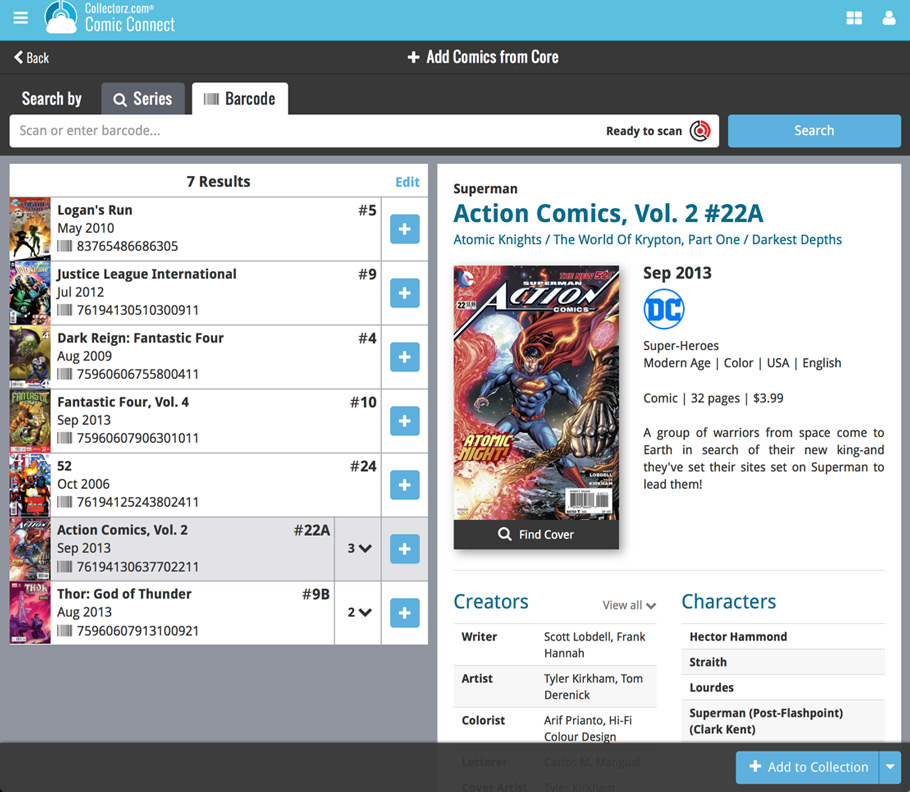
Adding Comics by Barcode
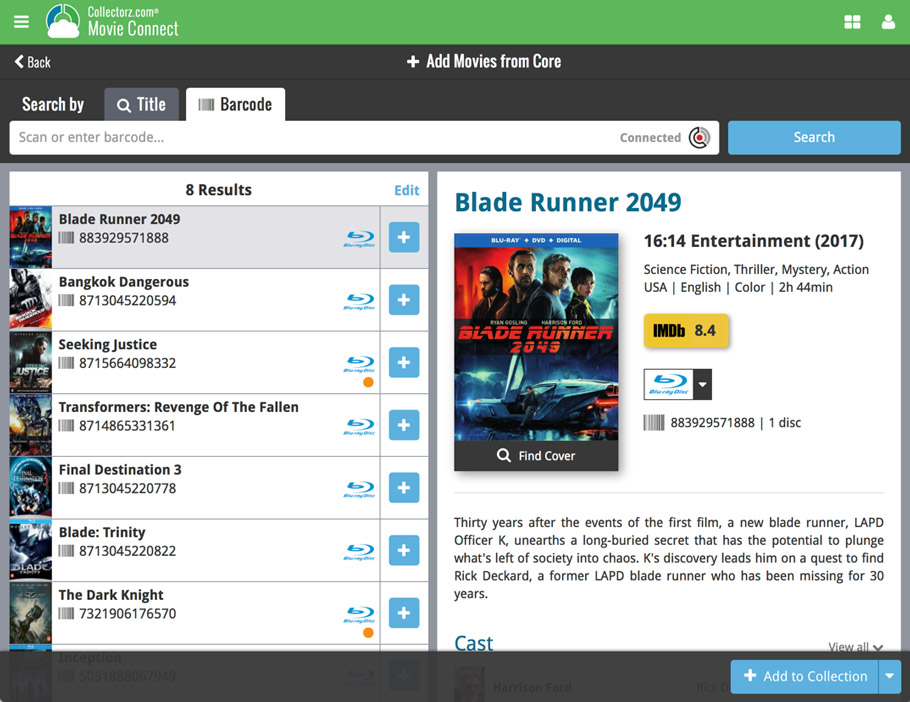
- Scan multiple barcodes in one go! Scanned barcodes will be automatically added to a queue, with the comic information populating instantly.
- Use the big blue Add to Collection button at the bottom right to add the selected comic to your database.
- OR use the little blue “+” buttons to add straight from the queue.
Adding Comics by Series
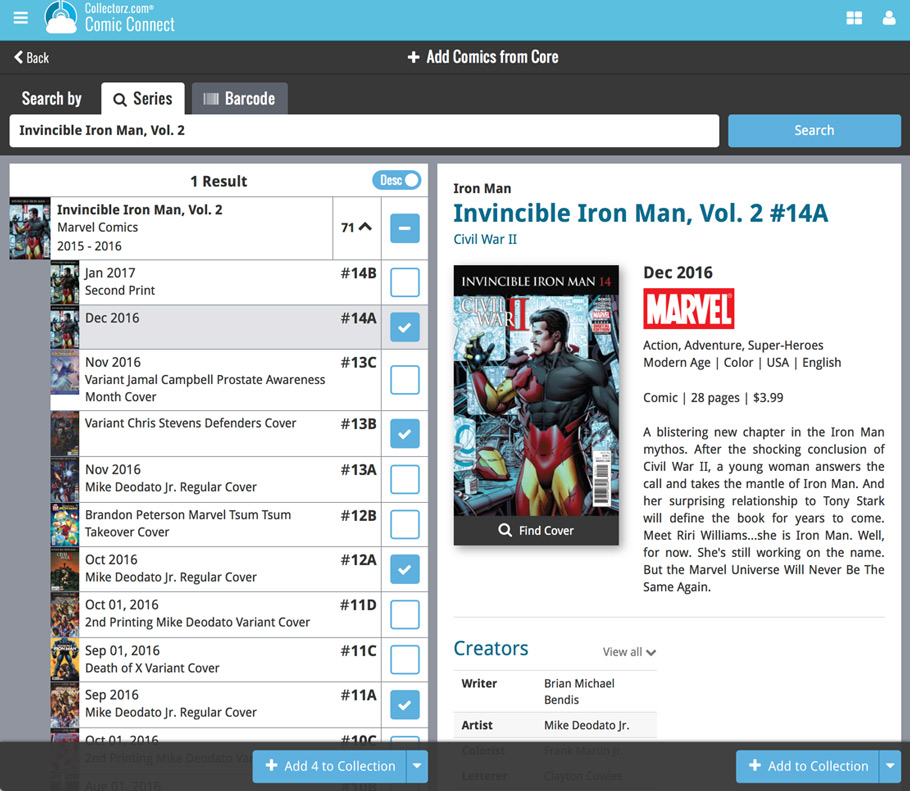
- Search by series title to see a list of matching series results.
- Expand a series entry to see the issue list for that series, with cover thumbnails!
- Use the Asc/Desc switch at the top to reverse the sorting of the issue list.
- Use the checkboxes on the right to select the issues you want to add.
- Use the checkbox to the right the series entries to Select All / Unselect All issues.
- Use shift-clicking on the checkboxes to select ranges of issues in one go.
- When done selecting issue, using the big blue “Add x to Collection” button at the bottom to add them all to your database in one go.
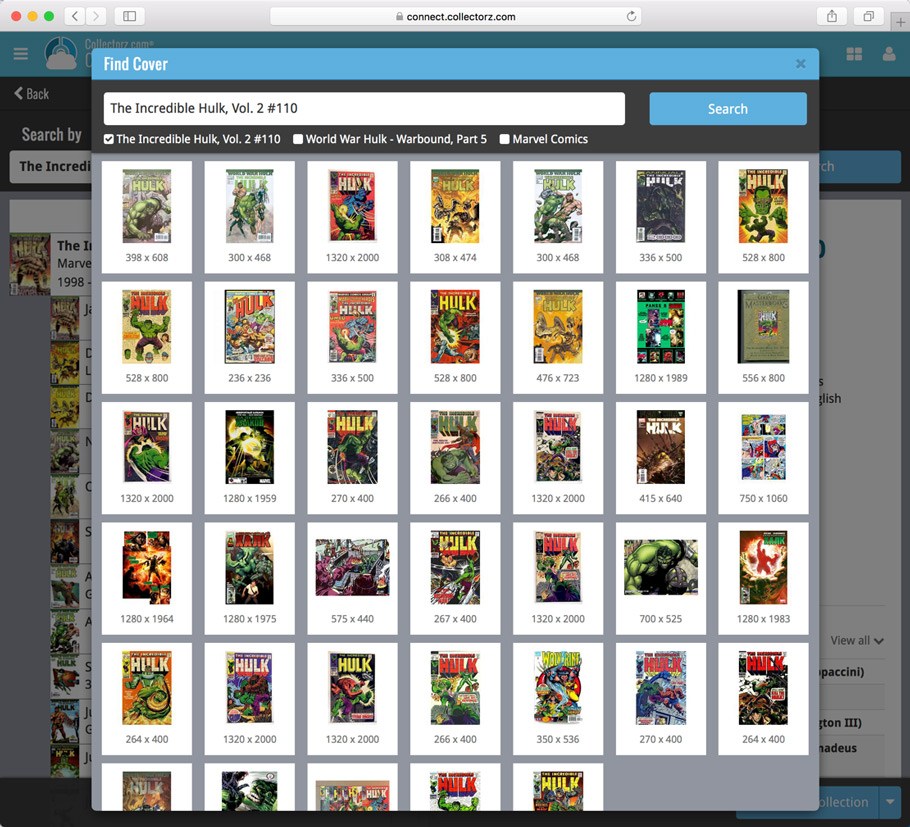
Not the right cover image? Use the built-in Find Cover tool to pick the correct one.
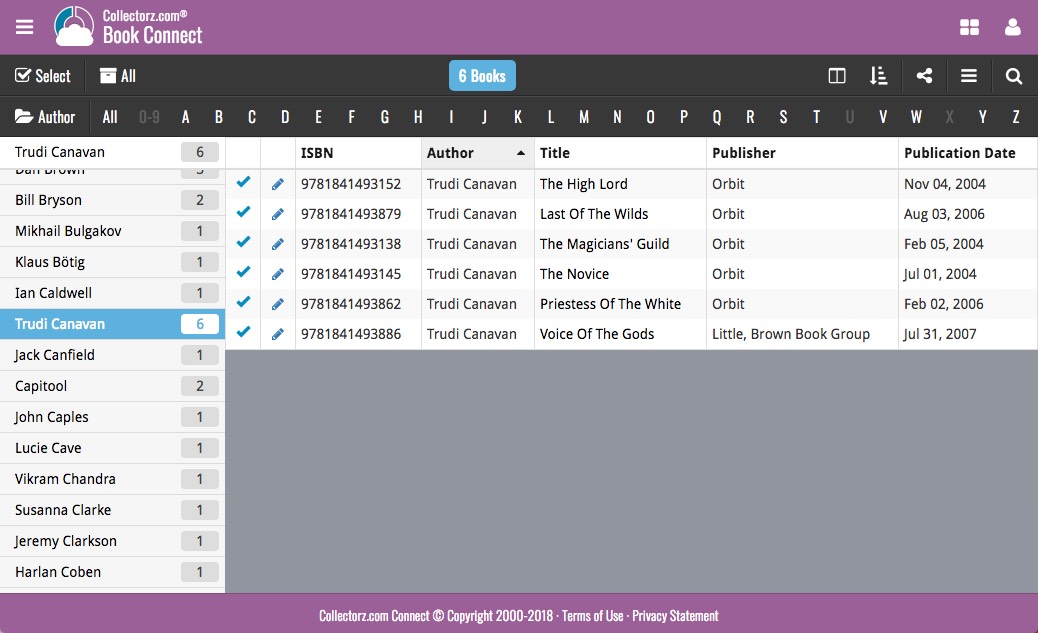
We have just updated both the Connect web-application and the free CLZ Cloud viewers to make them a lot faster.
- The folder panel now uses “lazy-loading” which makes it load (a lot) faster.
- When selecting a folder, only the list panel is re-loaded, where previously the entire page was refreshed.
The above changes will make browsing your CLZ Cloud or Connect app a lot snappier and will prevent server performance problems (two birds with one stone!).
The performance improvements are especially noticeable for large book, music and comic collections, as these generally have loooonnnngggg lists of author, artist and series folders.
In this “between Christmas and New Year” week, a huge update to the look and feel of our Connect web-based software.
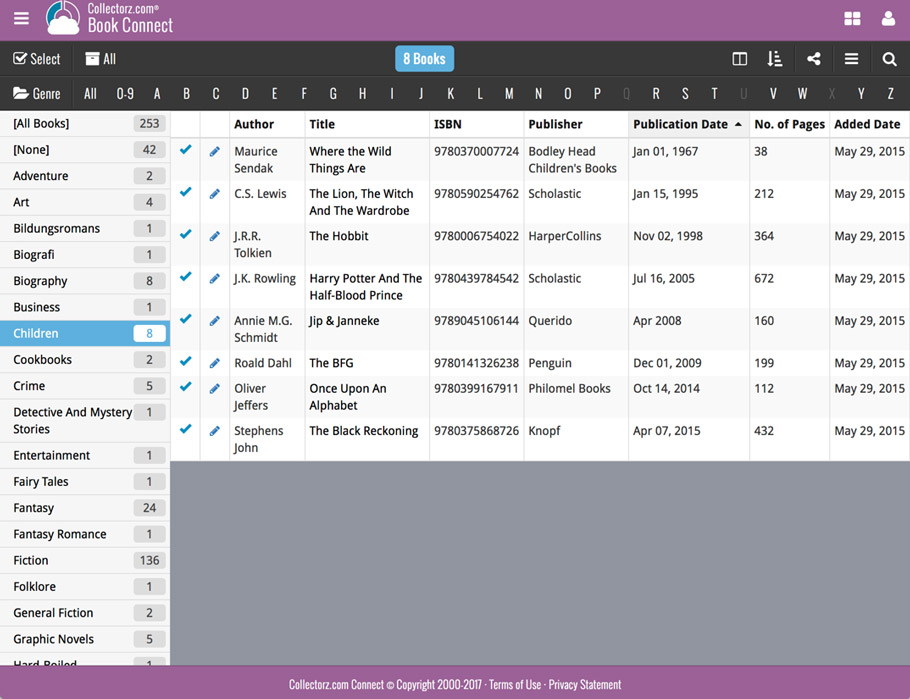
- We removed the tabs at the top that let you switch between the programs, to give you more screen space for the software you are in. (you can still switch using the app-switcher button top right).
- Dark toolbars with white text and buttons everywhere, while keeping your list and details pages light and clear.
- All tools and feature are now accessible from the “hamburger” menu on the top left.
- Your account settings and log out options in a “user menu” on the right.
- TIP: the new look is also available in your free CLZ Cloud viewer!
