News & updates tagged 'key' (page 32)
A BIG update for your Book Collector software today, with an important change:
Secure HTTPS connections, for your security and privacy
As indicated in our GDPR email from a couple of weeks ago, we are updating our software and services, to be more secure and to better protect your privacy.
Starting with version 18.4, Book Collector now uses secure HTTPS connections for all communications with our servers:
- for logging in with your username and password
- for syncing your data with CLZ Cloud
- for sending your searches to Core.
To make this possible, we have created new secure “entry points” on our servers, that are only allowing secure HTTPS connections. The new Book Collector software only communicates with those secure entry points.
For your privacy and security, we strongly recommend updating to version 18.4.
A BIG update for your Comic Collector software today, with an important change:
Secure HTTPS connections, for your security and privacy
As indicated in our GDPR email from a couple of weeks ago, we are updating our software and services, to be more secure and to better protect your privacy.
Starting with version 18.4, Comic Collector now uses secure HTTPS connections for all communications with our servers:
- for logging in with your username and password
- for syncing your data with CLZ Cloud
- for sending your searches to Core.
To make this possible, we have created new secure “entry points” on our servers, that are only allowing secure HTTPS connections. The new Comic Collector software only communicates with those secure entry points.
For your privacy and security, we strongly recommend updating to version 18.4.
A BIG update for your Game Collector software today, with an important change:
Secure HTTPS connections, for your security and privacy
As indicated in our GDPR email from a couple of weeks ago, we are updating our software and services, to be more secure and to better protect your privacy.
Starting with version 18.3, Game Collector now uses secure HTTPS connections for all communications with our servers:
- for logging in with your username and password
- for syncing your data with CLZ Cloud
- for sending your searches to Core.
To make this possible, we have created new secure “entry points” on our servers, that are only allowing secure HTTPS connections. The new Game Collector software only communicates with those secure entry points.
For your privacy and security, we strongly recommend updating to version 18.3.
A BIG update for your Movie Collector software today, with an important change:
Secure HTTPS connections, for your security and privacy
As indicated in our GDPR email from a couple of weeks ago, we are updating our software and services, to be more secure and to better protect your privacy.
Starting with version 18.4, Movie Collector now uses secure HTTPS connections for all communications with our servers:
- for logging in with your username and password
- for syncing your data with CLZ Cloud
- for sending your searches to Core.
To make this possible, we have created new secure “entry points” on our servers, that are only allowing secure HTTPS connections. The new Movie Collector software only communicates with those secure entry points.
For your privacy and security, we strongly recommend updating to version 18.4.
During 2017, our content managers worked for months to enhance our Core online movie database with movie list information for thousands of multi-movie box sets.
As of today, CLZ Movies can use this new Core data: Just use the enhanced Add Movies screen to find a box set, either by title or by barcode, and our Core “knows” which movies are in the box.
See it in action:
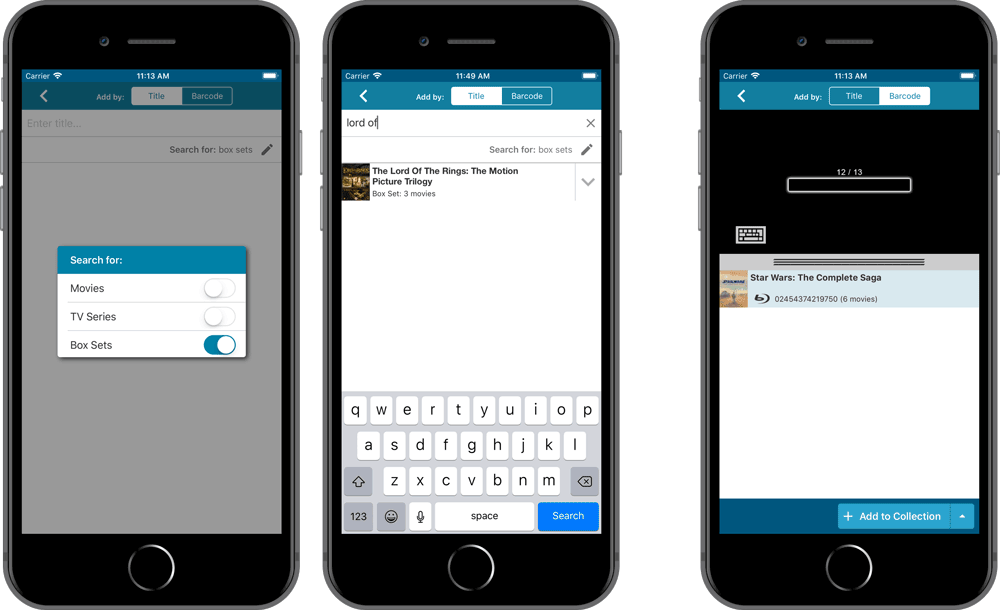
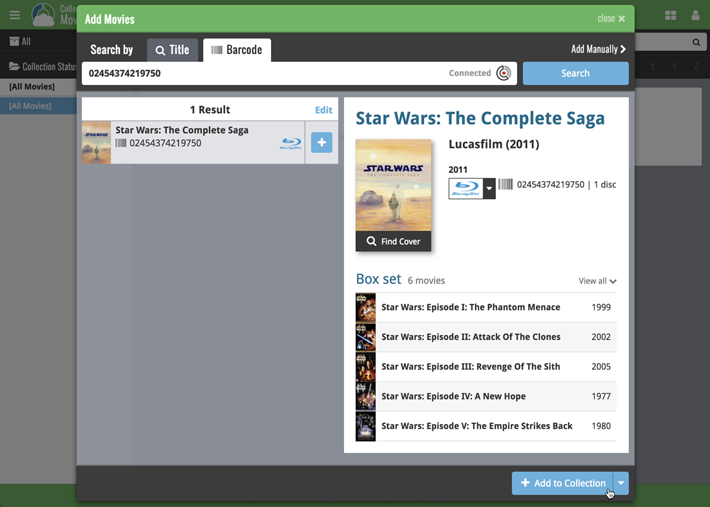
Find and add box sets by barcode
Scan a box-set barcode and Core will show you which movies it contains. Click Add to Collection at the bottom right and all contained movies will be added to your database, automatically linked by a box set entry.
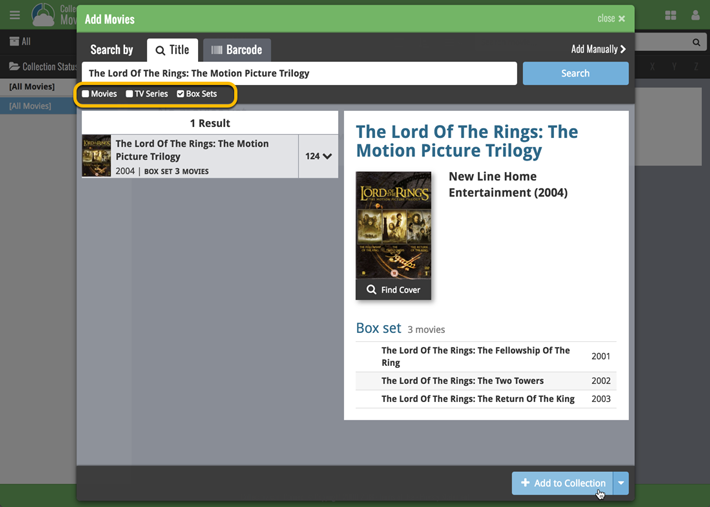
Find and add box sets by title
Alternatively, use the Title tab and enable the new Box Set search to find box sets by their title.
Note: the new Movies, TV Series and Box Sets switches now let you search each of these three Core section separately OR combined.
AND: The switches also operate on the Search-As-You-Type suggestions, for even quicker searching and adding!
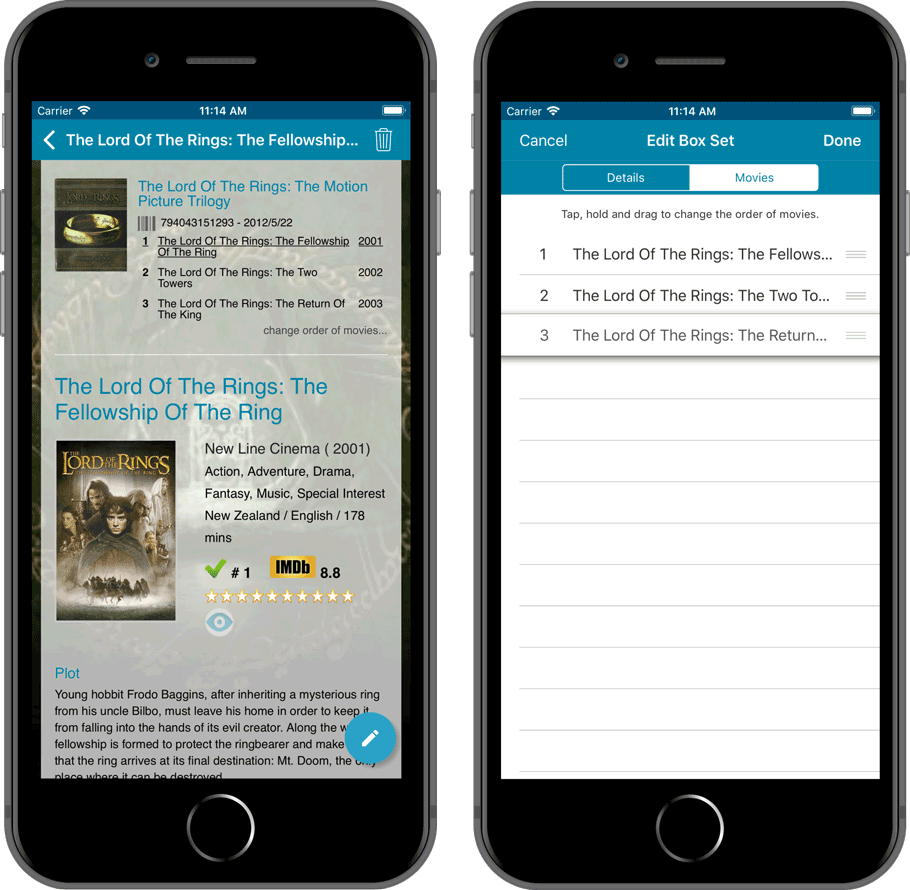
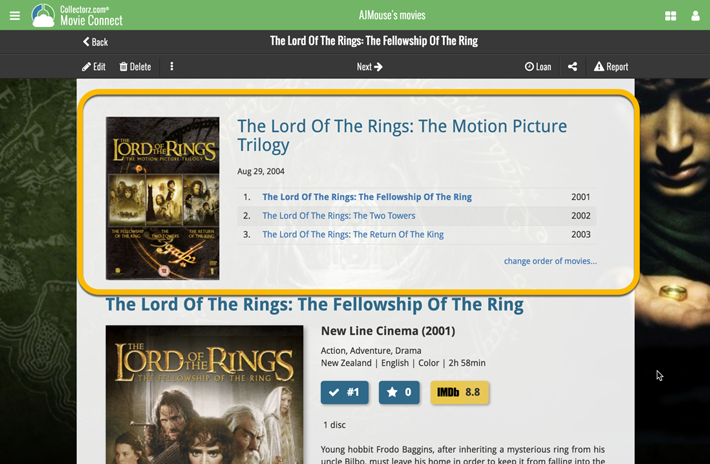
New box set panel on movie details page, with movie list!
A nice new box set panel at the top of the movie details for each of the contained movies. Now showing the list of the contained movies, in the correct order, AND with clickable links to go straight to the other movies in the set!
Change the order of movies in a box set
At the bottom of the list of movies you will find a link to “change order of movies…” to modify the order in which the movies are displayed in the details page.
Two updates for the Book Connect software and the CLZ Cloud viewer today. One a big step forward in usability, the other a nice cosmetic improvement:
Book Details now integrated in main screen
Up till now, when you clicked a book entry to see its’ full details, you were taken to the book details page, that is, a new page in your browser. One had to click “Back” to get back to the book list again. Often resulting in an annoying back and forth clicking, each time causing you to lose your position in the list.
But not anymore! Starting with today’s update, the book details are now integrated in a panel within the main collection view:
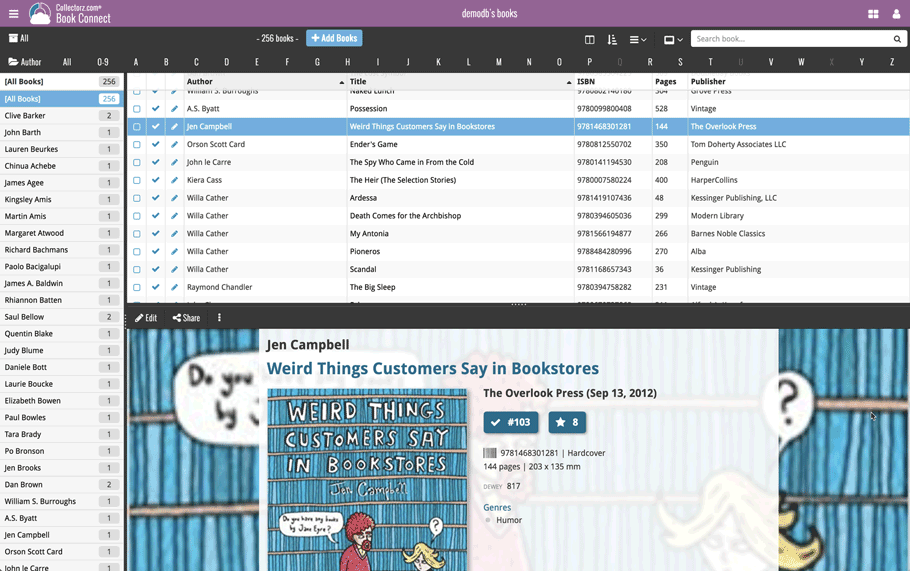
No more back and forth clicking. Just click a book entry to see its’ details, click another one to see that book’s details. Nice and easy, never lose your spot again.
Choose from two Layouts:
- Horizontal Split: folders on the left, list on the top right, details on bottom right
- Vertical Split: 3 panels side by side, folder, list and details
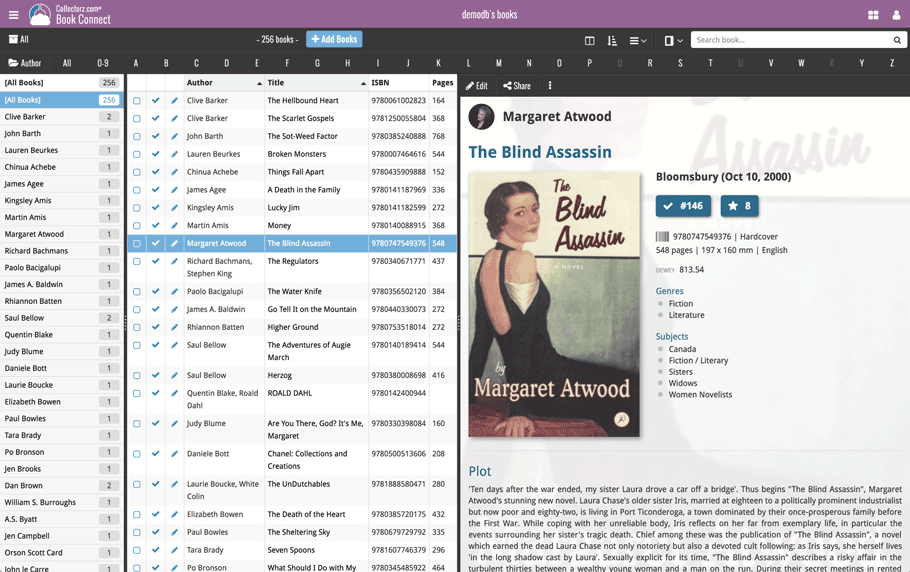
In either layout, the 3 panels are fully resizable by dragging the black “splitter bars” between the panels, so that you can customize the layout to your own liking.
The book details panel comes with its’ own “action bar”, with the main actions you may want to take on the selected book (Edit, Share, Delete, Duplicate, Loan and Link with Core).
Improved Cover View and Card View
At the same time, we made some small tweaks to both the Card View and Cover View, so that they’re making better use of your specific screen width. Both now use a “fully justified” layout, with the Cards auto-resizing to fit your screen width and the Cover distributing over the width, both resulting in a cleaner, less “jagged” view.
Two updates for the Game Connect software and the CLZ Cloud viewer today. One a big step forward in usability, the other a nice cosmetic improvement:
Game Details now integrated in main screen
Up till now, when you clicked a game entry to see its’ full details, you were taken to the game details page, that is, a new page in your browser. One had to click “Back” to get back to the game list again. Often resulting in an annoying back and forth clicking, each time causing you to lose your position in the list.
But not anymore! Starting with today’s update, the game details are now integrated in a panel within the main collection view:
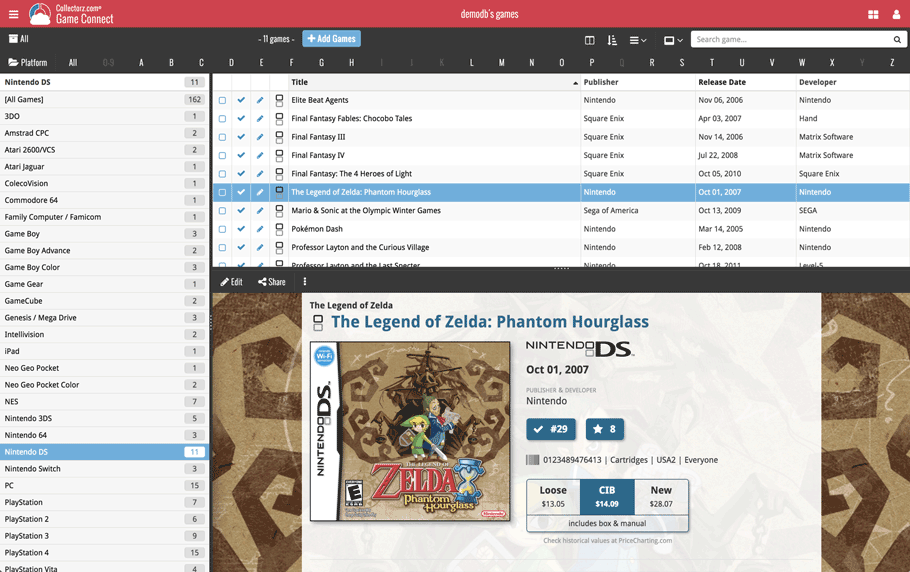
No more back and forth clicking. Just click a game entry to see its’ details, click another one to see that game’s details. Nice and easy, never lose your spot again.
Choose from two Layouts:
- Horizontal Split: folders on the left, list on the top right, details on bottom right
- Vertical Split: 3 panels side by side, folder, list and details
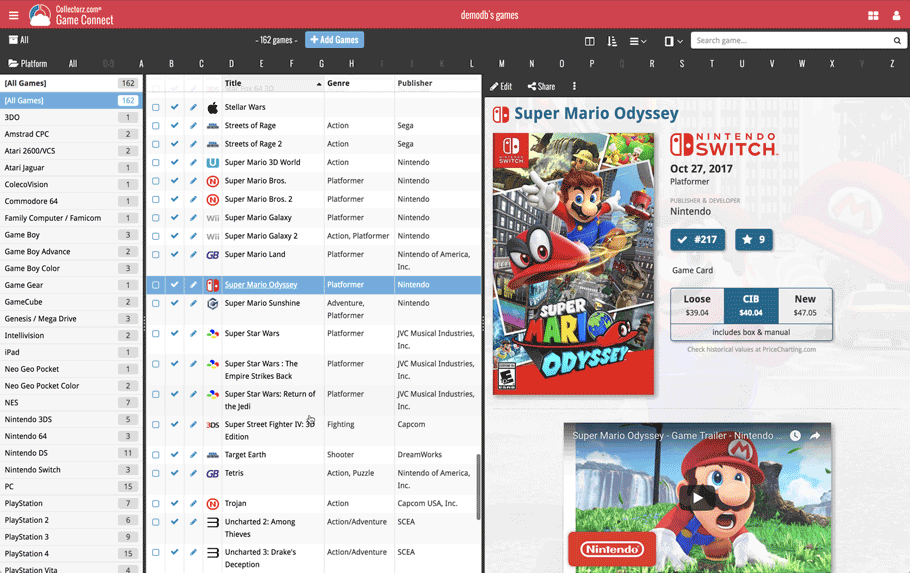
In either layout, the 3 panels are fully resizable by dragging the black “splitter bars” between the panels, so that you can customize the layout to your own liking.
The game details panel comes with its’ own “action bar”, with the main actions you may want to take on the selected game (Edit, Share, Delete, Duplicate, Loan and Link with Core).
Improved Cover View and Card View
At the same time, we made some small tweaks to both the Card View and Cover View, so that they’re making better use of your specific screen width. Both now use a “fully justified” layout, with the Cards auto-resizing to fit your screen width and the Covers distributing over the width, both resulting in a cleaner, less “jagged” view.
Two updates for the Music Connect software and the CLZ Cloud viewer today. One a big step forward in usability, the other a nice cosmetic improvement:
Album Details now integrated in main screen
Up till now, when you clicked an album entry to see its’ full details, you were taken to the album details page, that is, a new page in your browser. One had to click “Back” to get back to the album list again. Often resulting in an annoying back and forth clicking, each time causing you to lose your position in the list.
But not anymore! Starting with today’s update, the album details are now integrated in a panel within the main collection view:
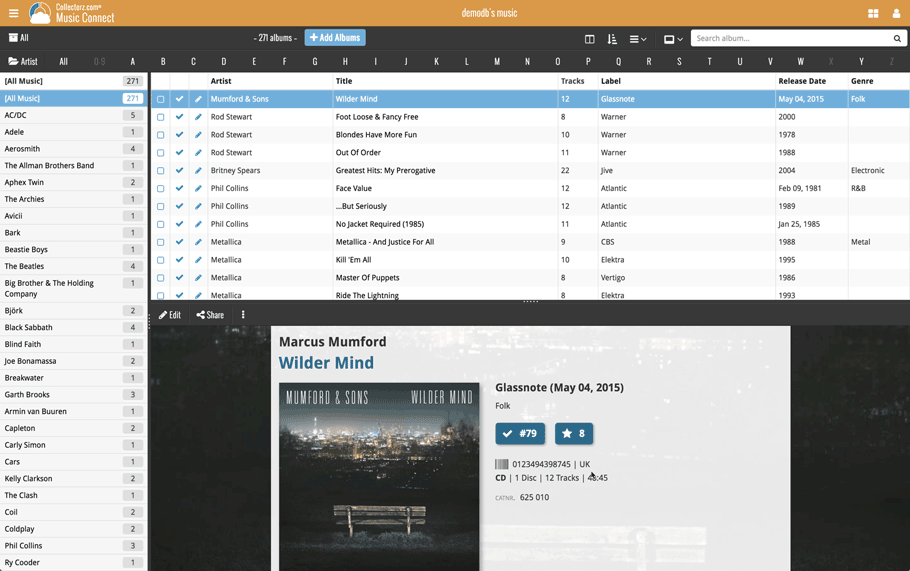
No more back and forth clicking. Just click an album entry to see its’ details, click another one to see that album’s details. Nice and easy, never lose your spot again.
Choose from two Layouts:
- Horizontal Split: folders on the left, list on the top right, details on bottom right
- Vertical Split: 3 panels side by side, folder, list and details
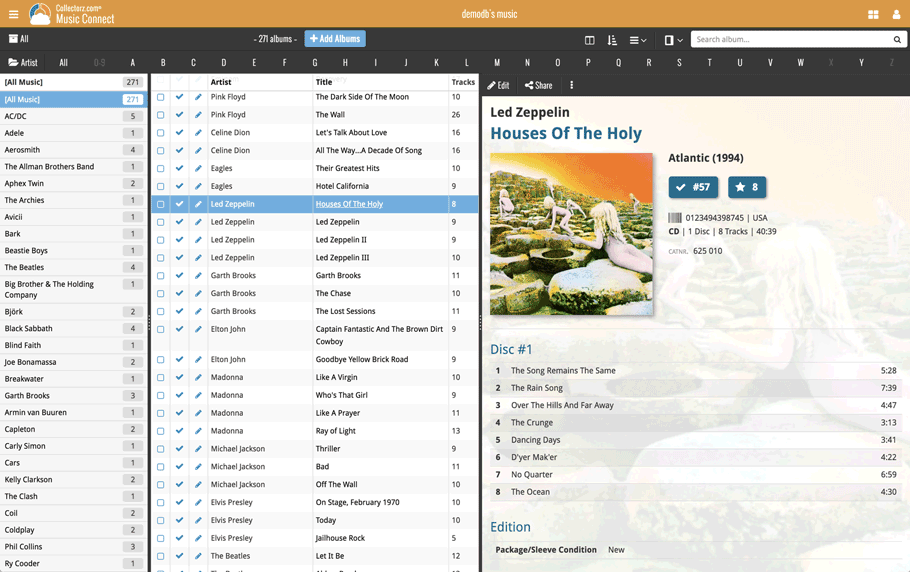
In either layout, the 3 panels are fully resizable by dragging the black “splitter bars” between the panels, so that you can customize the layout to your own liking.
The album details panel comes with its’ own “action bar”, with the main actions you may want to take on the selected album (Edit, Share, Delete, Duplicate, Loan and Link with Core).
Improved Cover View and Card View
At the same time, we made some small tweaks to both the Card View and Cover View, so that they’re making better use of your specific screen width. Both now use a “fully justified” layout, with the Cards auto-resizing to fit your screen width and the Covers distributing over the width, both resulting in a cleaner, less “jagged” view.
Two updates for the Comic Connect software and the CLZ Cloud viewer today. One a big step forward in usability, the other a nice cosmetic improvement:
Comic Details now integrated in main screen
Up till now, when you clicked a comic entry to see its’ full details, you were taken to the comic details page, that is, a new page in your browser. One had to click “Back” to get back to the comic list again. Often resulting in an annoying back and forth clicking, each time causing you to lose your position in the list.
But not anymore! Starting with today’s update, the comic details are now integrated in a panel within the main collection view:
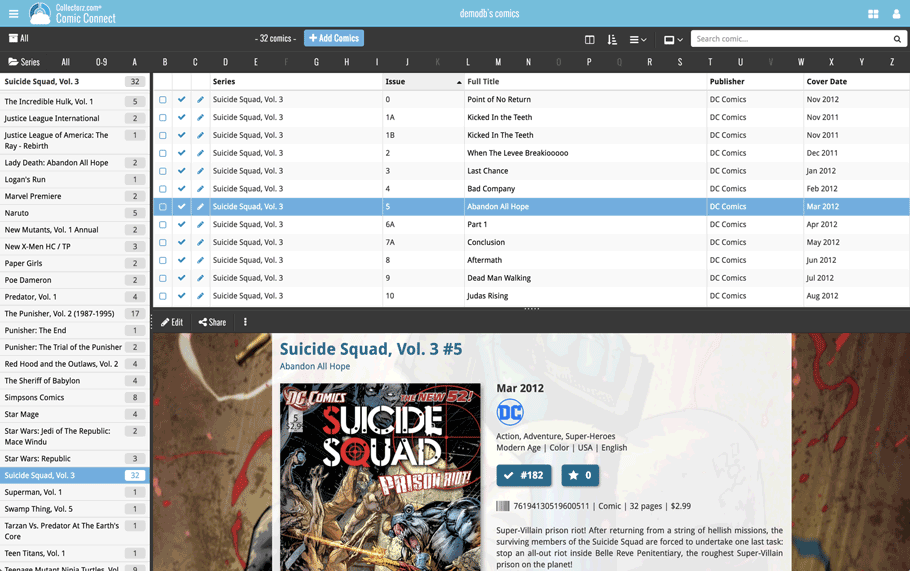
No more back and forth clicking. Just click a comic entry to see its’ details, click another one to see that comic’s details. Nice and easy, never lose your spot again.
Choose from two Layouts:
- Horizontal Split: folders on the left, list on the top right, details on bottom right
- Vertical Split: 3 panels side by side, folder, list and details
In either layout, the 3 panels are fully resizable by dragging the black “splitter bars” between the panels, so that you can customize the layout to your own liking.
The comic details panel comes with its’ own “action bar”, with the main actions you may want to take on the selected comic (Edit, Share, Delete, Duplicate, Loan and Link with Core).
Improved Cover View and Card View
At the same time, we made some small tweaks to both the Card View and Cover View, so that they’re making better use of your specific screen width. Both now use a “fully justified” layout, with the Cards auto-resizing to fit your screen width and the Covers distributing over the width, both resulting in a cleaner, less “jagged” view.
Two updates for the Movie Connect software and the CLZ Cloud viewer today. One a big step forward in usability, the other a nice cosmetic improvement:
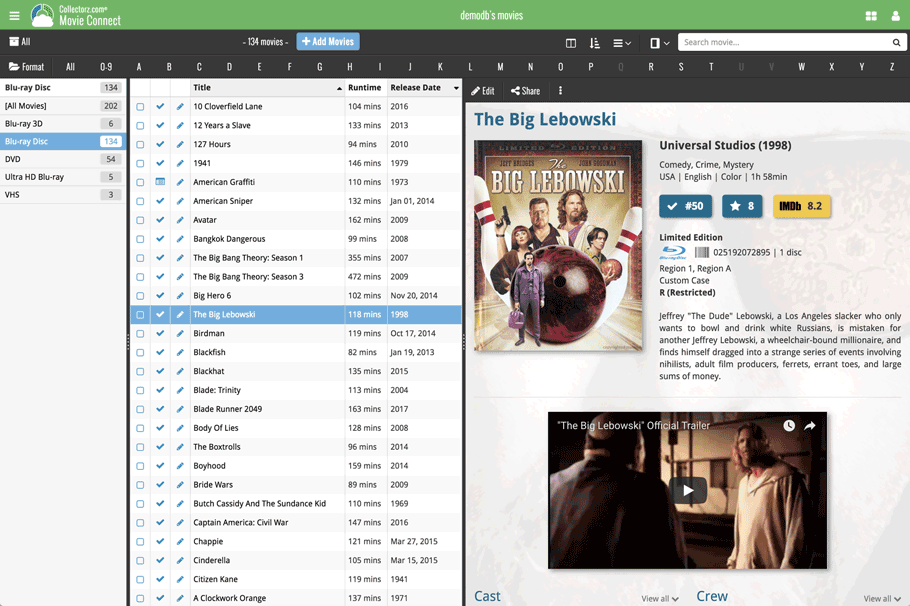
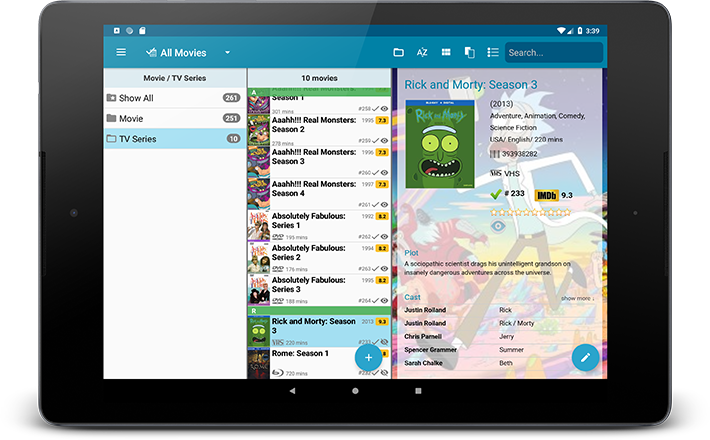
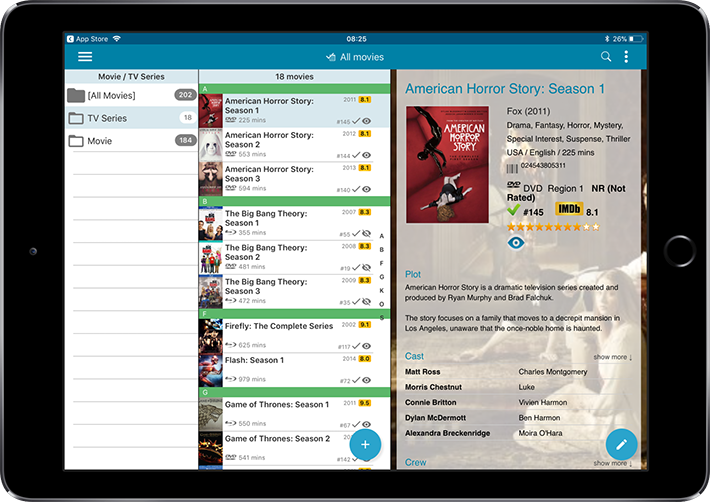
Movie Details now integrated in main screen
Up till now, when you clicked a movie entry to see its’ full details, you were taken to the movie details page, that is, a new page in your browser. One had to click “Back” to get back to the movie list again. Often resulting in an annoying back and forth clicking, each time causing you to lose your position in the list.
But not anymore! Starting with today’s update, the movie details are now integrated in a panel within the main collection view:
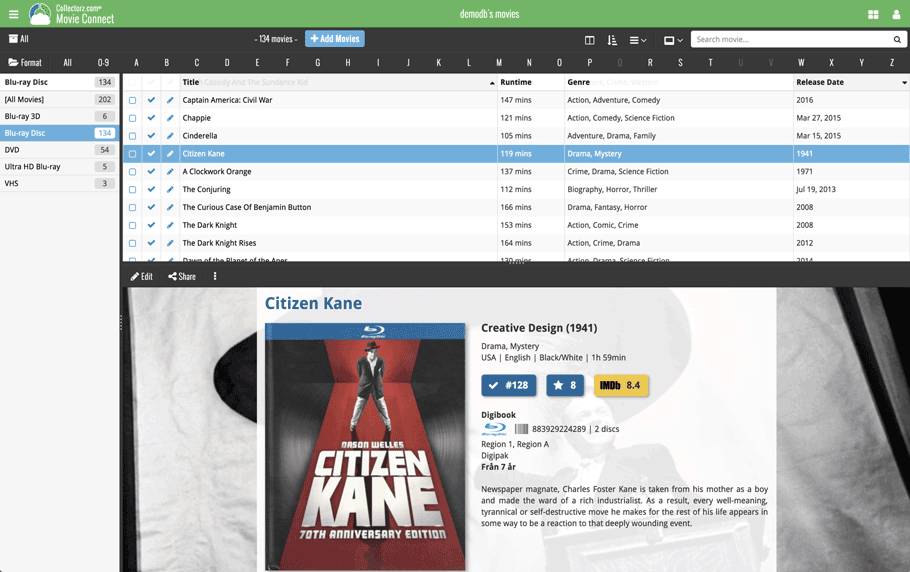
No more back and forth clicking. Just click a movie entry to see its’ details, click another one to see that movie’s details. Nice and easy, never lose your spot again.
Choose from two Layouts:
- Horizontal Split: folders on the left, list on the top right, details on bottom right
- Vertical Split: 3 panels side by side, folder, list and details
In either layout, the 3 panels are fully resizable by dragging the black “splitter bars” between the panels, so that you can customize the layout to your own liking.
The movie details panel comes with its’ own “action bar”, with the main actions you may want to take on the selected movie (Edit, Share, Delete, Duplicate, Loan and Link with Core).
Improved Cover View and Card View
At the same time, we made some small tweaks to both the Card View and Cover View, so that they’re making better use of your specific screen width. Both now use a “fully justified” layout, with the Cards auto-resizing to fit your screen width and the Covers distributing over the width, both resulting in a cleaner, less “jagged” view.
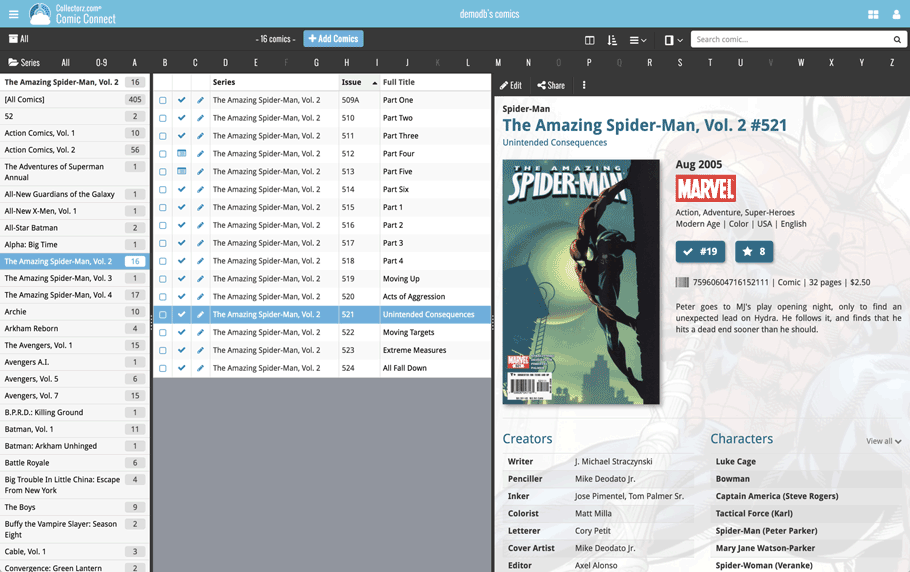
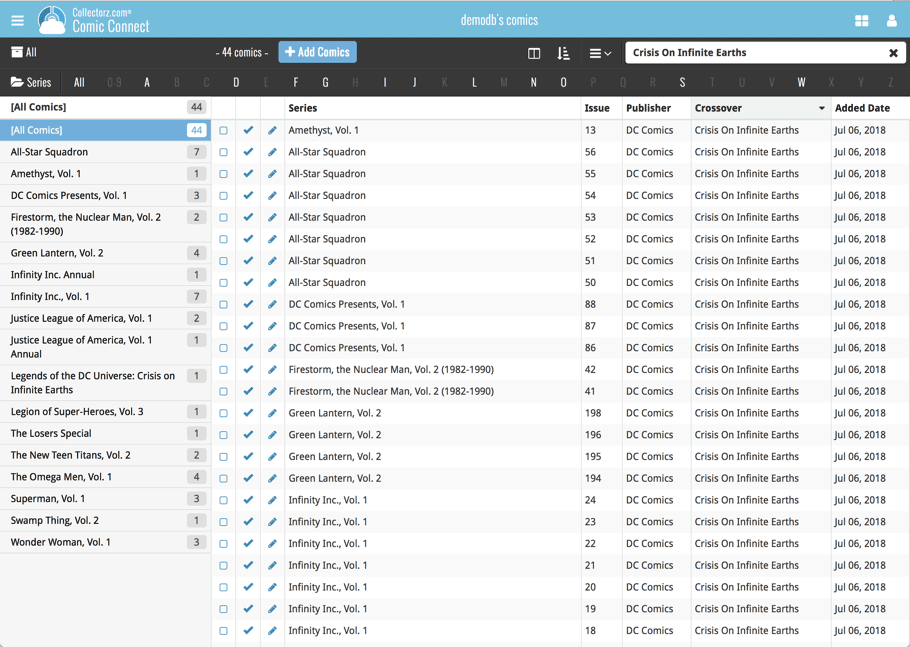
Up until today, the quick search box in Comic Connect (and the CLZ Cloud viewer for comic) only searched in the Series title, Issue title, Barcode and Tags fields. Pretty limited, but necessary for performance reasons.
However, with the new search engine we created last year, it became possible to search more fields while keeping the search super-fast. So lets use that capability!
From now on, if you use the search box, it will also search in many more fields. The complete lists of fields that are now searched:
- Series Title
- Issue Title
- Barcode
- Crossover
- Story Arc
- Series Group
- Plot
- Tags
- Notes
Example: searching for the crossover “Crisis On Infinite Earths” will return all issues that are part of that crossover:
As some of you may know, we have a page detailing the 50 most popular movies of this week in our Core online movie database. It also details the new DVD, Blu-ray, 4K releases for last month and this month.
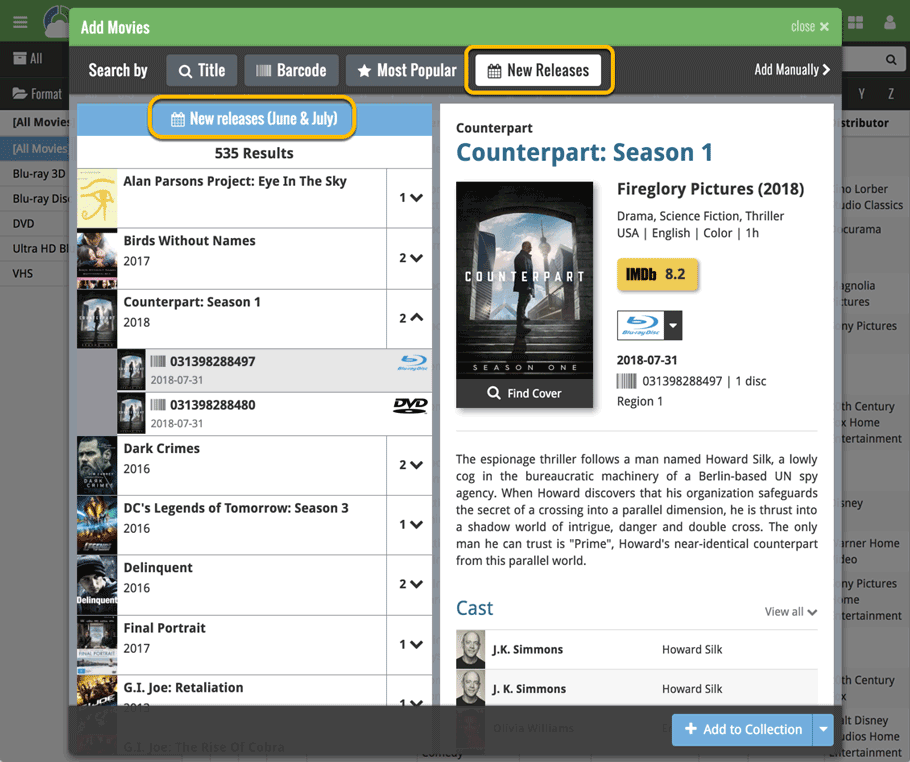
Wouldn’t it be cool if you could quickly add those to your Collection or Wish List? Yes. It would. So we added 2 new tabs to the Add Movies screen!
New: Most Popular tab
Open your Add Movies screen and click the “Most Popular” tab to see the 50 most popular movies of this week in our online movie database. Select one to add it to your collection or wish list!
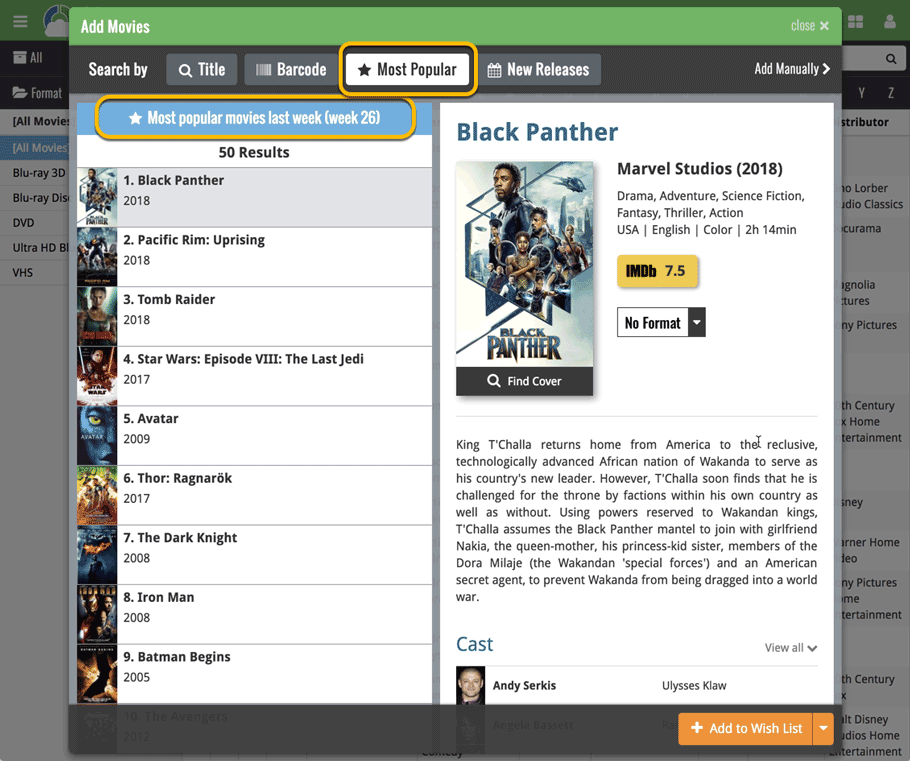
New: New Releases tab
The second new tab in the Add Movies screen is the “New Releases” tab showing you all new releases of last month and this month. Use the little expand button to see which editions are new (including their release date!).
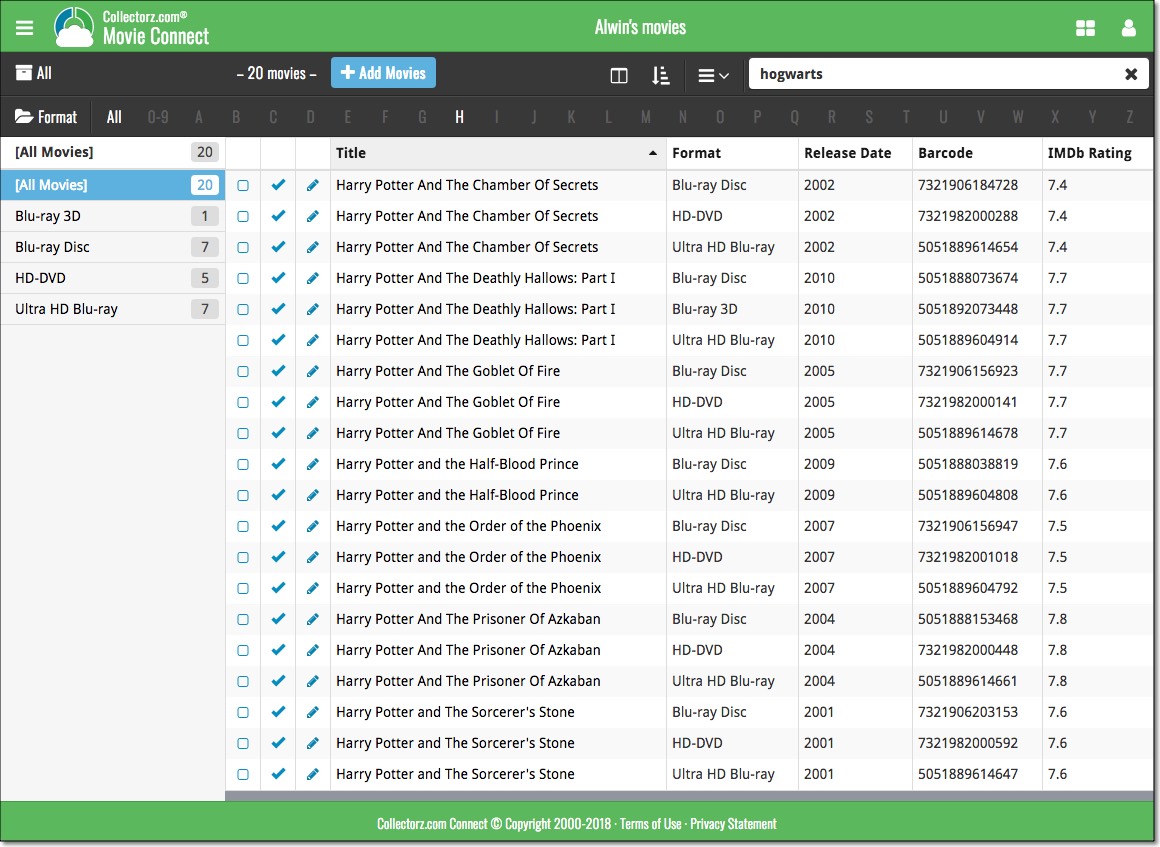
Up until today, the quick search box in Movie Connect (and the CLZ Cloud viewer for movie) only searched in the Title, Year, Barcode and Tags fields. Pretty limited, but necessary for performance reasons.
However, with the new search engine we created last year, it became possible to search more fields while keeping the search super-fast. So lets use that capability!
From now on, if you use the search box, it will also search in many more fields. The complete lists of fields that are now searched:
- Title
- Title Extension
- Original Title
- Series
- Episode Titles
- Year
- Barcode
- Plot
- Notes
- Tags
Example: searching for “hogwarts” will return all Harry Potter movies, because the word appears in the plot summary:
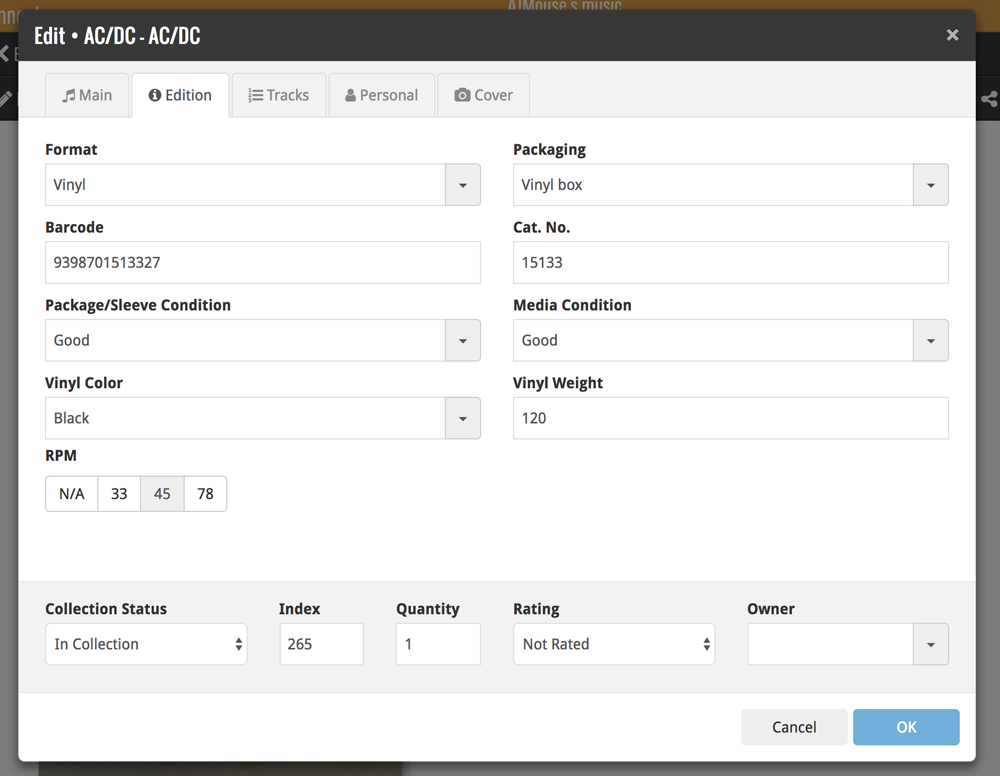
By popular demand, we have added 8 more fields to Music Connect, and we’ve moved some fields around. Most new fields can be found on the new “Edition” tab in the edit album popup!
- Packaging
- Media Condition
- Vinyl Color
- Vinyl Weight
- RPM
- Disc Titles
- Composer Sort Names (use the Manage Pick Lists page to modify sort names of composers)
- Original Release Date (this one exists next to Release Date)
Of course, most fields can also folder grouped on, added as column, sorted on, etc.
Note: We renamed the old “Condition” field to “Package/Sleeve Condition” so you now have a “Package/Sleeve Condition” field and a “Media Condition” field.
We will be adding these fields to the desktop and mobile app sync within a couple of weeks too.
A couple of weeks ago, our CLZ Cloud (and Comic Connect) has been updated with 7 more fields and loan information. Today’s version 18.3 now supports the syncing of all these new fields and your loan information to the CLZ Cloud and your CLZ Comics mobile app!
Added for syncing:
- Edition
- Crossover
- Story Arc
- Imprint
- Age
- Cover Price
- Release Date
- Loans
Heads up: after updating to version 18.3, the software will automatically mark most of your comics as “changed”, to force the upload of your data for the new fields to the CLZ Cloud.
These fields also all sync to the latest iOS and Android mobile apps (version 4.11 needed)!
Fixes:
- Several Access Violation errors in the main screen.
- List View: Double clicking on checks would make list unresponsive.
- Edit Screen: Using Next/Prev would cause strange effects with checkboxes in main screen.
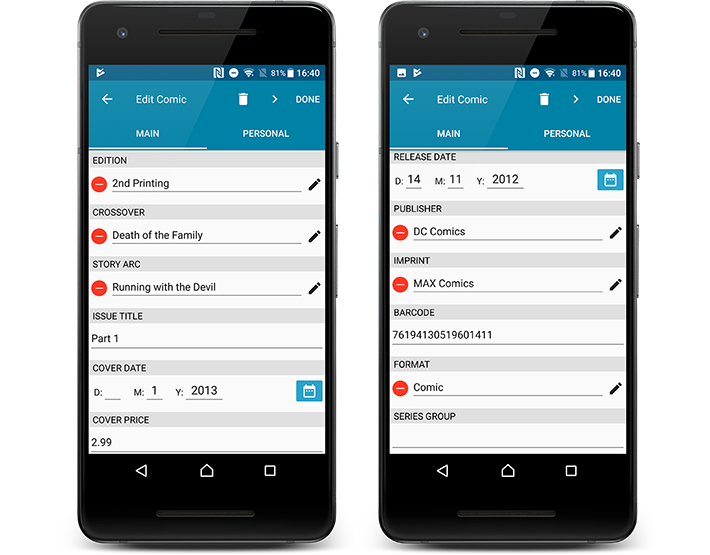
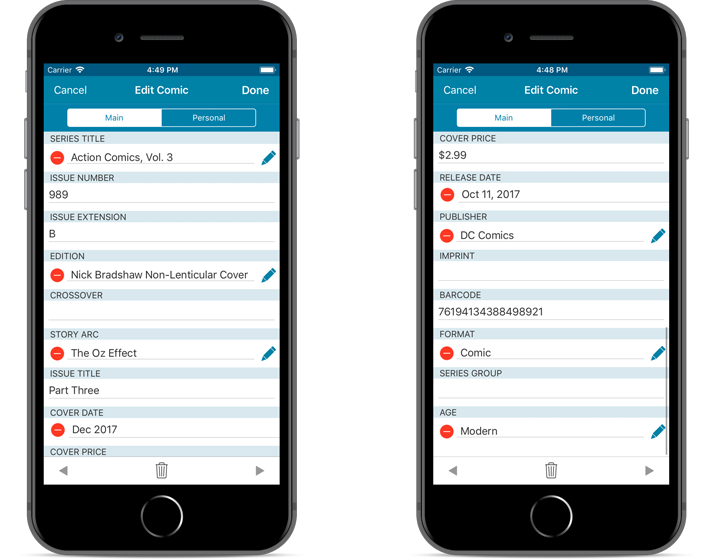
By popular demand, we have added 7 more editable fields to CLZ Comics. These fields were already available as automatic Core fields but are now fully editable:
Fields that are now fully editable:
- Edition
- Crossover
- Story Arc
- Imprint
- Age
- Cover Price
- Release Date
But wait, that’s not all: All the above fields now also sync to and from the CLZ Cloud!
Secure HTTPS connections, for your security and privacy
As indicated in our recent GDPR email, we are updating our software and services, to be more secure and to better protect your privacy.
Starting with version 4.11 CLZ Comics now uses secure HTTPS connections for all communications with our servers:
- for logging in with your username and password
- for syncing your data with CLZ Cloud
- for sending your searches to Core.
To make this possible, we have created new secure “entry points” on our servers, that are only allowing secure HTTPS connections. The new CLZ Movies app only communicates with those secure entry points.
For your privacy and security, we strongly recommend updating your app to v4.11.
By popular demand, we have added 7 more editable fields to CLZ Comics. These fields were already available as automatic Core fields but are now fully editable:
Fields that are now fully editable:
- Edition
- Crossover
- Story Arc
- Imprint
- Age
- Cover Price
- Release Date
But wait, that’s not all: All the above fields now also sync to and from the CLZ Cloud!
Note: Because of the new fields the app needs to perform a database optimization. If you have a very big database (over 10.000 items) and/or a slower device, this optimization can take a while to complete. If you’re having troubles with this, please contact us for a solution.
Secure HTTPS connections, for your security and privacy
As indicated in our recent GDPR email, we are updating our software and services, to be more secure and to better protect your privacy.
Starting with version 4.11 CLZ Comics now uses secure HTTPS connections for all communications with our servers:
- for logging in with your username and password
- for syncing your data with CLZ Cloud
- for sending your searches to Core.
To make this possible, we have created new secure “entry points” on our servers, that are only allowing secure HTTPS connections. The new CLZ Movies app only communicates with those secure entry points.
For your privacy and security, we strongly recommend updating your app to v4.11.
Fixed:
- Last update made some settings disappear in the settings screen. They are back now.
- Added bottom margin to the add auto screen on iPhone X to make the add button more reachable
- The sync screen wasn’t logging local deletes.
A couple of weeks ago, our CLZ Cloud (and Movie Connect) has been updated with 9 more fields and loan information. Today’s version 18.3 now supports the syncing of all these new fields and your loan information to and from the CLZ Cloud!
Added for syncing:
- Full Release Date (previously, only the year was synced)
- Runtime
- IMDb Number
- IMDb Rating
- Audience Rating
- Region
- Studio
- Distributor
- Box Set
- Loans
Heads up: after updating to version 18.3, the software will automatically mark most of your movies as “changed”, to force the upload of your data for the new fields to the CLZ Cloud.
These fields also all sync to the latest iOS and Android versions!
Fixed:
- Behaviour: The setting for ‘Let selection “Follow” the Edited Movie’ didn’t work.
- An access violation could occur when double clicking on the checkboxes.
- The details panel could not be resized correctly sometimes.
- Edit Multiple movies would sometimes not activate due to an issue with counting the selected movies.
During 2017, our content managers worked for months to enhance our Core online movie database with movie list information for thousands of multi-movie box sets.
As of today, Movie Connect can use this new Core data: Just use the enhanced Add Movies screen to find a box set, either by title or by barcode, and our Core “knows” which movies are in the box.
See it in action:
Find and add box sets by barcode
Scan a box-set barcode and Core will show you which movies it contains. Click Add to Collection at the bottom right and all contained movies will be added to your database, automatically linked by a box set entry.
Find and add box sets by title
Alternatively, use the Title tab and enable the new Box Set search to find box sets by their title.
Note: the new Movies, TV Series and Box Sets checkboxes now let you search each of these three Core section separately OR combined.
AND: The check boxes now also operate on the Search-As-You-Type suggestions, for even quicker searching and adding!
New box set panel on movie details page, with movie list!
A nice new box set panel at the top of the movie details for each of the contained movies. Now showing the list of the contained movies, in the correct order, AND with clickable links to go straight to the other movies in the set!
Change the order of movies in a box set
At the bottom of the list of movies you will find a link to “change order of movies…” to modify the order in which the movies are displayed in the details page.

By popular demand, we have added 10 more editable fields to CLZ Movies. Two completely new fields (Is TV Series and Box Set) and 8 fields that were already available as automatic Core fields but are now fully editable:
Completely New Fields:
- Is TV Series (Yes/No). For your entries, indicate whether these are movies or TV series. Use Is TV Series folders to split them in the main list. This is a new field. Default values for your entries have been set using our Core central database, but you may want to run though your list to check and correct as needed.
- Box Set. Enter a box set title in your movies to make them part of a box set. You can see the box set information at the top of the details panel for each of the movies inside that box set. Also available as a folder option.
Fields that are now fully editable:
- Release Date. Previous only available as Release Year, this is now a full date field.
- Runtime. Previously set automatically, now fully editable.
- IMDb Number. Previously set automatically, now fully editable.
- IMDb Rating. Previously set automatically, now fully editable.
- Audience Rating. Previously set automatically, now fully editable. Also available as a folder option.
- Region. Previously set automatically, now fully editable. Allows multiple values. Also available as a folder option.
- Studio. Previously set automatically, now fully editable. Allows multiple values. Also available as a folder option.
- Distributor. Previously set automatically, now fully editable. Also available as a folder option.
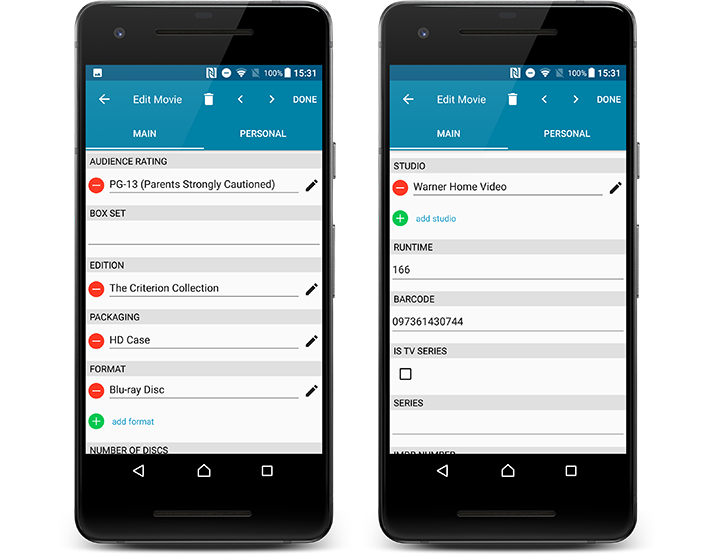
But wait, that’s not all: All the above fields now also sync to and from the CLZ Cloud!
Secure HTTPS connections, for your security and privacy
As indicated in our recent GDPR email, we are updating our software and services, to be more secure and to better protect your privacy.
Starting with version 4.11 CLZ Movies now uses secure HTTPS connections for all communications with our servers:
- for logging in with your username and password
- for syncing your data with CLZ Cloud
- for sending your searches to Core.
To make this possible, we have created new secure “entry points” on our servers, that are only allowing secure HTTPS connections. The new CLZ Movies app only communicates with those secure entry points.
For your privacy and security, we strongly recommend updating your app to v4.11.
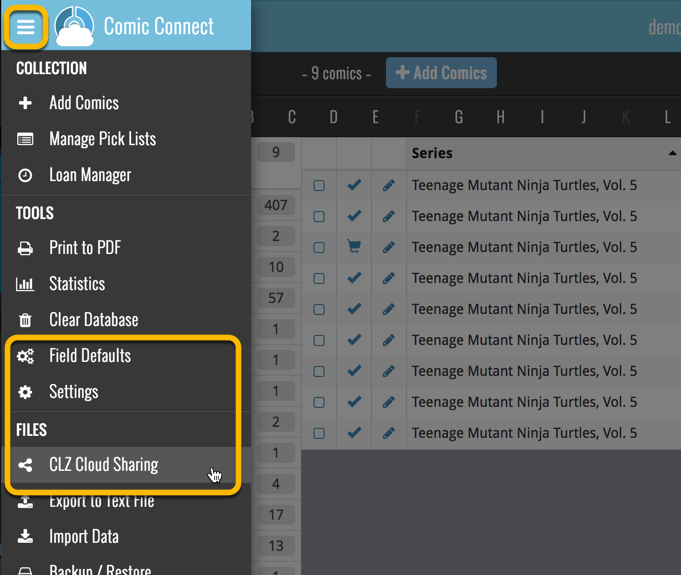
Over the last week Joël from team Connect worked on splitting the settings into more logical places, and added new tooltips to explain what all the buttons do. The full what’s new:
Added tooltips
Hovering your mouse over the various buttons will now show tooltips to explain what the buttons do! Hover your mouse over the buttons to see what they do.
Split the settings
All settings used to be together in one screen, but they weren’t easy to find so we decided to split the settings up into their own logical pages. You can now find them by opening the menu (top left), and look for:
- Field Defaults: to set up default field values for new items
- CLZ Cloud Sharing: to set up all your CLZ Cloud sharing options
- Settings: with just the behaviour and display settings
By popular demand, we have added 10 more editable fields to CLZ Movies. Two completely new fields (Is TV Series and Box Set) and 8 fields that were already available as automatic Core fields but are now fully editable:
Completely New Fields:
- Is TV Series (Yes/No). For your entries, indicate whether these are movies or TV series. Use Is TV Series folders to split them in the main list. This is a new field. Default values for your entries have been set using our Core central database, but you may want to run though your list to check and correct as needed.
- Box Set. Enter a box set title in your movies to make them part of a box set. You can see the box set information at the top of the details panel for each of the movies inside that box set. Also available as a folder option.
Fields that are now fully editable:
- Release Date. Previous only available as Release Year, this is now a full date field.
- Runtime. Previously set automatically, now fully editable.
- IMDb Number. Previously set automatically, now fully editable.
- IMDb Rating. Previously set automatically, now fully editable.
- Audience Rating. Previously set automatically, now fully editable. Also available as a folder option.
- Region. Previously set automatically, now fully editable. Allows multiple values. Also available as a folder option.
- Studio. Previously set automatically, now fully editable. Allows multiple values. Also available as a folder option.
- Distributor. Previously set automatically, now fully editable. Also available as a folder option.

But wait, that’s not all: All the above fields now also sync to and from the CLZ Cloud!
Secure HTTPS connections, for your security and privacy
As indicated in our recent GDPR email, we are updating our software and services, to be more secure and to better protect your privacy.
Starting with version 4.11 CLZ Movies now uses secure HTTPS connections for all communications with our servers:
- for logging in with your username and password
- for syncing your data with CLZ Cloud
- for sending your searches to Core.
To make this possible, we have created new secure “entry points” on our servers, that are only allowing secure HTTPS connections. The new CLZ Movies app only communicates with those secure entry points.
For your privacy and security, we strongly recommend updating your app to v4.11.
Fixed:
- Last update made some settings disappear in the settings screen. They are back now.
- Added bottom margin to the add auto screen on iPhone X to make the add button more reachable
- The sync screen wasn’t logging local deletes.
A BIG update for your Movie Collector software today, with two important changes:
1. Secure HTTPS connections, for your security and privacy
As indicated in our recent GDPR email, we are updating our software and services, to be more secure and to better protect your privacy.
Starting with version 18.2, Movie Collector now uses secure HTTPS connections for all communications with our servers:
- for logging in with your username and password
- for syncing your data with CLZ Cloud
- for sending your searches to Core.
To make this possible, we have created new secure “entry points” on our servers, that are only allowing secure HTTPS connections. The new Movie Collector software only communicates with those secure entry points.
For your privacy and security, we strongly recommend updating to version 18.2.
2. More sync fields
Last week, our CLZ Cloud (and Movie Connect) has been updated with 9 more fields and loan information. Today’s version 18.2 now supports the syncing of all these new fields and your loan information to and from the CLZ Cloud!
Added for syncing:
- Full Release Date (previously, only the year was synced)
- Runtime
- IMDb Number
- IMDb Rating
- Audience Rating
- Region
- Studio
- Distributor
- Box Set
- Loans
Heads up: after updating to version 18.2, the software will automatically mark most of your movies as “changed”, to force the upload of your data for the new fields to the CLZ Cloud.
BTW: Updates for the CLZ Movies mobile apps are coming up soon, so that you can fully sync the above new fields from desktop to mobile and vice versa.
Fixed:
- Preferences: Ignore Sort Title Setting was ignored
- Add Movies Files: Batch add checked for movie files was not working
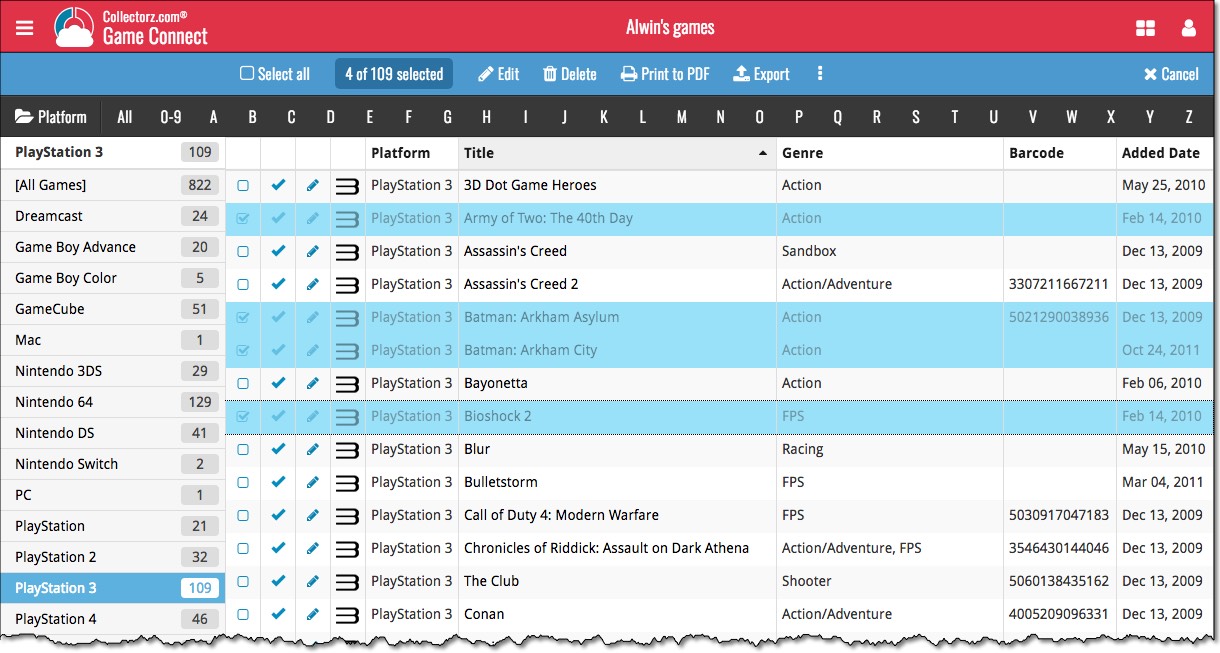
A cool user interface update for your Game Connect software today, in which we makes it easier to select games and easier to perform batch actions on the selected games.
Select using checkboxes
To select games, just click the checkboxes on the left of each game entry in the list. Checkboxes are also available in Card View and Images View, just hover your mouse over an item.
No more need to go into “Select Mode” first. The Select Mode is automatically activated as soon as you checkbox the first game, clearly indicated by the blue Batch Action Bar that replace the regular toolbar.
Batch Action Bar
While in Select Mode, the blue Batch Action Bar is visible, always showing you the number of selected games. Also:
- Use the “Select all” checkbox to select all games in the current list in one go
- Use the “x Cancel” button on the right to leave Select Mode
- And of course, use any of the action buttons (Edit, Delete, Print, Export, Duplicate and Loan) to perform an action on the selection games
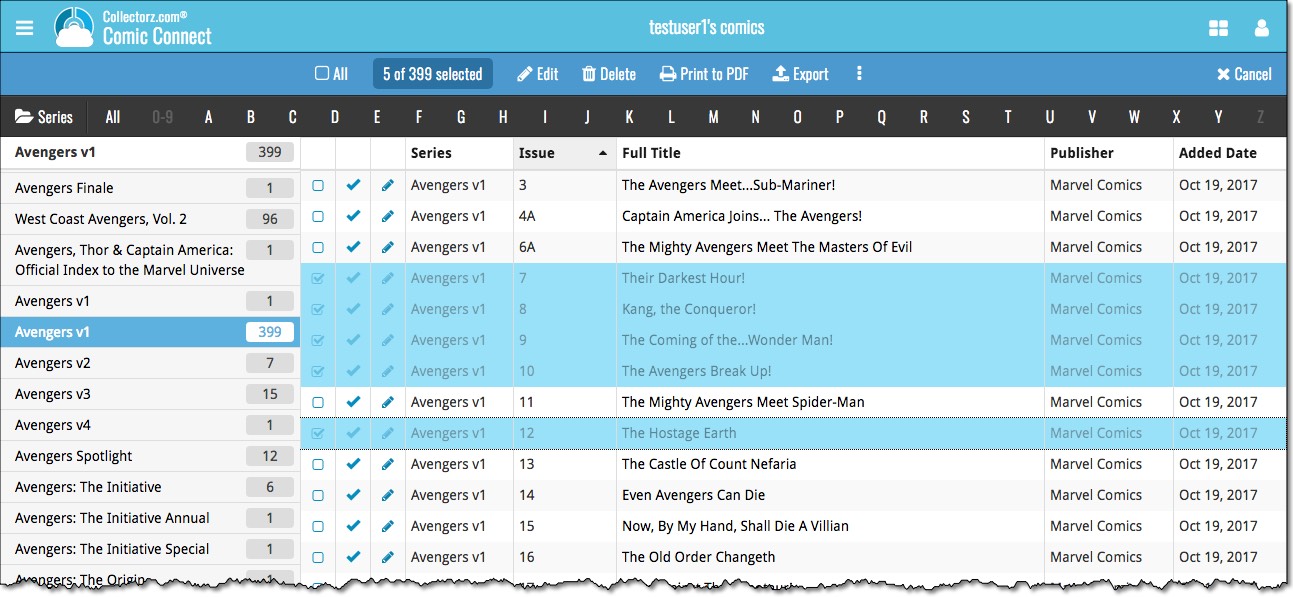
A cool user interface update for your Comic Connect software today, in which we makes it easier to select comics and easier to perform batch actions on the selected comics.
Select using checkboxes
To select comics, just click the checkboxes on the left of each comic entry in the list. Checkboxes are also available in Card View and Images View, just hover your mouse over an item.
No more need to go into “Select Mode” first. The Select Mode is automatically activated as soon as you checkbox the first comic, clearly indicated by the blue Batch Action Bar that replace the regular toolbar.
Batch Action Bar
While in Select Mode, the blue Batch Action Bar is visible, always showing you the number of selected comics. Also:
- Use the “Select all” checkbox to select all comics in the current list in one go
- Use the “x Cancel” button on the right to leave Select Mode
- And of course, use any of the action buttons (Edit, Delete, Print, Export, Duplicate and Loan) to perform an action on the selection comics