News & updates released in 2017
This is Alwin, with the final CLZ Newsletter for 2017. December is always a busy month here at the CLZ HQ, but this December was particularly crazy, with all the v18 for Windows releases.
Our support guys and gal have been handling over 100 support requests every day since early December. Add to that this week’s Connect updates plus a Year End Sale and we’re up to 150 tickets each day 🙂
But no worries, it’s not just all work and no play 🙂 On December 23, the entire CLZ Team and their families visited the local Dutch theme park “De Efteling”! We had a great day, with cool rides, great food and a lot of laughter.
More pictures of the CLZ Family here.
Our newsletter topics for December 2017:
- Now live: version 18 for all Windows editions
- Now live: a new look for all Connect editions
- Now live: a new Add Movies screen in Movie Connect
- Year-End-Sale: Get Connect for 1 year, get 6 extra months free
- Coming up: Auto-Cloud-Syncing for all iOS and macOS editions
On Saturday December 23, the entire CLZ Team and their families visited the local Dutch theme park “De Efteling”! We had a great day, with cool rides, great good and a lot of laughter.


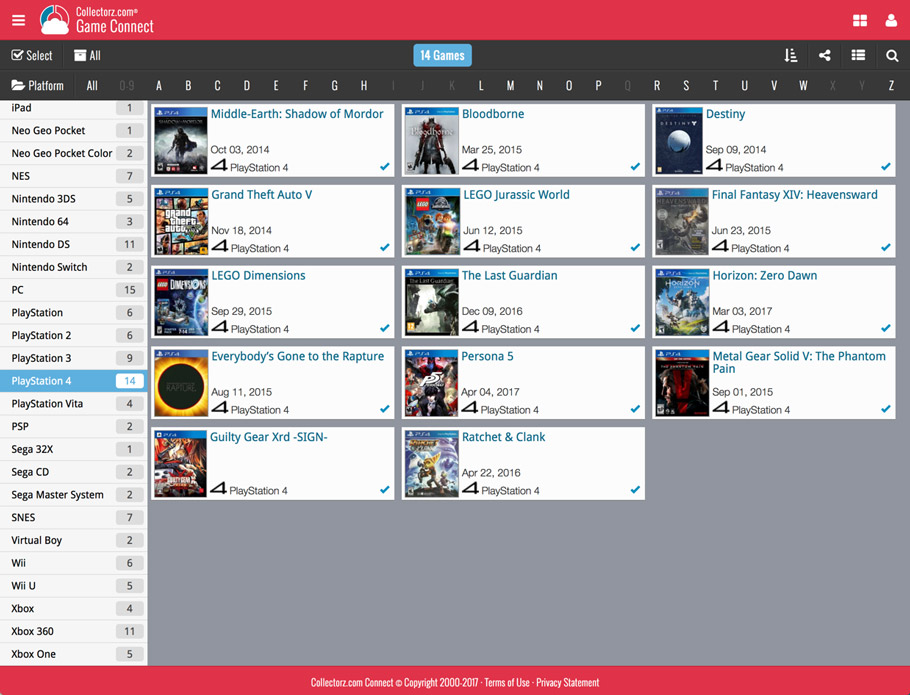
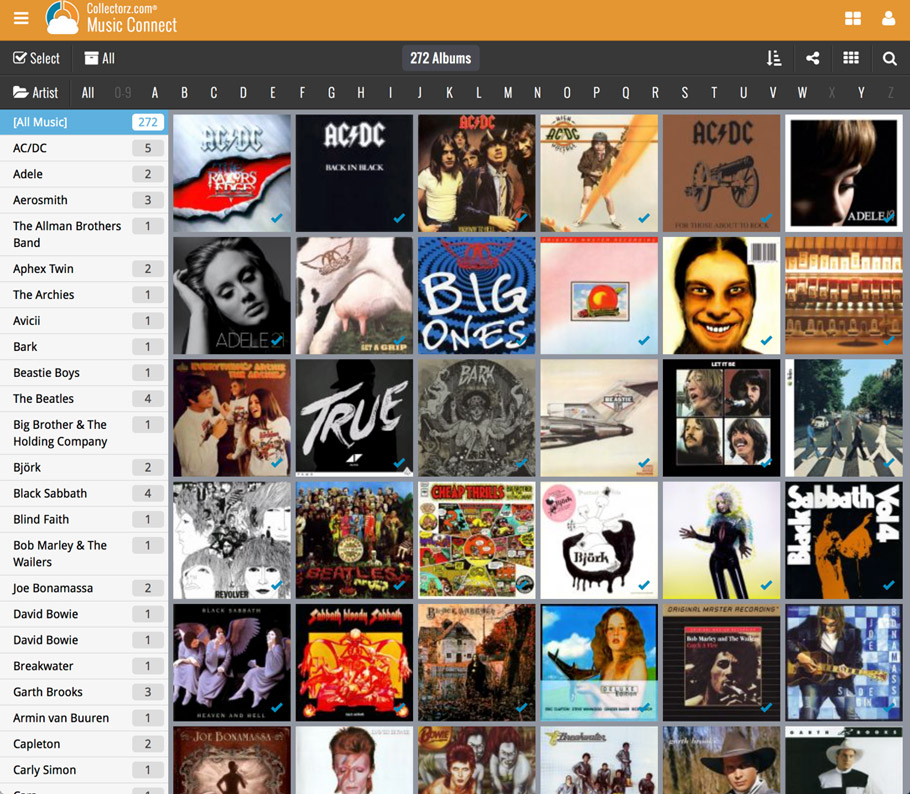
In this “between Christmas and New Year” week, a huge update to the look and feel of our Connect web-based software.
- We removed the tabs at the top that let you switch between the programs, to give you more screen space for the software you are in. (you can still switch using the app-switcher button top right).
- Dark toolbars with white text and buttons everywhere, while keeping your list and details pages light and clear.
- All tools and feature are now accessible from the “hamburger” menu on the top left.
- Your account settings and log out options in a “user menu” on the right.
- TIP: the new look is also available in your free CLZ Cloud viewer!
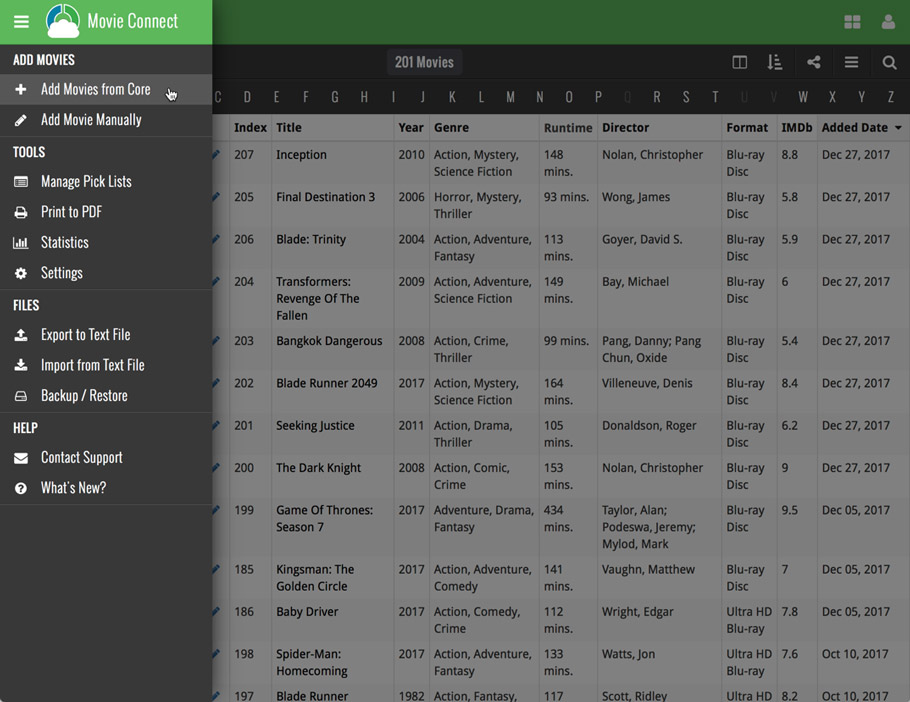
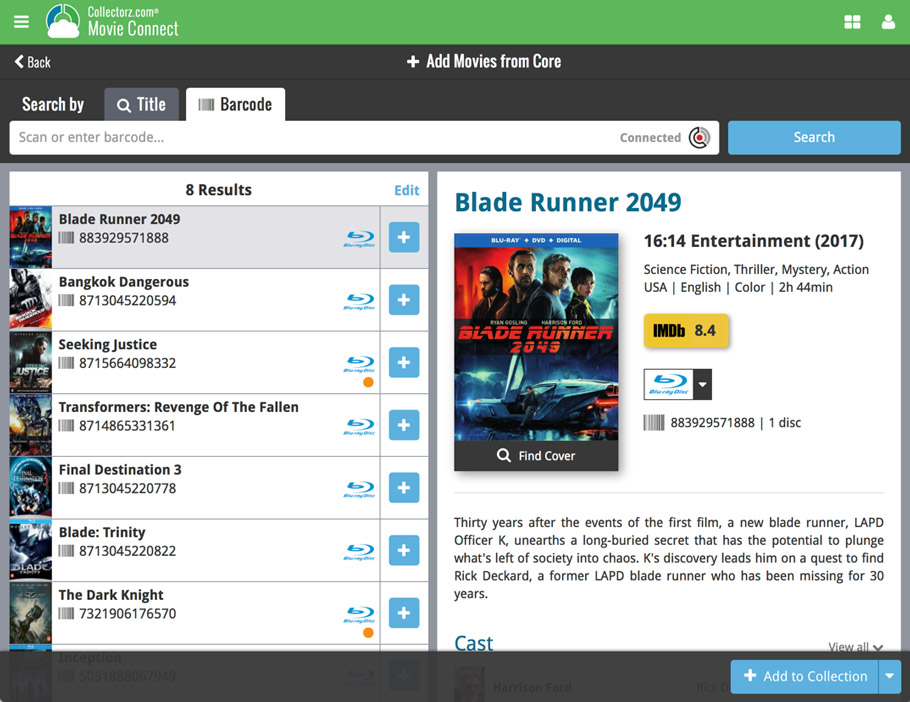
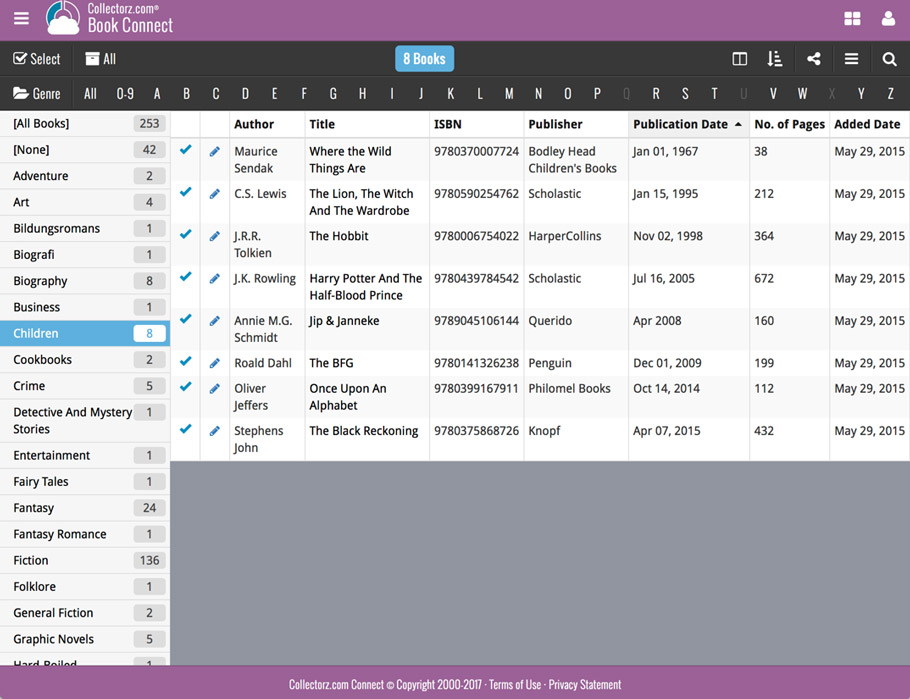
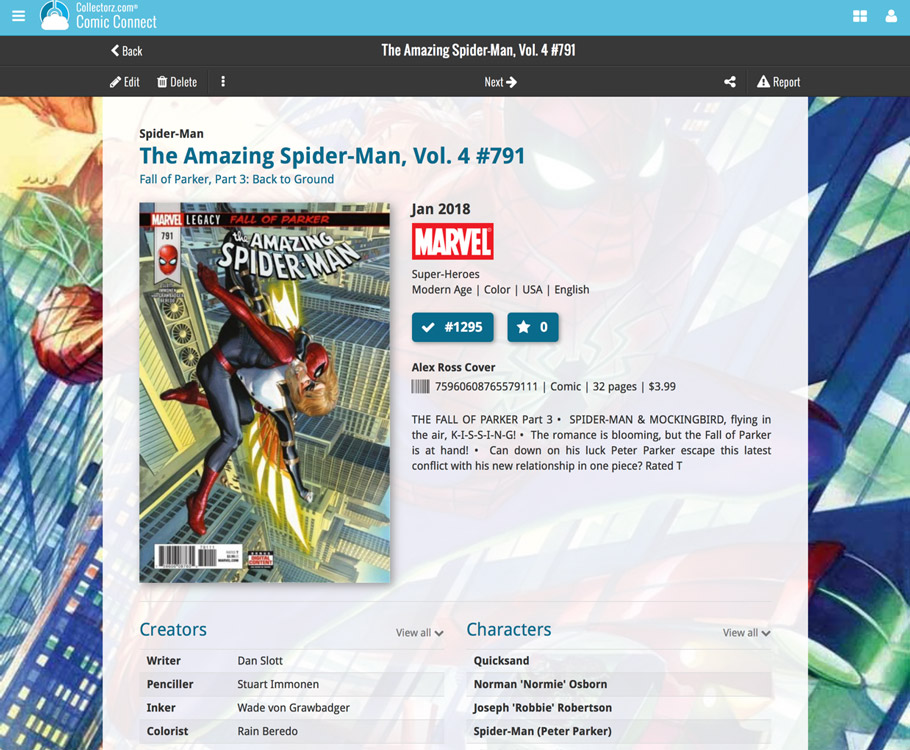
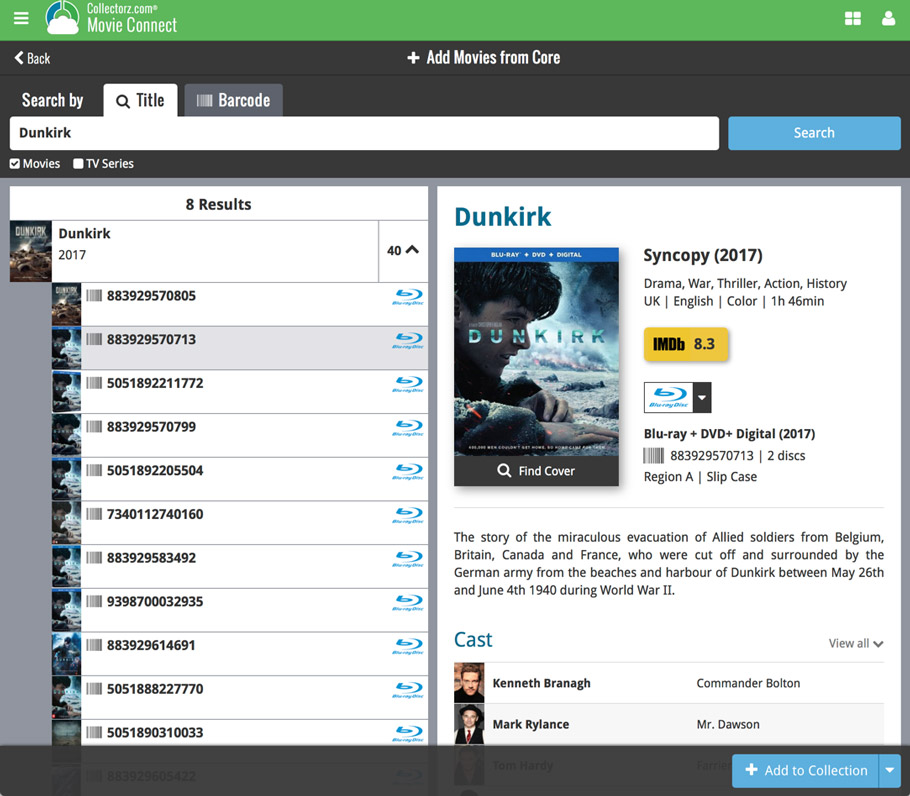
Now live in your Movie Connect software, a complete re-design of the Add Movies screen, with a new look, easier interface and new features.
Adding Movies by Title
Search by title to see a list of matching movie results, or pick the movie you were looking for directly for the Search-As-You-Type suggestions.
Expand a movie entry to see the available DVD and Blu-ray editions, with small cover thumbnails:
Pick your format straight from this Add screen, no need to edit afterwards:
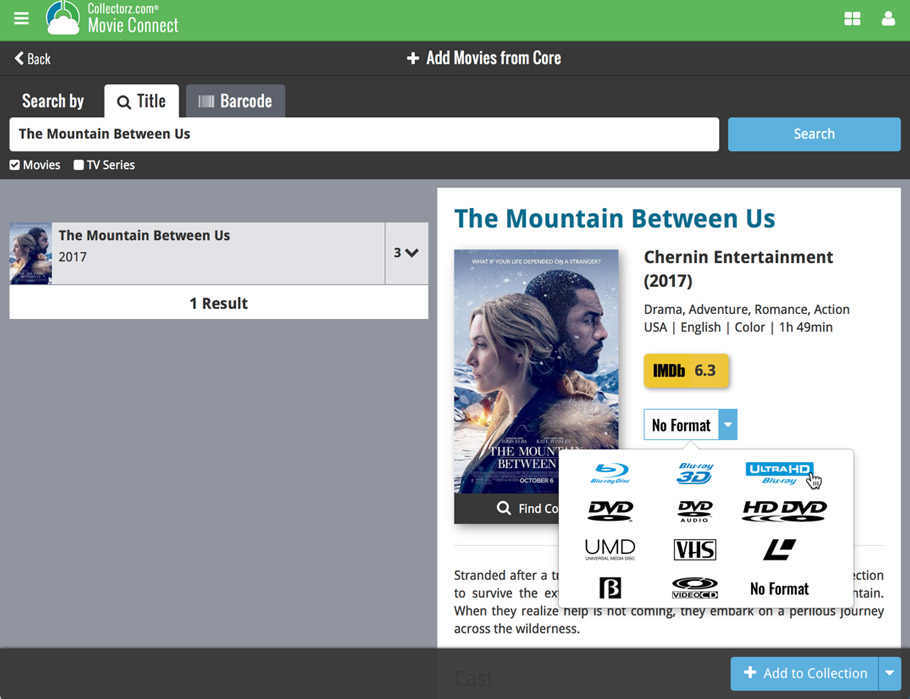
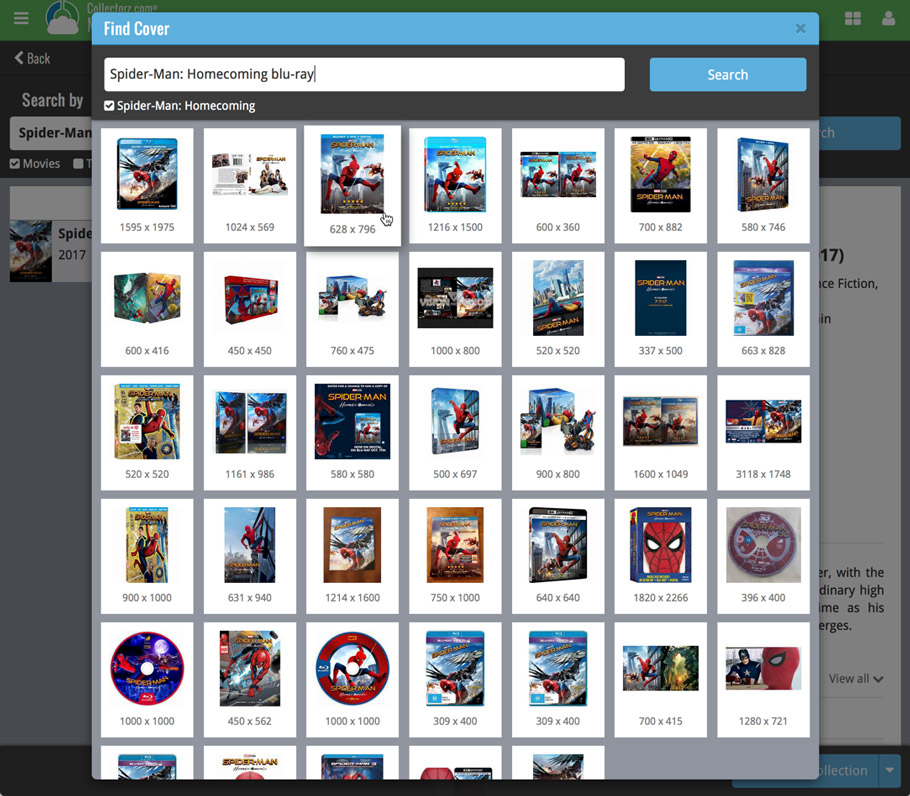
Not the right cover image? Use the built-in Find Cover tool to pick the correct one.
Adding Movies by Barcode
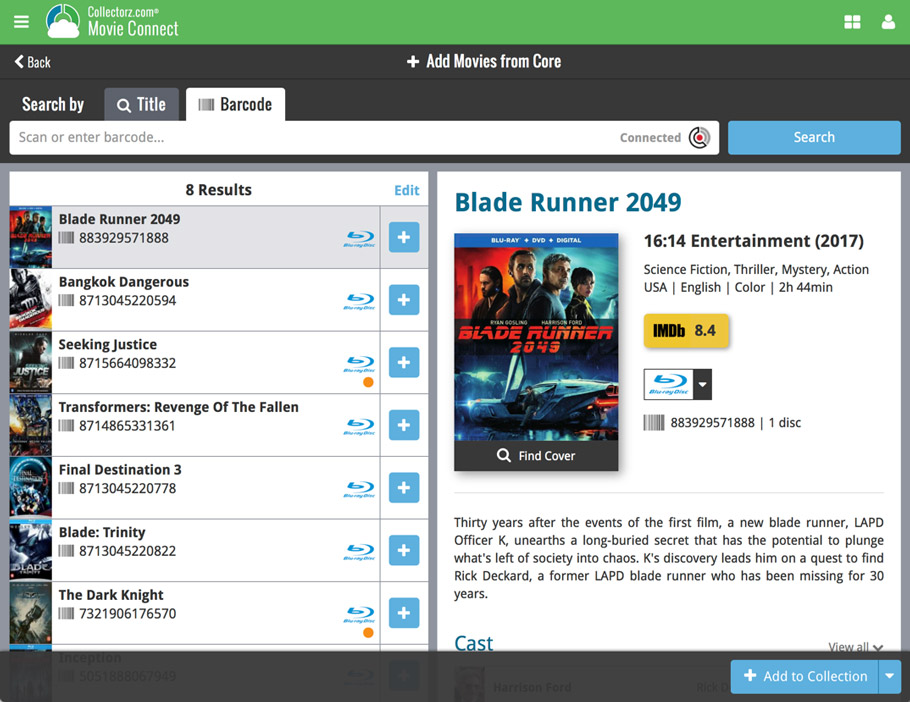
Scanned barcodes will be automatically added to your queue, with the movie information populating instantly. Use the big blue Add to Collection button at the bottom right to add the selected movie to your database, OR use the little blue “+” buttons to add straight from the queue.
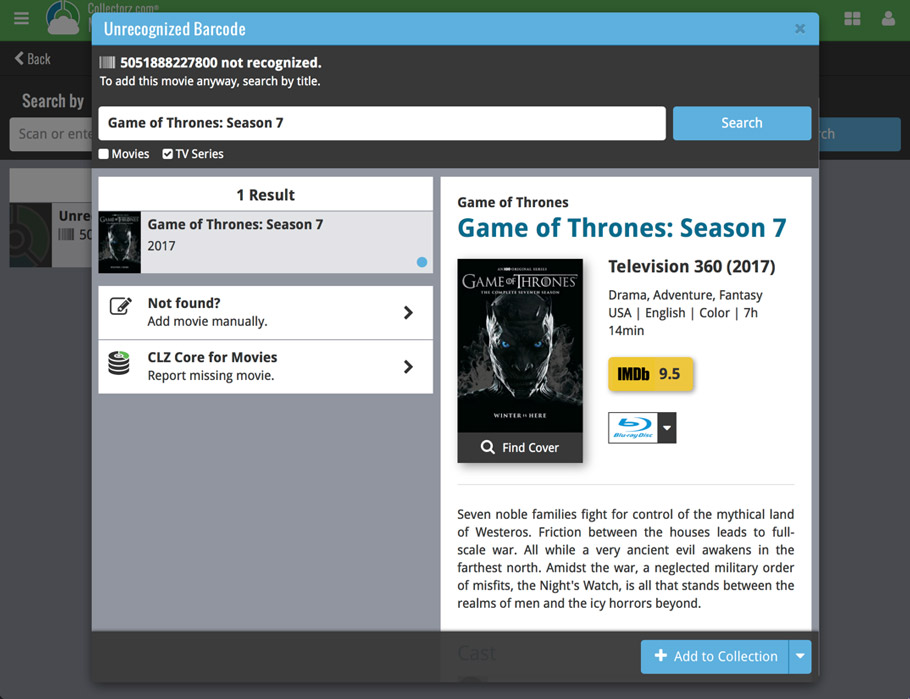
Barcode not found? Use the new Unrecognized Barcode screen to find the movie by title. This will not only let you add the movie anyway, but also helps our Core by adding the barcode to that selected movie.
Fixed
- Pick Item Screens: when using the quick search the list wasn’t always sorted correctly
- Manage Pick List:
- When using the quick search the list wasn’t always sorted correctly
- “auto resort” check box didn’t work
- Reassign Index fields sort fields were stored as “reassignindex” as sort fields preset
- Manage Presets: removing all presets would cause an Access Violation after closing the screen
- Edit Game: navigating Links using ALT+N or ALT+P would navigate the games instead
Fixed
- Pick Item Screens: when using the quick search the list wasn’t always sorted correctly
- Manage Pick List:
- When using the quick search the list wasn’t always sorted correctly
- “auto resort” check box didn’t work
- Reassign Index fields sort fields were stored as “reassignindex” as sort fields preset
- Manage Presets: removing all presets would cause an Access Violation after closing the screen
- Edit Comic: navigating Content or Links using ALT+N or ALT+P would navigate the comics instead
Fixed
- Pick Item Screens: when using the quick search the list wasn’t always sorted correctly
- Manage Pick List:
- When using the quick search the list wasn’t always sorted correctly
- “auto resort” check box didn’t work
- Reassign Index fields sort fields were stored as “reassignindex” as sort fields preset
- Manage Presets: removing all presets would cause an Access Violation after closing the screen
- Edit Album: navigating Tracks or Links using ALT+N or ALT+P would navigate the albums instead
Fixed
- Pick Item Screens: when using the quick search the list wasn’t always sorted correctly
- Manage Pick List:
- When using the quick search the list wasn’t always sorted correctly
- “auto resort” check box didn’t work
- Reassign Index fields sort fields were stored as “reassignindex” as sort fields preset
- Manage Presets: removing all presets would cause an Access Violation after closing the screen
- Edit Book: navigating Contents or Links using ALT+N or ALT+P would navigate the books instead
Fixed
- Pick Item Screens: when using the quick search the list wasn’t always sorted correctly
- Manage Pick List:
- When using the quick search the list wasn’t always sorted correctly
- “auto resort” check box didn’t work
- Reassign Index fields sort fields were stored as “reassignindex” as sort fields preset
- Manage Presets: removing all presets would cause an Access Violation after closing the screen
- Edit Movie: navigating Episodes or Links using ALT+N or ALT+P would navigate the movies instead
Fixed:
- Edit Screen:
- Some fields were overlapping when resizing the screen
- Orchestra grid was too small after opening the screen in a wider size than normal
- Making the screen larger and then smaller again would show a scrollbar on the “user defined” tab when it wasn’t needed
- ALT+N/ALT+P for Next/Previous played a Windows sound
- Adding a new item to a list sometimes displayed a popup that was too small
- Reassign Index Fields: Saving your selected fields wasn’t possible sometimes
- Export/Print field selection menus were missing “Manage Presets…” caption
Fixes for the Clean Templates:
- Country flags weren’t displayed
- We swapped musicians and instruments (musician names now display on the left, instruments on the right)
- Images for musicians weren’t displayed correctly
- Layout of discs wasn’t always correct for multi-disc albums
- Tracks that were placed after (but not inside) a header messed up the layout of the tracklist
- Several other improvements to the layout
New:
- Pick Item Screens: adding a new item will now use the quick search string to pre-fill the name field
Fixed:
- Edit Screen: ALT+N/ALT+P for Next/Previous played a Windows sound
- Edit Screen: Adding a new item to a list sometimes displayed a popup that was too small
- Reassign Index Fields: Saving your selected fields wasn’t possible sometimes
- Export/Print field selection menus were missing “Manage Presets…” caption
- Clean Templates: Several layout improvements
New:
- Edit Book: Genres and Subjects can now be added and edited in a pick item grid
- Pick Item Screens: adding a new item will now use the quick search string to pre-fill the name field
Fixed:
- Edit Screen: ALT+N/ALT+P for Next/Previous played a Windows sound
- Edit Screen: Adding a new item to a list sometimes displayed a popup that was too small
- Reassign Index Fields: Saving your selected fields wasn’t possible sometimes
- Export/Print field selection menus were missing “Manage Presets…” caption
- Clean Templates:
- “Genre” and “Subject” fields didn’t follow the field labels
- The “Volume” field wasn’t always displayed correctly
- Some improvements to the layout
v18.0.6: Updated the Studios field in the Edit Screen and more
New:
- Edit Movie: Studios can now be added and edited in a pick item grid
- Pick Item Screens: adding a new item will now use the quick search string to pre-fill the name field
Fixed:
- Edit Screen: ALT+N/ALT+P for Next/Previous played a Windows sound
- Edit Screen: Adding a new item to a list sometimes displayed a popup that was too small
- Reassign Index Fields: Saving your selected fields wasn’t possible sometimes
- Clean Templates:
- “Genre” and “Subject” fields didn’t follow the field labels
- Some improvements to the layout
v18: Auto-Cloud-Syncing, revamped Edit screen, new “Clean” template and more!

NEW: Fully Automatic CLZ Cloud Syncing!
The free CLZ Cloud service is at the center of all our cataloging solutions (desktop, mobile and web), the glue that binds them all together.
Tens of thousands of users are using the CLZ Cloud syncing every day, to transfer data between their desktop, Connect and mobile software, to update their online collection list, or simply for keeping an online backup of their precious database.
Now, it is time to take the CLZ Cloud to the next level, with automatic syncing:
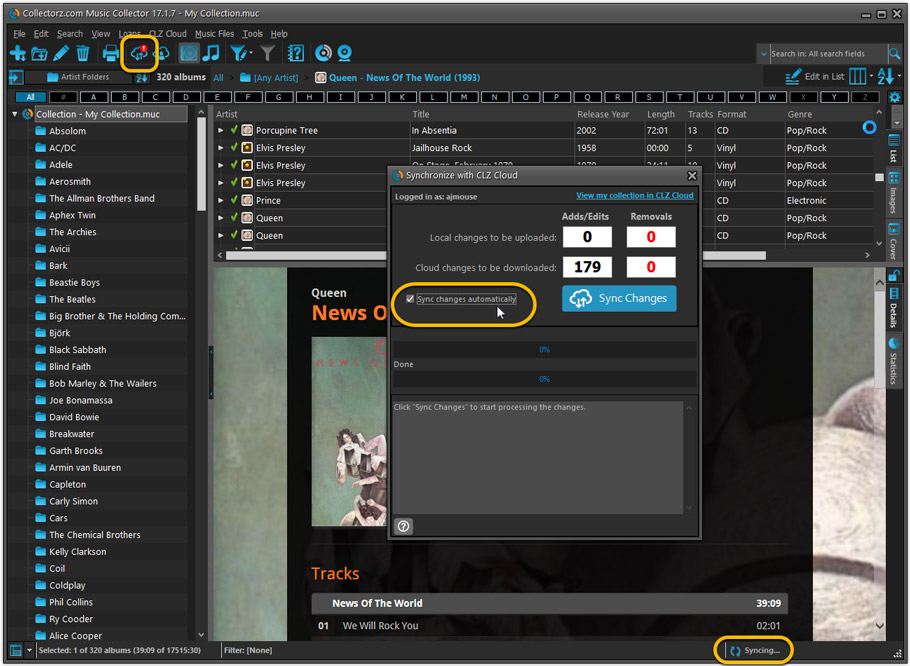
Add or edit albums in Music Collector and these changes will auto-upload to the CLZ Cloud instantly. Did you make changes using the CLZ Music mobile app or directly in Music Connect? Just start your software and changes will download automatically.
No more need to go to the Sync with CLZ Cloud screen, ever.
With “Sync Automatically” switched on…
- Your online cloud backup is always up-to-date.
- Your cloud viewer always shows the current state of your collection.
- All your CLZ tools (desktop, mobile and Connect) will always be in-sync.
Automatic Cloud Syncing is an optional feature, switched OFF by default. If you don’t want to auto-sync, or don’t want to sync with the CLZ Cloud at all, just leave it switched OFF.
Revamped Edit Album and Edit Disc/Track screens
A huge refresh of the Edit screens, bringing the look and feel more in line with the recent Add Albums from Core screen.
- Button bar is now at the bottom of the screen
With OK button high-lighted in blue, nice Next/Prev arrow buttons, etc… - Clearer blue “+” buttons for checkbox list fields (like Sound, Extras)
- Same blue + buttons for dropdown fields (like Format, Label, Packaging)
- Revamped Edit screen for pick list items
Button bar at the bottom with blue OK button, smaller generate buttons, etc..
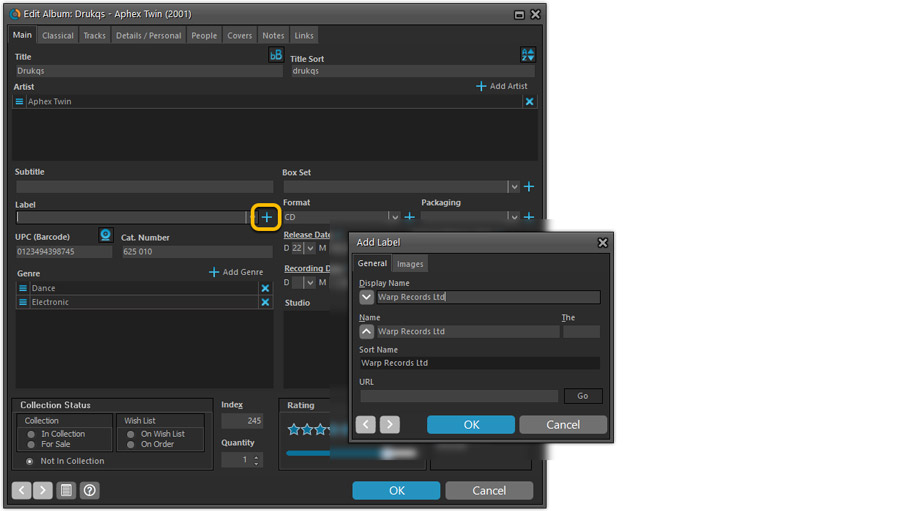
But it’s not all just cosmetic changes:
Improved interface for adding Artists, Musicians, Credits
The new interface helps you make better use of your existing person pick lists:
- Cleaner lists, showing just Display Name and Instrument/Role.
- Right-click to Modify the name and sort name of a person in the list.
- Drag the icon in the first column to change the order.
- Click the “x” in the last column to remove entries.
- 1. click the “+ Add Artist” button, or hit Insert on your keyboard
- 2. A new screen appears, showing your existing Person pick list.
- 4. Type a few letters in the search box to find the artist you want to add, e.g. enter “spri” to find Bruce Springsteen.
- 5. Hit the down arrow on your keyboard a few times to select the person from the search results
- 6. Hit Enter to return to the Edit Album screen with the artist added to the list.
ONLY when the artist is not in your pick list yet, there’s 3 extra steps:
- 4a: click the New Artist button top right
- 4b. enter/paste the display name
- 4c. click OK
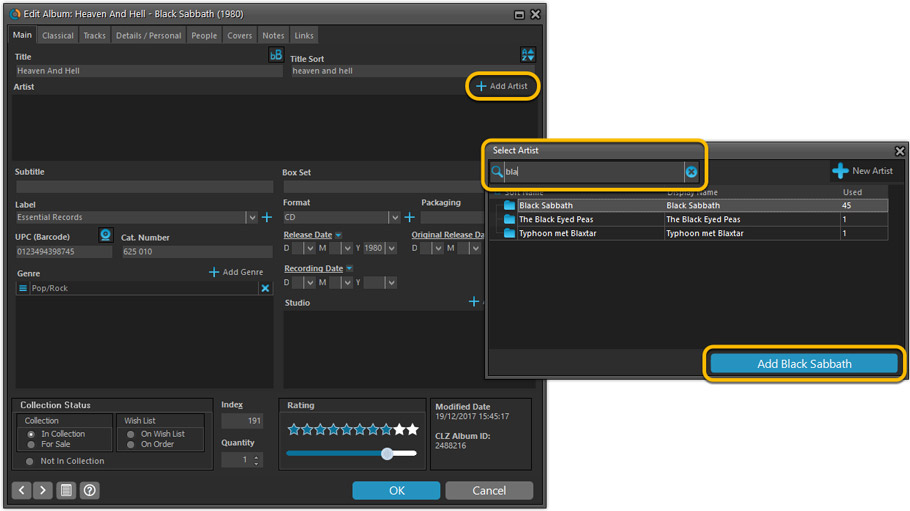
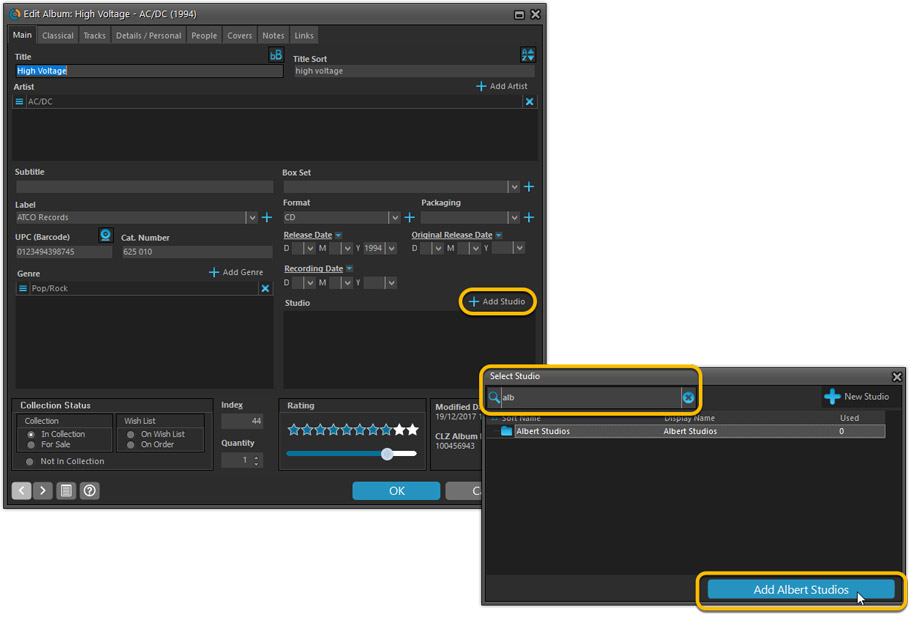
A similar interface is now also used for the Genre and Studio fields.
No more endless scrolling in a small check-box list to find the Genre or Studio you’d like to add. Instead, just click the Add button and making your pick from your pick list, using the convenient search feature if necessary.
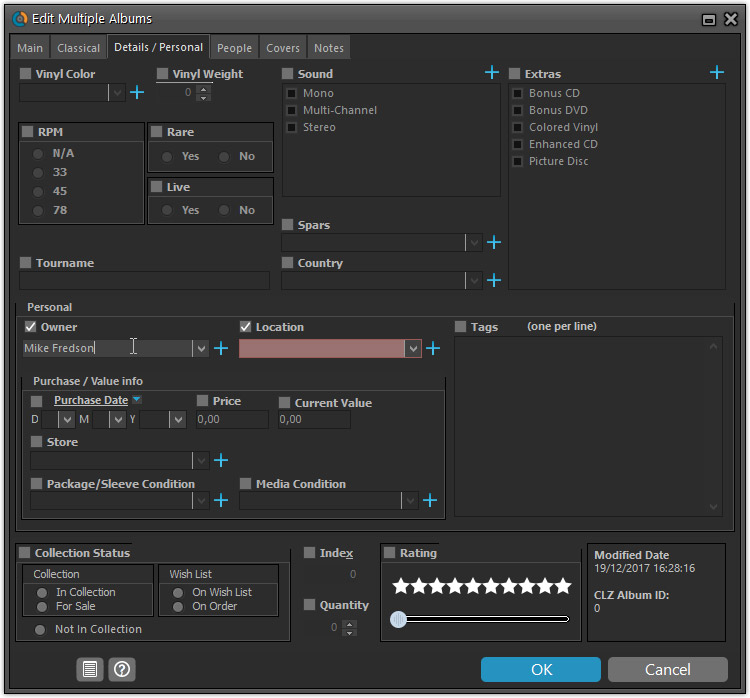
Improved: Edit Multiple screens
- Now use checkboxes to explicitly indicate which field(s) you want set.
Safer and clearer, no more unexpected changes. - To clear a field, just click the checkbox and leave the box empty.
The box will highlight in red to indicate the CLEAR action. No more hidden F8 keys.
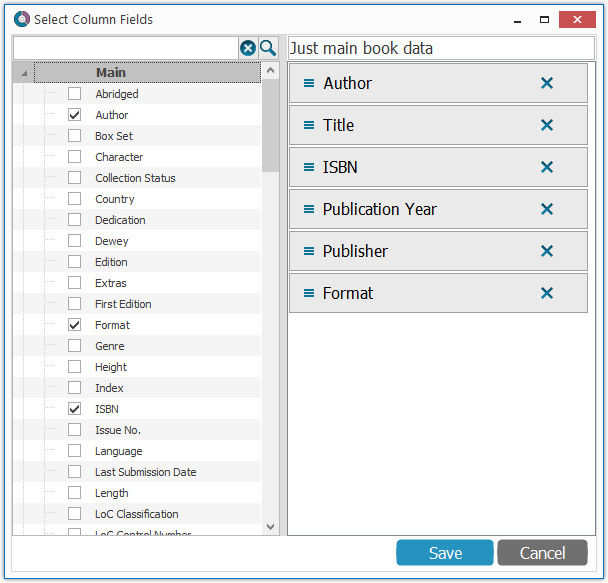
New screens for selecting Column, Sort and Folder fields.
The ability to select your own Columns for the List View is an important customization feature of our Music Collector software. The same holds for selecting the sort order and the folder fields for the folder panel.
However, the “field selection” screens for doing these customizations have always been an area of confusion. So for v18 we decided to re-imagine both the field selection screens and the system for creating/managing your own presets.
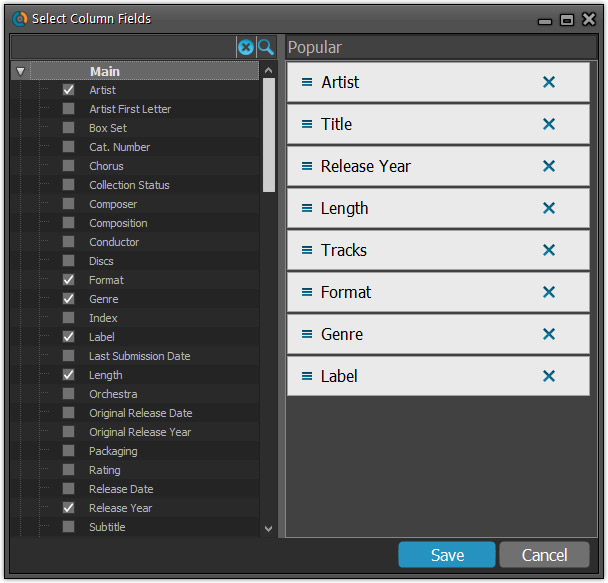
- New Field Selection screen:
- Available fields are now grouped, like the tabs in the Edit Album screen.
- Easily find the field you want with the search box top left.
- Use checkboxes on the left to select fields.
- Use the “x” button on the right to remove fields.
- Drag and drop fields on the right side to change the order.
- Rename the field set at the top right.
- New interface for selecting and managing your field presets:
- Just click the Columns or Sort Order button to EDIT the current preset.
- Click the little arrow to the right of the Columns or Sort Order button to open the preset menu and switch to a different preset.
- Choose Manage Presets from the preset menu to edit your presets and create new ones.
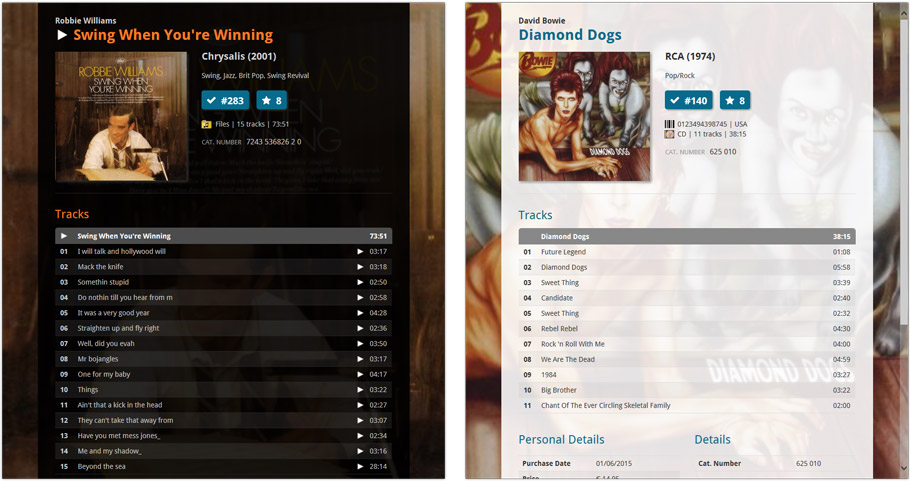
NEW: “Clean” template for the details panel, in Light and Dark styles
A complete refresh, based on the recent Connect/Cloud details page updates. Clean, clear and modern, with some fresh layout ideas:
- Cleaner look, in both Light and Dark styles.
- Larger cover image.
- New look of the track list.
No more Standard edition: Pro-only features now available for everyone!
Since last week, we stopped selling the Standard edition of Music Collector. From now on, the Pro edition is the only edition we sell, and will just be called “Music Collector” now.
Our gift to all users on the Standard edition who have a valid Update Plan:
Starting with v18, you now get access to all Pro-only features:
- Batch editing with the Edit Multiple feature:
Save time by editing multiple items in batch, e.g. to fill in a field value for many items in one go. - Customizable pre-sets for sorting, columns and folders:
Create your own pre-set field combination for sorting and columns. Define your own folder options, even multi-level folder combinations. - User Defined Fields:
Create your own fields (text, number, pick list, checkbox or date) and rename pre-defined fields. - Export features:
Export your database to a CSV or XML file.
New:
- Edit Comic: Add Credits/Characters: When searching for a credit/character and clicking “New Credit” (for example), the screen will now use the search words for the name of the new person you’re adding.
Fixed:
- Edit Comic: Add button for User Defined Field comboboxes were not positioned correctly when resizing the Edit Comic screen
- Main Screen: the bread crumb at the top didn’t reflect the “Collection Status” filter from the quick filter panel
- Add from Core: the program could freeze when experiencing connection problems
- Edit Series: “Generate” buttons were overlapping front of “Display Name” and “Name” fields
New:
- Edit Book: Add Author/Credits/Character: When searching for (example) an author and clicking “New Author”, the screen will now use the search words for the name of the new author you’re adding.
Fixed:
- Edit Book:
- Editing a book from the “Edit Book” screen would set the “Read Times” field to 1
- Cancel in Edit Content/Story screen would cause an Access Violation
- Add button for User Defined Fields comboboxes were not positioned correctly when resizing the Edit Book screen
- Edit Series: “Generate” buttons were overlapping the front of “Display Name” and “Name” fields
- Main Screen: the bread crumb at the top didn’t reflect the “Collection Status” filter from the quick filter panel
- Add from Core: the program could freeze when experiencing connection problems
New:
- Edit Movie: Add Cast/Crew: When searching for a cast/crew member and clicking “New Actor” (or crew), the screen will now use the search words for the name of the new cast/crew member you’re adding.
Fixed:
- Edit Movie: Add button for User Defined Fields comboboxes were not positioned correctly when resizing the Edit Movie screen
- Main Screen: the bread crumb at the top didn’t reflect the “Collection Status” filter from the quick filter panel
- Add from Core: the program could freeze when experiencing connection problems
v18: Auto-Cloud-Syncing, revamped Edit screen, new “Clean” template and more!

NEW: Fully Automatic CLZ Cloud Syncing!
The free CLZ Cloud service is at the center of all our cataloging solutions (desktop, mobile and web), the glue that binds them all together.
Tens of thousands of users are using the CLZ Cloud syncing every day, to transfer data between their desktop, Connect and mobile software, to update their online collection list, or simply for keeping an online backup of their precious database.
Now, it is time to take the CLZ Cloud to the next level, with automatic syncing:
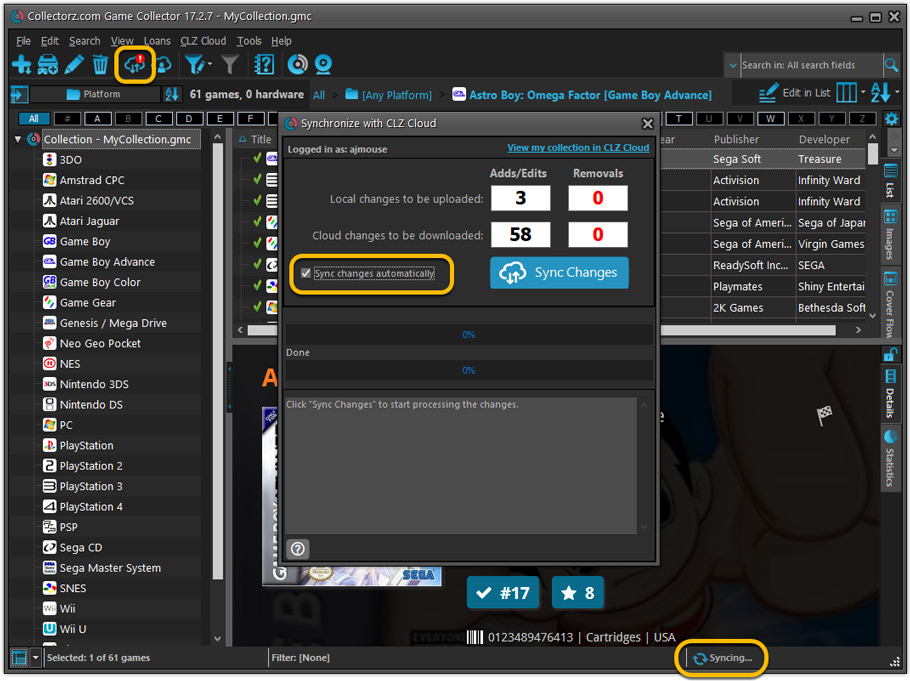
Add or edit games in Game Collector and these changes will auto-upload to the CLZ Cloud instantly. Did you make changes using CLZ Games or directly in Game Connect? Just start your software and changes will download automatically.
No more need to go to the Sync with CLZ Cloud screen, ever.
With “Sync Automatically” switched on…
- Your online cloud backup is always up-to-date.
- Your cloud viewer always shows the current state of your collection.
- All your CLZ tools (desktop, mobile and Connect) will always be in-sync.
Automatic Cloud Syncing is an optional feature, switched OFF by default. If you don’t want to auto-sync, or don’t want to sync with the CLZ Cloud at all, just leave it switched OFF.
Revamped Edit Game screen
A huge refresh of the Edit Game screen, bringing the look and feel more in line with the recent Add Games from Core screen.
- Button bar is now at the bottom of the screen
With OK button high-lighted in blue, nice Next/Prev arrow buttons, etc… - Clearer blue + buttons for checkbox list fields (like Genres)
- Same blue + buttons for dropdown fields (like Platform and Format)
- Revamped Edit screen for pick list items
Button bar at the bottom with blue OK button, smaller generate buttons, etc..
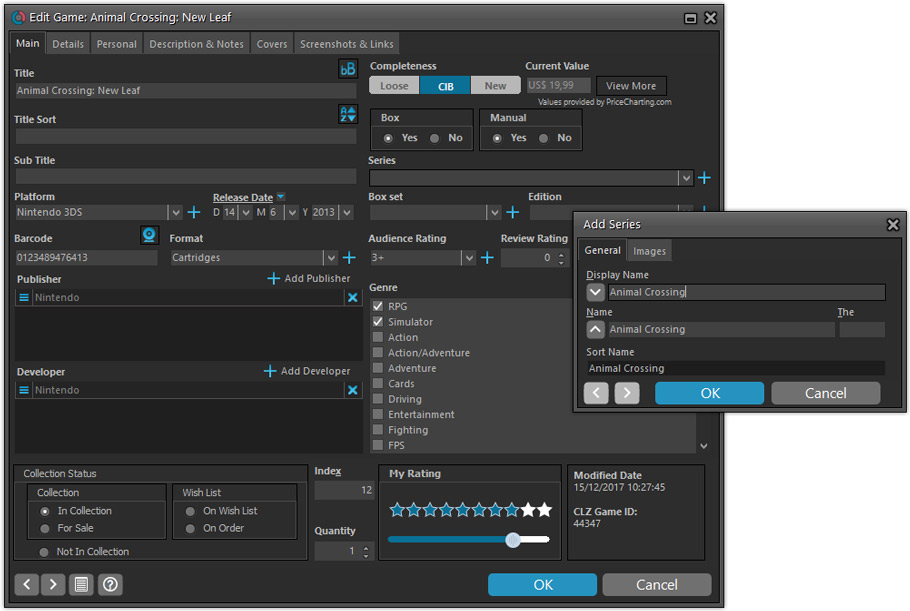
But it’s not all just cosmetic changes:
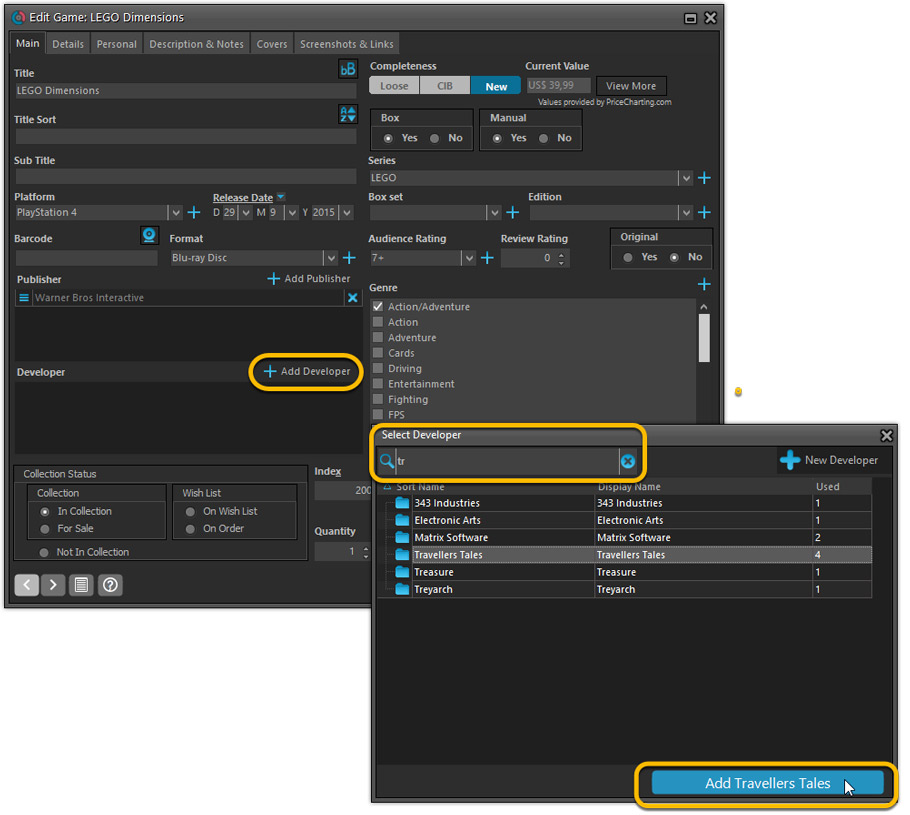
Improved interface for adding Publishers and Developers
The new interface helps you make better use of your existing publisher and developer pick lists:
- Drag the icon in the first column to change the order.
- Click the “x” in the last column to remove entries.
- Right-click to Modify the name and sort name of a company in the list.
- 1. click the “+ Add Developer” button, or hit Insert on your keyboard
- 2. A new screen appears, showing your existing creator pick list.
- 3. Type a few letters in the search box to find the creator you want to add, e.g. enter “id” to find id Software.
- 5. Hit the down arrow on your keyboard a few times to select the actor from the search results
- 6. Hit Enter to return to the Edit Game screen with the developer added to list.
ONLY when the developer is not in your pick list yet, there’s 3 extra steps:
- 4a: click the New Developer button top right
- 4b. enter/paste the display name
- 4c. click OK
Simplified: Edit Multiple Games screen
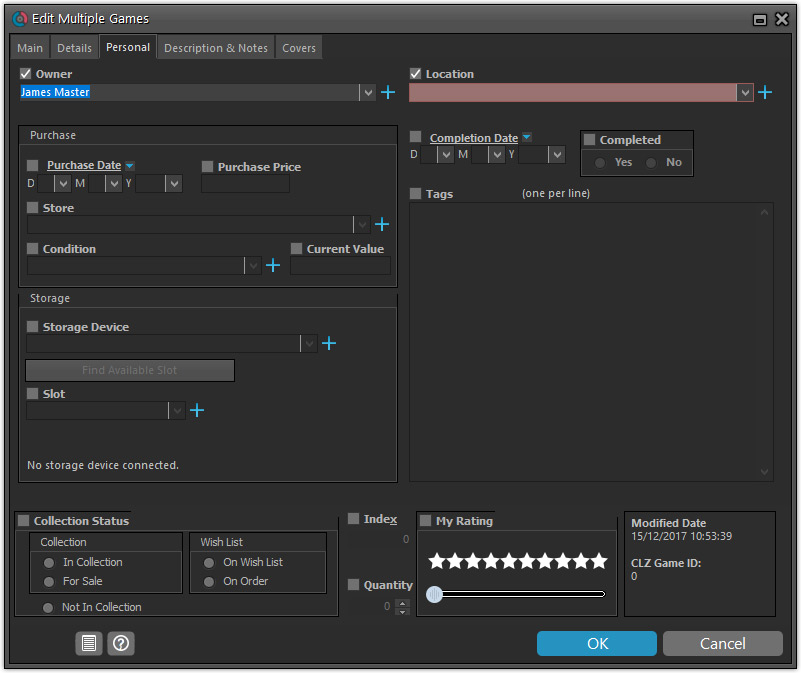
- Now use checkboxes to explicitly indicate which field(s) you want set.
Safer and clearer, no more unexpected changes. - To clear a field, just click the checkbox and leave the box empty.
The box will highlight in red to indicate the CLEAR action. No more hidden F8 keys.
Simplified screens for selecting Column, Sort and Folder fields.
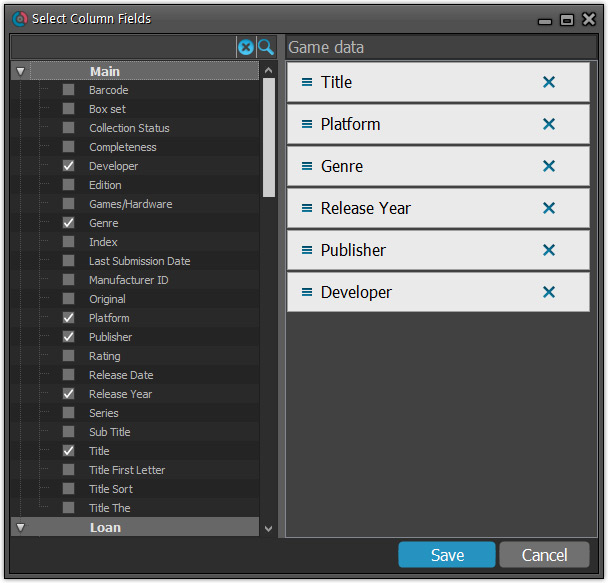
The ability to select your own Columns for the List View is an important customization feature of our Game Collector software. The same holds for selecting the sort order and the folder fields for the folder panel.
However, the “field selection” screens for doing these customizations have always been an area of confusion. So for v18 we decided to re-imagine both the field selection screens and the system for creating/managing your own presets.
- Simplified Field Selection screen:
- Available fields are now grouped, like the tabs in the Edit Game screen.
- Easily find the field you want with the search box top left.
- Use checkboxes on the left to select fields.
- Use the “x” button on the right to remove fields.
- Drag and drop fields on the right side to change the order.
- Rename the field set at the top right.
- Simplified system for managing your field presets:
- Just click the Columns or Sort Order button to EDIT the current preset.
- Click the little arrow to the right of the Columns or Sort Order button to open the preset menu and switch to a different preset.
- Choose Manage Presets from the preset menu to edit your presets and create new ones.
NEW: “Clean” template for the details panel, in Light and Dark styles
A complete refresh, based on the recent Connect/Cloud details page updates. Clean, clear and modern, with some fresh layout ideas:
- Cleaner look, in both Light and Dark styles.
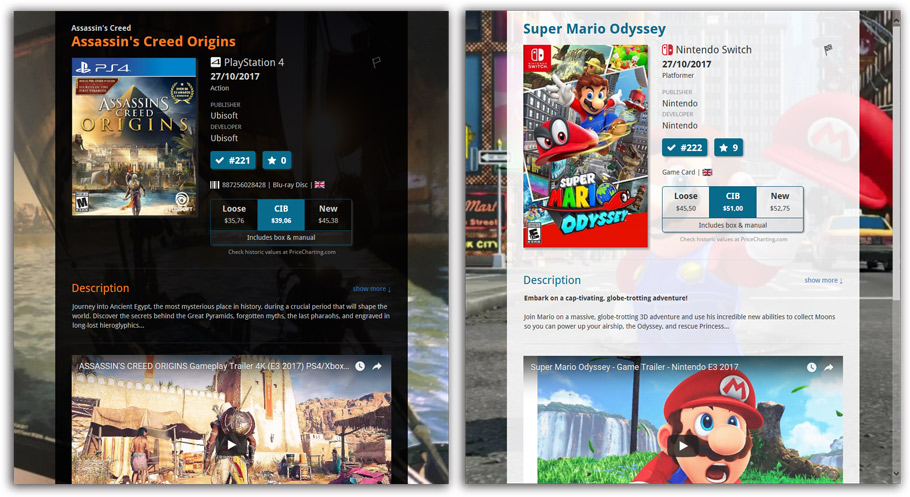
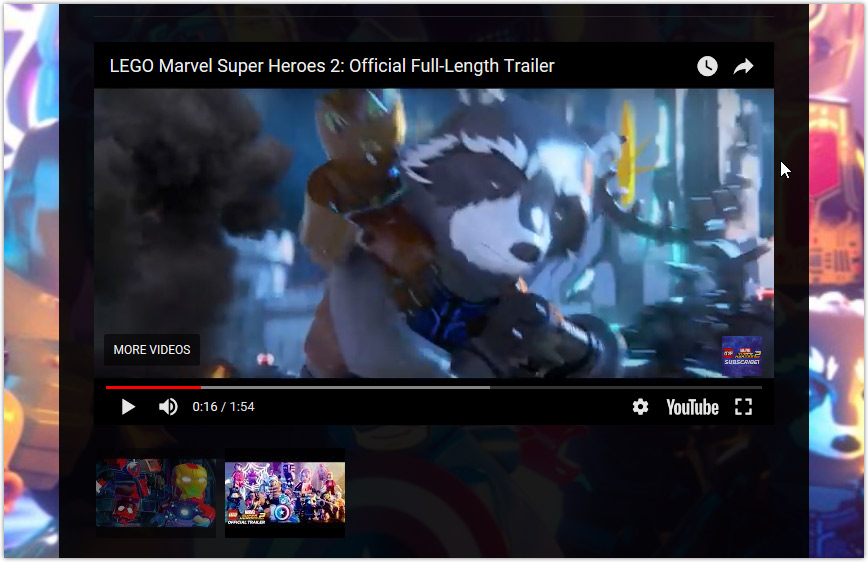
- Now shows just one embedded trailer video, with a trailer selection bar beneath to switch between multiple trailers.
No more Standard edition: Pro-only features now available for everyone!
Since last week, we stopped selling the Standard edition of Game Collector. From now on, the Pro edition is the only edition we sell, and will just be called “Game Collector” now.
Our gift to all users on the Standard edition who have a valid Update Plan:
Starting with v18, you now get access to all Pro-only features:
- Batch editing with the Edit Multiple feature:
Save time by editing multiple items in batch, e.g. to fill in a field value for many items in one go. - Customizable pre-sets for sorting, columns and folders:
Create your own pre-set field combination for sorting and columns. Define your own folder options, even multi-level folder combinations. - User Defined Fields:
Create your own fields (text, number, pick list, checkbox or date) and rename pre-defined fields. - Export features:
Export your database to a CSV or XML file.
v18: Auto-Cloud-Syncing, revamped Edit screen, new “Clean” template and more!

NEW: Fully Automatic CLZ Cloud Syncing!
The free CLZ Cloud service is at the center of all our cataloging solutions (desktop, mobile and web), the glue that binds them all together.
Tens of thousands of users are using the CLZ Cloud syncing every day, to transfer data between their desktop, Connect and mobile software, to update their online collection list, or simply for keeping an online backup of their precious database.
Now, it is time to take the CLZ Cloud to the next level, with automatic syncing:
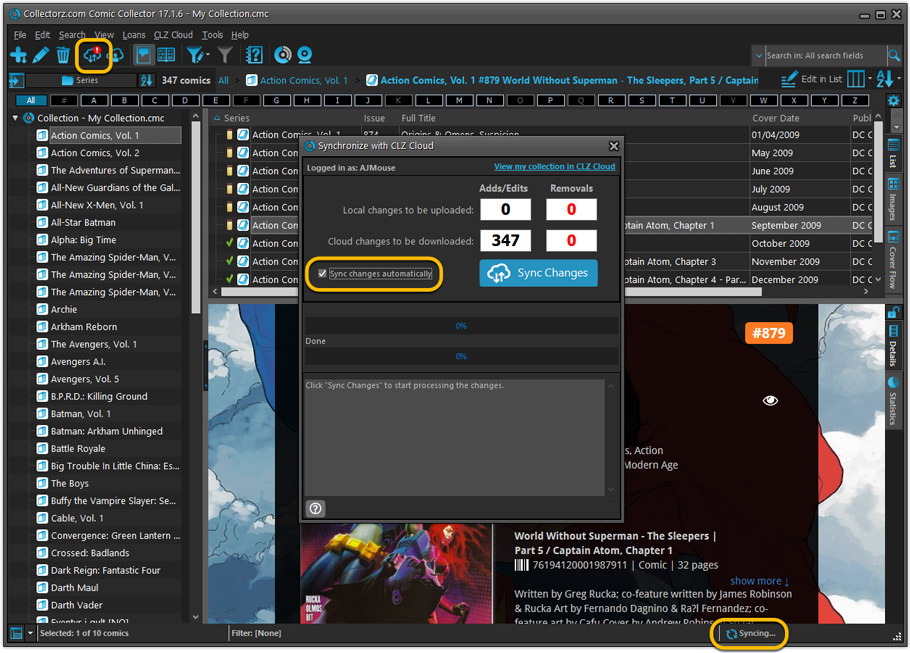
Add or edit comics in Comic Collector and these changes will auto-upload to the CLZ Cloud instantly. Did you make changes using CLZ Comics or directly in Comic Connect? Just start your software and changes will download automatically.
No more need to go to the Sync with CLZ Cloud screen, ever.
With “Sync Automatically” switched on…
- Your online cloud backup is always up-to-date.
- Your cloud viewer always shows the current state of your collection.
- All your CLZ tools (desktop, mobile and Connect) will always be in-sync.
Automatic Cloud Syncing is an optional feature, switched OFF by default. If you don’t want to auto-sync, or don’t want to sync with the CLZ Cloud at all, just leave it switched OFF.
Revamped Edit Comic screen
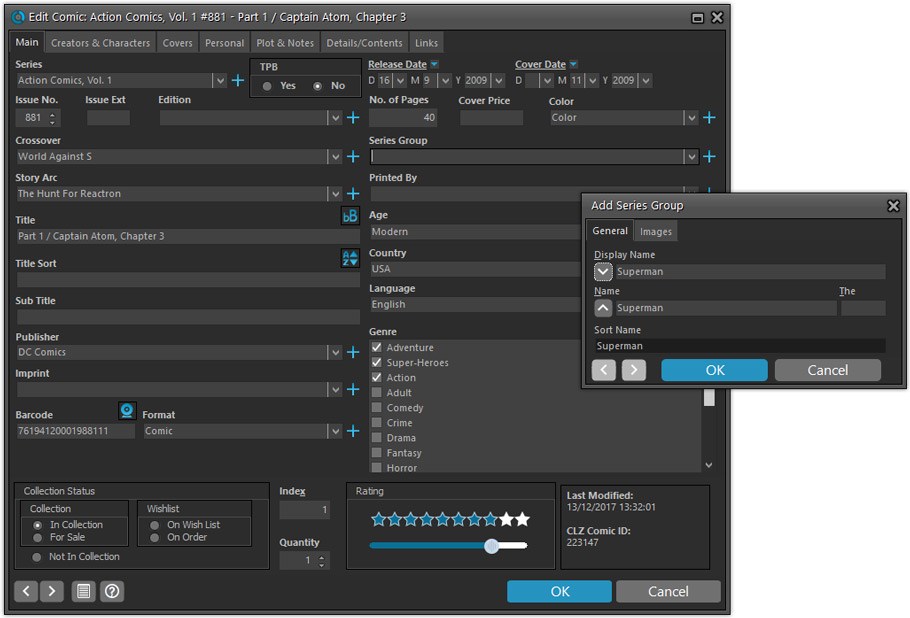
A huge refresh of the Edit Comic screen, bringing the look and feel more in line with the recent Add Comics from Core screen.
- Button bar is now at the bottom of the screen
With OK button high-lighted in blue, nice Next/Prev arrow buttons, etc… - Clearer blue + buttons for checkbox list fields (like Genres)
- Same blue + buttons for dropdown fields (like Series, Publisher, Imprint)
- Revamped Edit screen for pick list items
Button bar at the bottom with blue OK button, smaller generate buttons, etc..
But it’s not all just cosmetic changes:
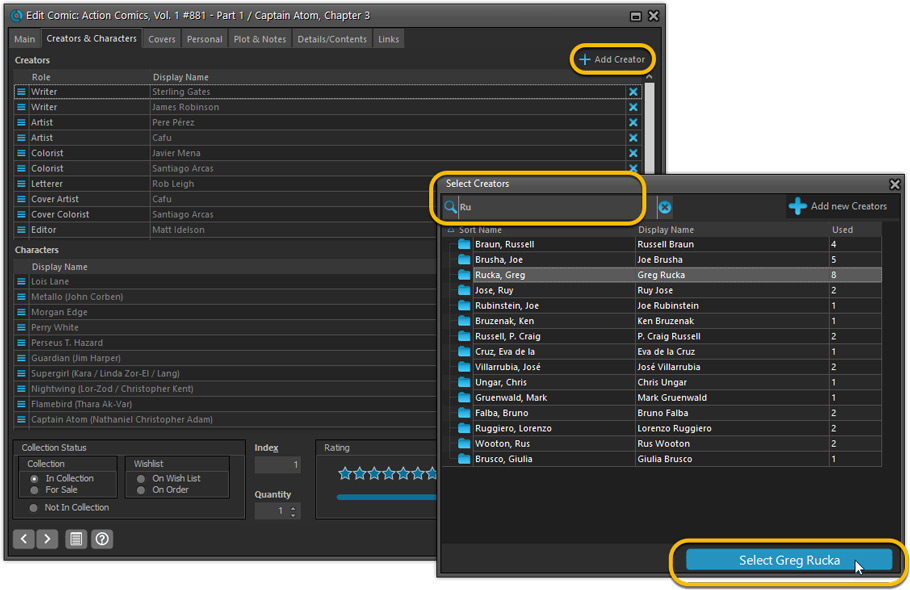
Improved interface for adding Creators and Characters
The new interface helps you make better use of your existing creator and character pick lists:
- Cleaner lists, showing just Display Name and Role/Alias.
- Right-click to Modify the name and sort name of a person in the list.
- Drag the icon in the first column to change the order.
- Click the “x” in the last column to remove entries.
- 1. click the “+ Add Creator” button, or hit Insert on your keyboard
- 2. Select the creator type (Writer, Penciler, Inker, etc…)
- 3. A new screen appears, showing your existing creator pick list.
- 4. Type a few letters in the search box to find the creator you want to add, e.g. enter “stra” to find J. Michael Straczynski.
- 5. Hit the down arrow on your keyboard a few times to select the creator from the search results
- 6. Hit Enter to return to the Edit Comic screen with the creator added to the list.
ONLY when the creator is not in your pick list yet, there’s 3 extra steps:
- 4a: click the New Creator button top right
- 4b. enter/paste the display name
- 4c. click OK
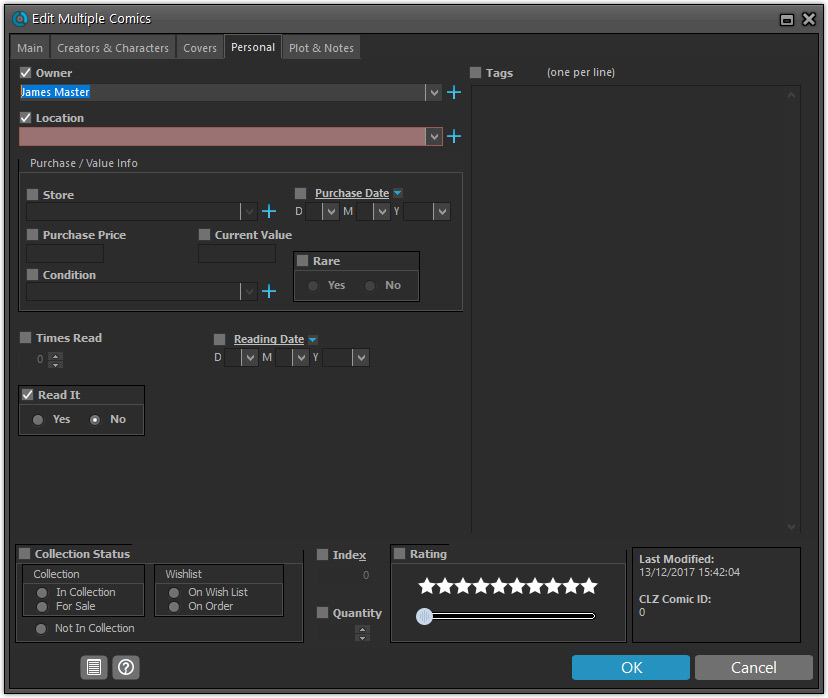
Simplified: Edit Multiple Comics screen
- Now use checkboxes to explicitly indicate which field(s) you want set.
Safer and clearer, no more unexpected changes. - To clear a field, just click the checkbox and leave the box empty.
The box will highlight in red to indicate the CLEAR action. No more hidden F8 keys.
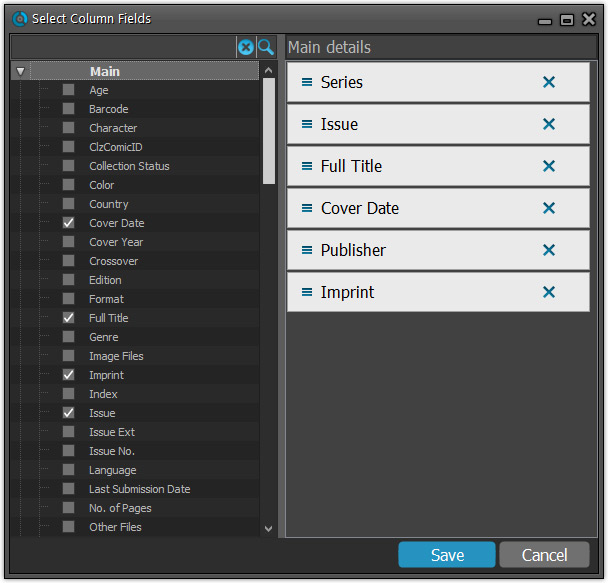
Simplified screens for selecting Column, Sort and Folder fields.
The ability to select your own Columns for the List View is an important customization feature of our Comic Collector software. The same holds for selecting the sort order and the folder fields for the folder panel.
However, the “field selection” screens for doing these customizations have always been an area of confusion. So for v18 we decided to re-imagine both the field selection screens and the system for creating/managing your own presets.
- Simplified Field Selection screen:
- Available fields are now grouped, like the tabs in the Edit Comic screen.
- Easily find the field you want with the search box top left.
- Use checkboxes on the left to select fields.
- Use the “x” button on the right to remove fields.
- Drag and drop fields on the right side to change the order.
- Rename the field set at the top right.
- Simplified system for managing your field presets:
- Just click the Columns or Sort Order button to EDIT the current preset.
- Click the little arrow to the right of the Columns or Sort Order button to open the preset menu and switch to a different preset.
- Choose Manage Presets from the preset menu to edit your presets and create new ones.
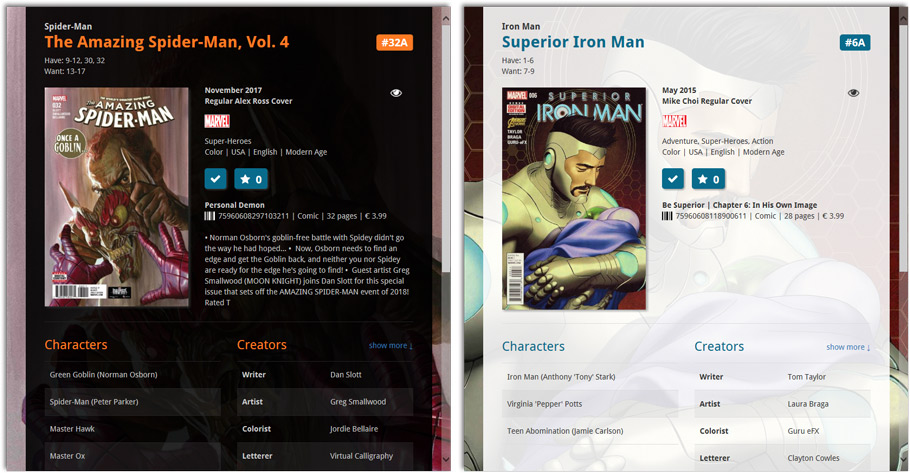
NEW: “Clean” template for the details panel, in Light and Dark styles
A complete refresh, based on the recent Connect/Cloud details page updates. Clean, clear and modern, with some fresh layout ideas:
- Cleaner look, in both Light and Dark styles.
- Clear display of Series, Issue Number, Date and Edition.
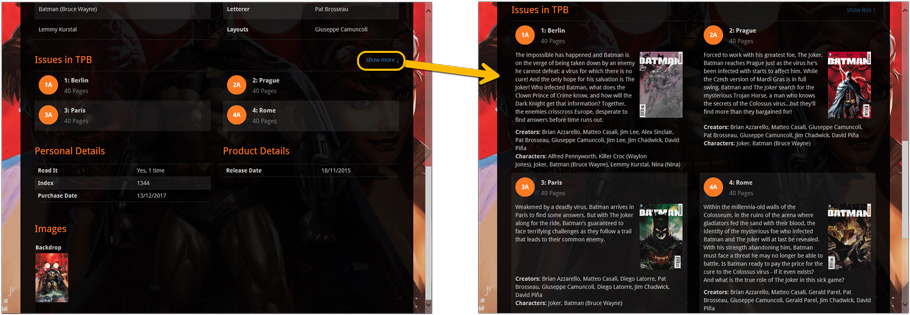
- Nicer display of contents of Trade Paper Backs:
No more Standard edition: Pro-only features now available for everyone!
Since last week, we stopped selling the Standard edition of Comic Collector. From now on, the Pro edition is the only edition we sell, and will just be called “Comic Collector” now.
Our gift to all users on the Standard edition who have a valid Update Plan:
Starting with v18, you now get access to all Pro-only features:
- Batch editing with the Edit Multiple feature:
Save time by editing multiple items in batch, e.g. to fill in a field value for many items in one go. - Customizable pre-sets for sorting, columns and folders:
Create your own pre-set field combination for sorting and columns. Define your own folder options, even multi-level folder combinations. - User Defined Fields:
Create your own fields (text, number, pick list, checkbox or date) and rename pre-defined fields. - Export features:
Export your database to a CSV or XML file.
This one slipped through. Quick fix available now:
Fixed:
- Edit Episode: error “class TAdvSmoothButton not found” when opening “Edit Episode” screen
Fixed:
- Edit Book: plot field was too small.
- Edit/Add Story:
- You couldn’t directly start typing in the Title field when adding a new content entry.
- Pressing “Enter” clicked “OK” which was wrong. It now presses the “Next” button like it should.
New: Manage Presets screens
Simplified system for managing your field presets:
- Just click the Columns or Sort Order button to EDIT the current preset.
- Click the little arrow to the right of the Columns or Sort Order button to open the preset menu and switch to a different preset.
- Choose Manage Presets from the preset menu to edit your presets and create new ones.
Fixed:
- Clean Templates:
- After using Quick Search, the search words weren’t highlighted in the template.
- Personal and Product Details can now scroll horizontally if the data is long to be displayed.
- After syncing with CLZ Cloud while using “Edit in List” mode, the CLZ Cloud Sync button icon wasn’t updated correctly.
- User Defined Fields check box labels were not displaying correctly in System skin.
- User Defined Fields screen: “checkbox” type fields showed a weird caption when no field name was filled in.
v18: Auto-Cloud-Syncing, revamped Edit screen, new “Clean” template and more!

NEW: Fully Automatic CLZ Cloud Syncing!
The free CLZ Cloud service is at the center of all our cataloging solutions (desktop, mobile and web), the glue that binds them all together.
Tens of thousands of users are using the CLZ Cloud syncing every day, to transfer data between their desktop, Connect and mobile software, to update their online collection list, or simply for keeping an online backup of their precious database.
Now, it is time to take the CLZ Cloud to the next level, with automatic syncing:
Add or edit books in Book Collector and these changes will auto-upload to the CLZ Cloud instantly. Did you make changes using CLZ Books or directly in Book Connect? Just start your software and changes will download automatically.
No more need to go to the Sync with CLZ Cloud screen, ever.
With “Sync Automatically” switched on…
- Your online cloud backup is always up-to-date.
- Your cloud viewer always shows the current state of your collection.
- All your CLZ tools (desktop, mobile and Connect) will always be in-sync.
Automatic Cloud Syncing is an optional feature, switched OFF by default. If you don’t want to auto-sync, or don’t want to sync with the CLZ Cloud at all, just leave it switched OFF.
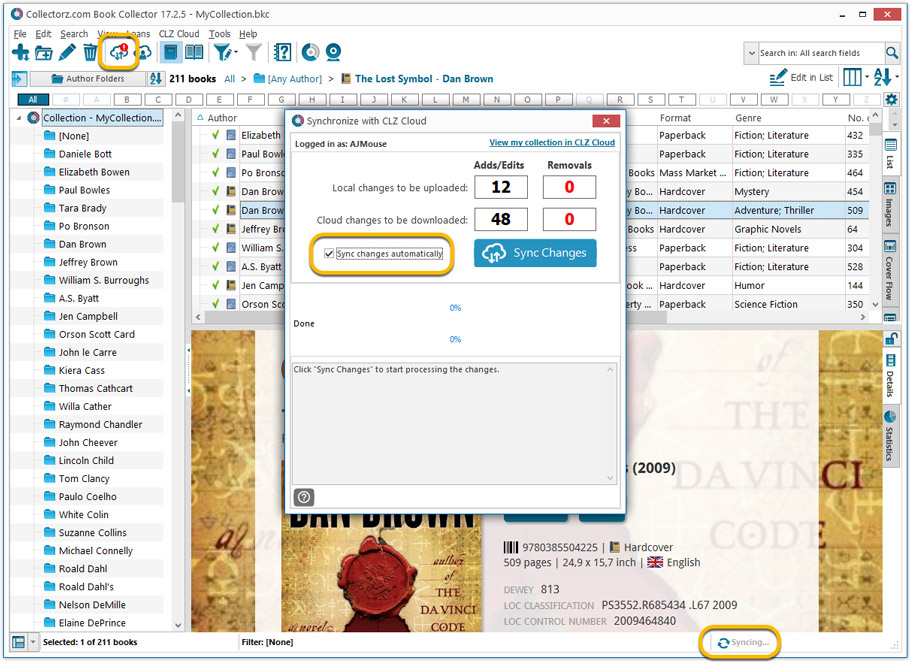
Revamped Edit Book screen
A huge refresh of the Edit Book screen, bringing the look and feel more in line with the recent Add Books from Core screen. But it’s not all just cosmetic changes, here’s what’s new:
- Button bar is now at the bottom of the screen
With OK button high-lighted in blue, nice Next/Prev arrow buttons, etc… - Re-designed user interface for adding and editing Authors
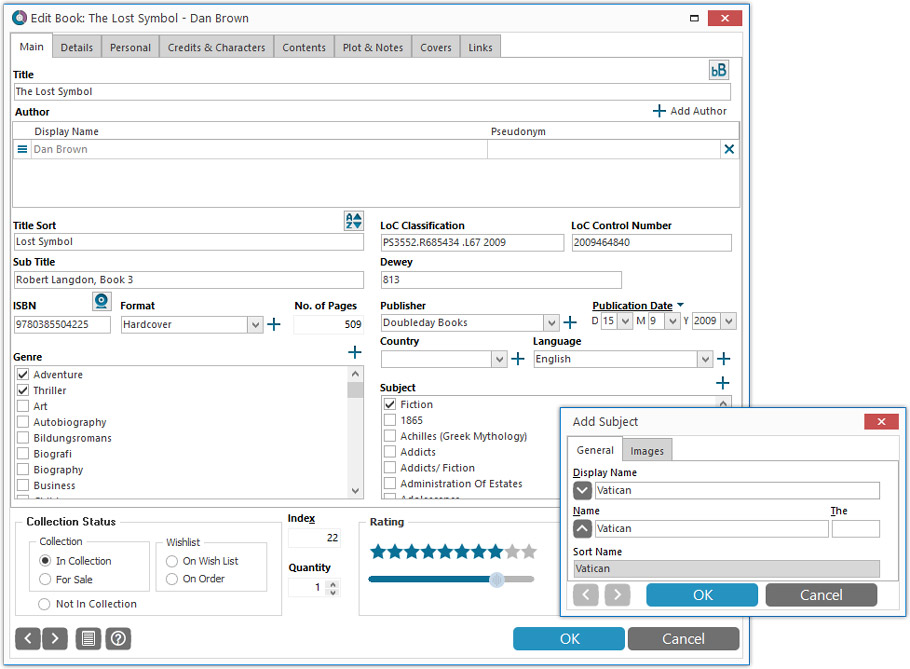
- The Author list in the Edit Book screen is now a cleaner list, showing just Display Name and Pseudonym.
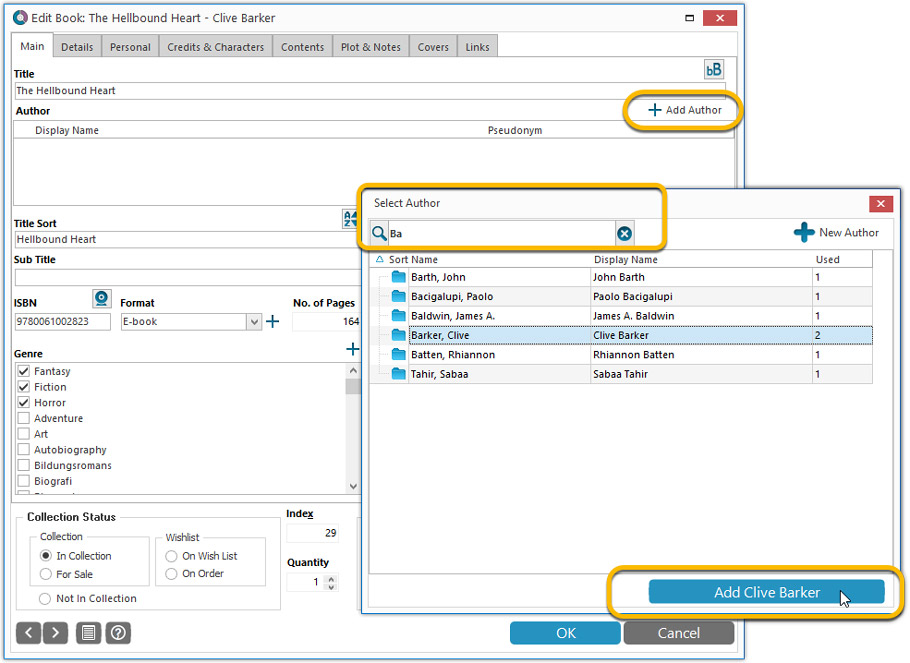
- To add an Author, click the Add button top right. The new Select Author screen appears, showing your current Author pick list. Use the search box to find the author you’d like to add, typing just a few letters will make it appear. Select it, then click the big blue Add Author button at the bottom right. If your author is not in the pick list yet, use the New Author button to create it.
- Right-click to Modify the name and sort name of an author in the list.
- Drag the icon in the first column to change the order.
- Click the “x” in the last column to remove entries.
- Clearer blue + buttons for checkbox list fields (like Genres and Subjects)
- Same blue + buttons for dropdown fields (like Publisher, Country and Language)
- Revamped Edit screen for pick list items
Button bar at the bottom with blue OK button, smaller generate buttons, etc..
Simplified: Edit Multiple Books screen
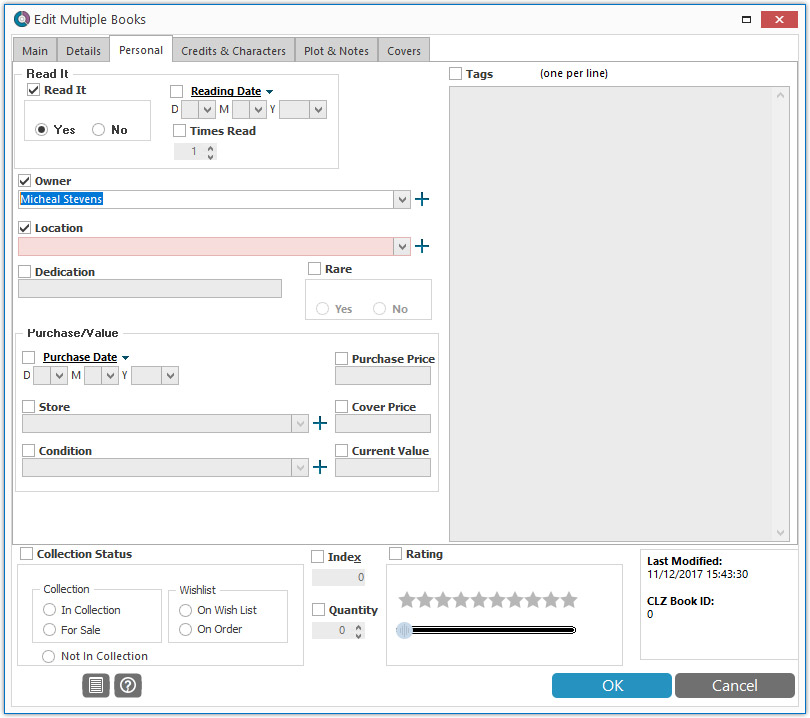
- Now use checkboxes to explicitly indicate which field(s) you want set.
Safer and clearer, no more unexpected changes. - To clear a field, just click the checkbox and leave the box empty.
The box will highlight in red to indicate the CLEAR action. No more hidden F8 keys.
Simplified screens for selecting Column, Sort and Folder fields.
The ability to select your own Columns for the List View is an important customization feature of our Book Collector software. The same holds for selecting the sort order and the folder fields for the folder panel.
However, the “field selection” screens for doing these customizations have always been an area of confusion. So for v18 we decided to re-imagine both the field selection screens and the system for creating/managing your own presets.
- Simplified Field Selection screen:
- Available fields are now grouped, like the tabs in the Edit Book screen.
- Easily find the field you want with the search box top left.
- Use checkboxes on the left to select fields.
- Use the “x” button on the right to remove fields.
- Drag and drop fields on the right side to change the order.
- Rename the field set at the top right.
- Simplified system for managing your field presets:
- Just click the Columns or Sort Order button to EDIT the current preset.
- Click the little arrow to the right of the Columns or Sort Order button to open the preset menu and switch to a different preset.
- Choose Manage Presets from the preset menu to edit your presets and create new ones.
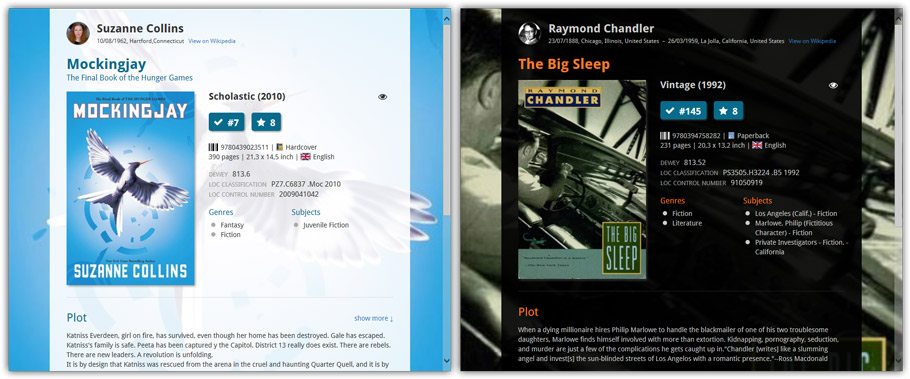
NEW: “Clean” template for the details panel, in Light and Dark styles
A complete refresh, based on the recent Connect/Cloud details page updates. Clean, clear and modern, with some fresh layout ideas:
- Cleaner look, in both Light and Dark styles.
- Re-designed and more compact Author panel at the top.
- Clearer display of Genres and Subjects.
- Now uses the book cover image as a subtle background image. Or opt for the “Plain” style for a “quieter” background.
No more Standard edition: Pro-only features now available for everyone!
Since last week, we stopped selling the Standard edition of Book Collector. From now on, the Pro edition is the only edition we sell, and will just be called “Book Collector” now.
Our gift to all users on the Standard edition who have a valid Update Plan:
Starting with v18, you now get access to all Pro-only features:
- Batch editing with the Edit Multiple feature:
Save time by editing multiple items in batch, e.g. to fill in a field value for many items in one go. - Customizable pre-sets for sorting, columns and folders:
Create your own pre-set field combination for sorting and columns. Define your own folder options, even multi-level folder combinations. - User Defined Fields:
Create your own fields (text, number, pick list, checkbox or date) and rename pre-defined fields. - Export features:
Export your database to a CSV or XML file.
A new v4.8 update for your app is available now, with:
Automatic CLZ Cloud syncing
Add or edit albums and your changes will auto-upload to the CLZ Cloud instantly.
Made changes on the desktop or Connect side? Just start the app and changes will download automatically.
Note: Auto-Syncing is switched OFF by default. Switch it ON in the “Sync with CLZ Cloud” screen.
Don’t have a CLZ Cloud account yet?
If you don’t have a CLZ Cloud account yet, We strongly recommend to signup up for one from the app. Using the CLZ Cloud is completely free!
The CLZ Cloud syncing will let you:
- Sync your data between devices, e.g. between your phone and your tablet. Or from your old phone to your new phone.
- View your database online using the free CLZ Cloud viewer website.
- Make an online backup of your data. Better safe than sorry!