What's new in CLZ Music? (page 8)
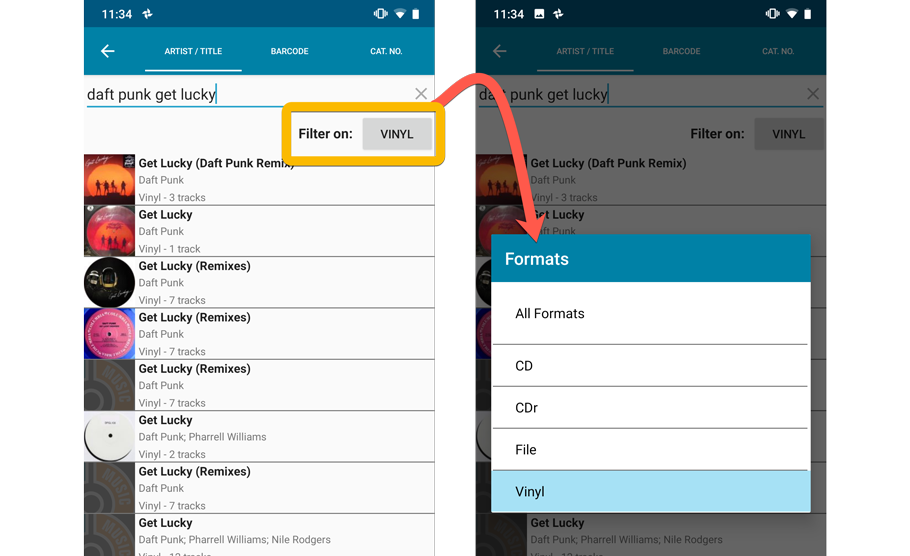
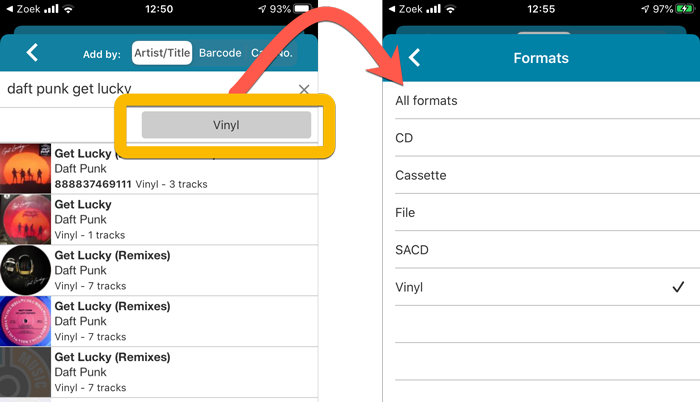
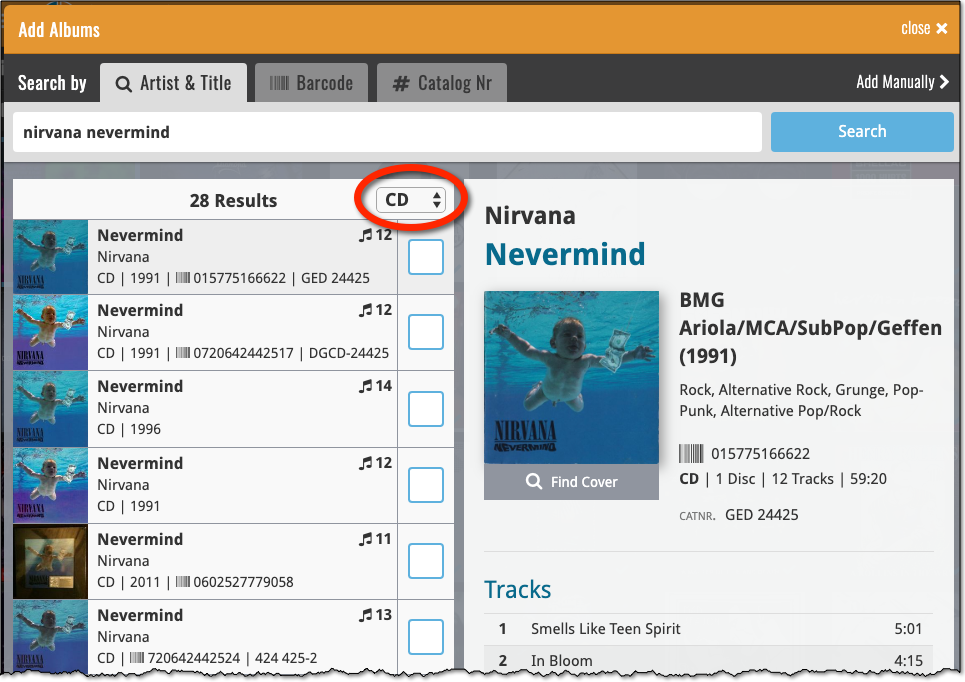
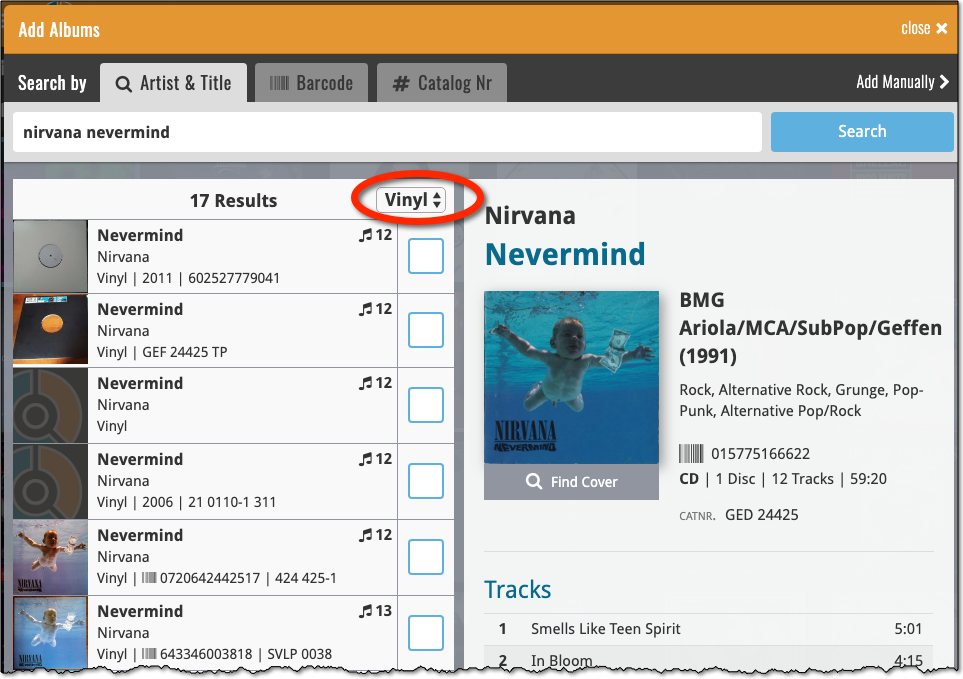
A small update for your CLZ Music app today: When adding albums by Artist/Title, you can now filter the search results to only show a specific format.
After searching for artist/title, tap the new “All Formats” button at the top right and switch it to “Vinyl” to see vinyl results only, or set to “CD” to list CDs only.
In this update we introduce a new quick-search for your folders, sorting your folders by the counters, and more stable cloud syncing through our brand-new dedicated Sync-server.
Quick-search your folders
Grouping in folders is a powerful way to browse and filter your collection. Just group by Artist, or Label, etc… tap a folder and the list will give you all albums for the selected Artist or Label.
However, if your collection spans thousands of albums, that “tap a folder” part is sometimes easier said than done. It may require lots of scrolling in the folder list.
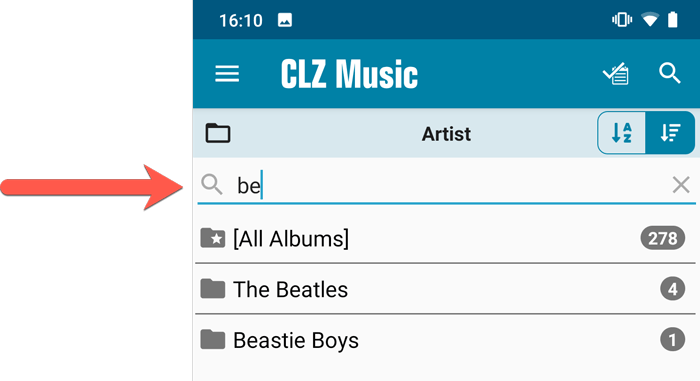
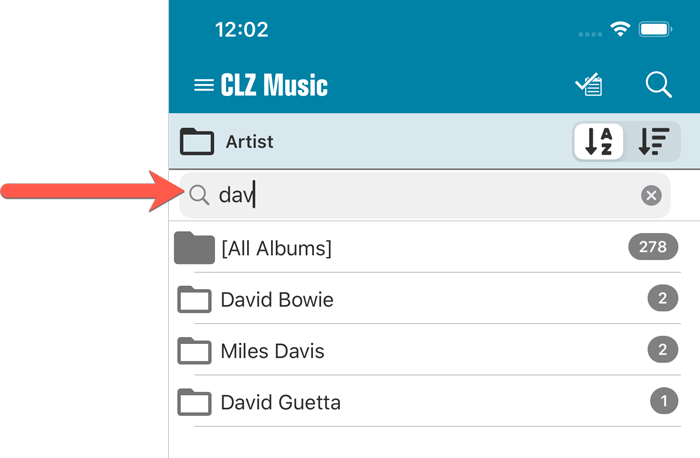
But not anymore! This version introduces a new search box right above the folder list, that lets you instantly search/filter the folder list as you type! Just typing a few letters is often enough to bring the folder you are looking for into view:
Sort folders by count
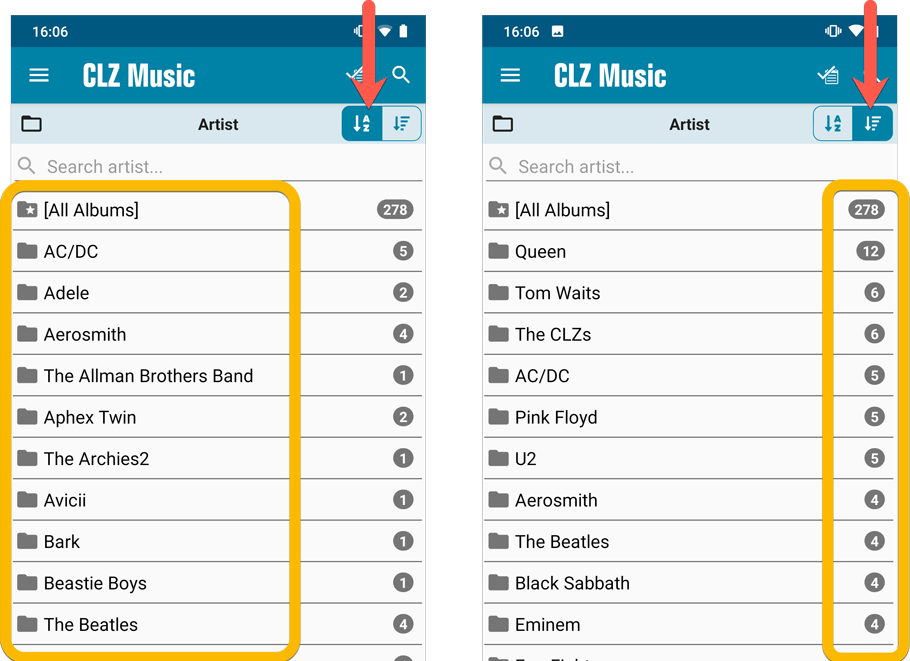
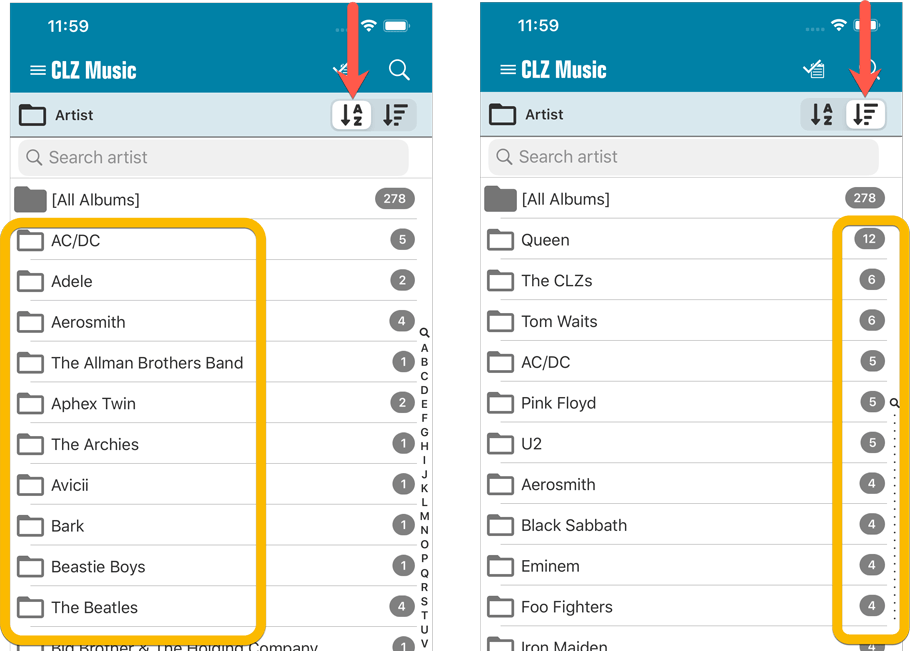
By default, the folders are sorted alphabetically. But as of today, there is another option: sort your folders by the counter, that is by the number of albums contained.
Sorting by the counters is a nice way to find the most popular Artists, Labels, Genres, etc..
Switch between the Alphabetical and By Count sorting using the sort toggle at the top:
Improved barcode scanning
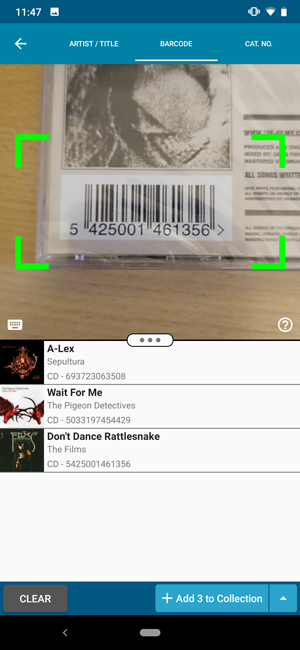
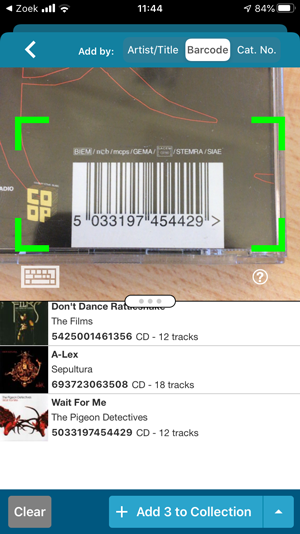
We have improved the scan engine and gave it a larger “scan area”. This should help scan barcodes faster and easier.
Now uses our brand-new CLZ Cloud Sync-server
Previously one big server was handling the Connect website, the CLZ Cloud website AND the CLZ Cloud syncing from the desktop programs and the mobile apps.
But this week we have set up a brand-new dedicated Sync-server to handle just the CLZ Cloud syncing.
In today’s update, CLZ Music has been updated to sync through this new server, which should result in faster syncing and a more stable syncing experience during high load times (weekends).
In this update we introduce a new quick-search for your folders, sorting your folders by the counters, and more stable cloud syncing through our brand-new dedicated Sync-server.
Quick-search your folders
Grouping in folders is a powerful way to browse and filter your collection. Just group by Artist, or Label, etc… tap a folder and the list will give you all albums for the selected Artist or Label.
However, if your collection spans thousands of albums, that “tap a folder” part is sometimes easier said than done. It may require lots of scrolling in the folder list.
But not anymore! This version introduces a new search box right above the folder list, that lets you instantly search/filter the folder list as you type! Just typing a few letters is often enough to bring the folder you are looking for into view:
Sort folders by count
By default, the folders are sorted alphabetically. But as of today, there is another option: sort your folders by the counter, that is by the number of albums contained.
Sorting by the counters is a nice way to find the most popular Artists, Labels, Genres, etc..
Switch between the Alphabetical and By Count sorting using the sort toggle at the top:
Filter search results on format
When searching by Artist/Title you can now filter the results to only show a specific format. After searching for artist/title, tap the new “All Formats” button to switch the results to “Vinyl” to see all vinyl results!
Improved barcode scanning
We have improved the scan engine and gave it a larger “scan area”. This should help scan barcodes faster and easier.
Now uses our brand-new CLZ Cloud Sync-server
Previously one big server was handling the Connect website, the CLZ Cloud website AND the CLZ Cloud syncing from the desktop programs and the mobile apps.
But this week we have set up a brand-new dedicated Sync-server to handle just the CLZ Cloud syncing.
In today’s update, CLZ Music has been updated to sync through this new server, which should result in faster syncing and a more stable syncing experience during high load times (weekends).
Fixed:
- Field Defaults: It wasn’t possible to set the rating field back to zero.
- Manage Pick Lists: Merging list items caused too many sync changes.
Multiple small tweaks to your Connect software today, improving both the Edit Comic screen and the Add Comics screen.
Editing pick list fields: checkbox multiple values in one go
The Edit screen is where many users are spending most of their time, so we’re always trying to make your editing life faster and easier.
Today, we improved all multi-value pick lists fields (e.g. Artists, Genres, Studios) by letting you add multiple values in one go. In the Select Value screen we have introduced checkboxes now, that let you checkbox multiple values and add them instantly.
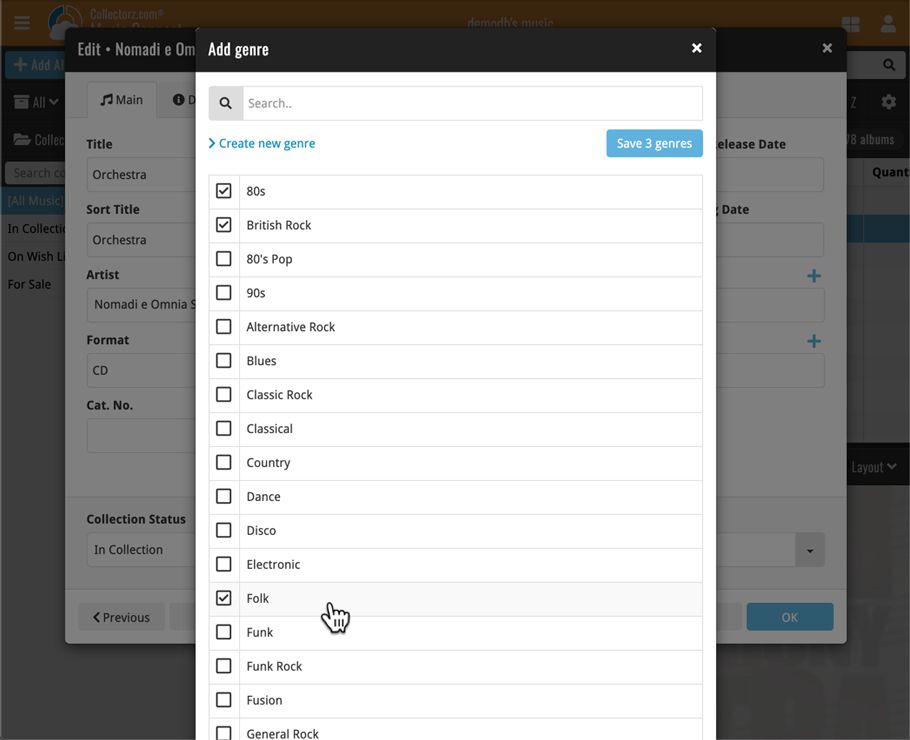
This is now available for the following fields:
- Artist
- Composer
- Genres
- Studios
- Extras
- Conductor
- Orchestras
- Tags
Adding Albums by Barcode: instant adding to queue
Previously, when you searched by barcode (either by typing or scanning), the barcode instantly disappeared from the search box, but only appeared in the queue when the search was complete. Also with no “loading” indicator showing in the meantime. Not a problem when searches are instant, but it could lead to confusion in situations where it took a bit longer for the search to complete.
So we got to work and made it better: after hitting search, the barcode now instantly appears in your queue, showing a “Searching” indicator. This gives you instant feedback the barcode was accepted and is searching. Then, when the search has completed, the queue entry is filled in with the album details and cover image.
The above tweak also applies to the opening of the screen while you still had some barcodes in the queue. This saved queue list will now populate faster.
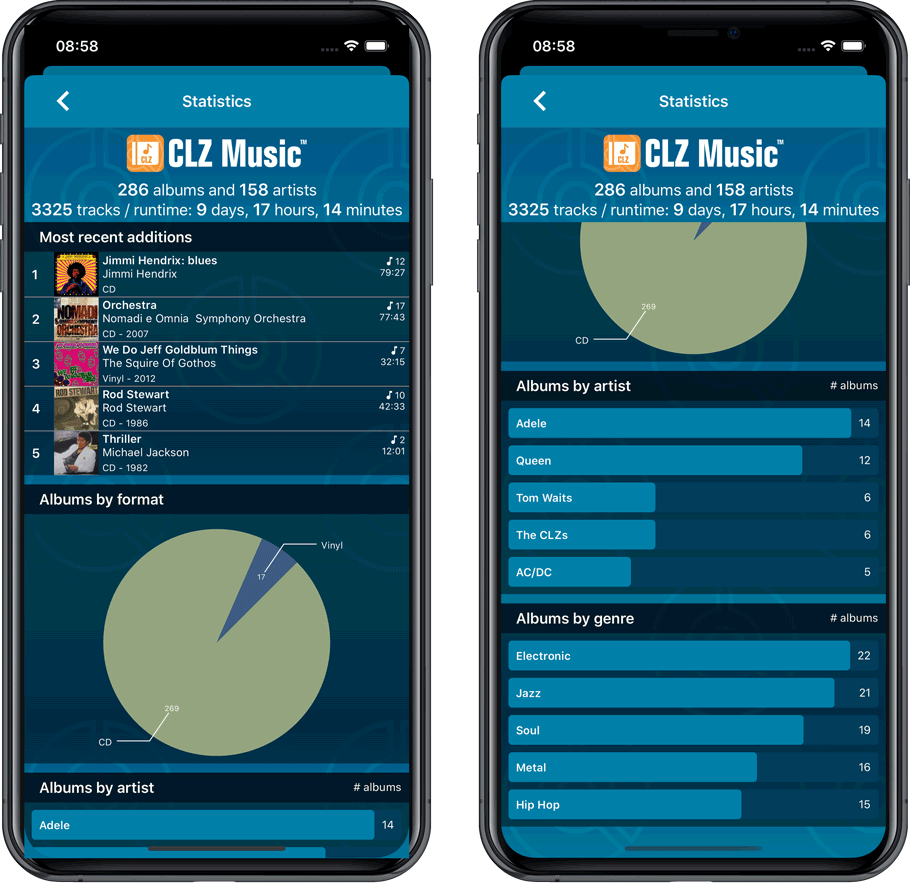
A big update for the CLZ Music app, introducing a new Statistics screen, a cool “infographic” style screen, showing totals and statistics about your music collection.
To open it, just choose “Statistics” from the menu.
In this new screen, you can find:
- The number of albums in your collection, and how many artists.
- How many tracks, and the total runtime.
- A top 5 list of your most recent additions.
- A nice pie chart showing the distribution of your albums over formats (CD, Vinyl, etc.)
- A bar chart of your albums by artist.
- A bar chart of your albums by genre.
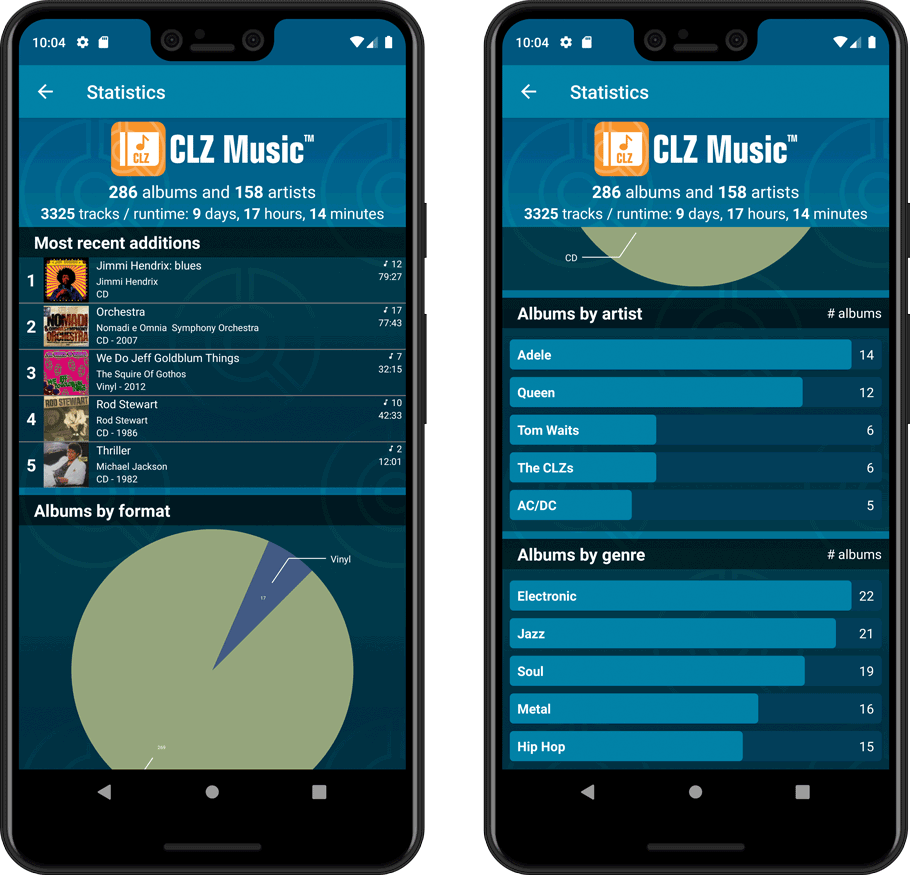
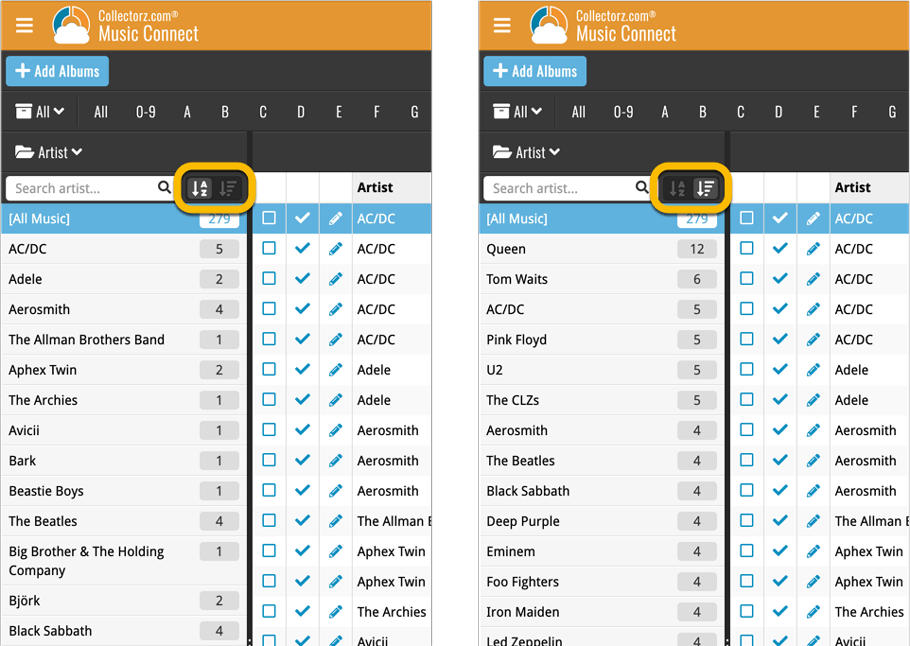
A useful and fun new option in Music Connect software today!
By default, the folders in your folder panel are sorted alphabetically. But as of today, there is another option: sort your folder panel by the numbers, that is by the number of albums contained.
Sorting by the numbers is a nice way to find the most important Artist, Labels, Genres, etc.. in your collection.
Switch between the Alphabetical and Number sorting using the new toggle to the right of the search box:
The app could crash during syncing of certain items. Shouldn’t happen anymore now!
Fixed:
- App could crash while syncing with CLZ Cloud
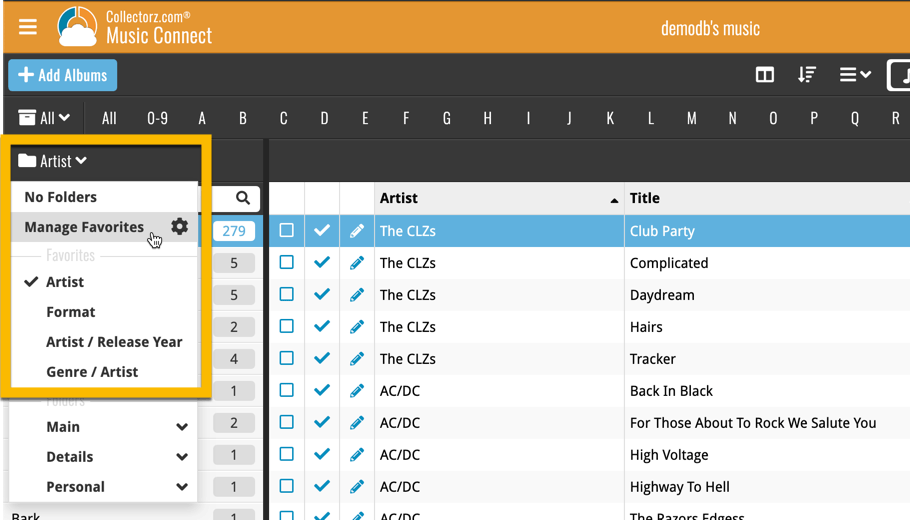
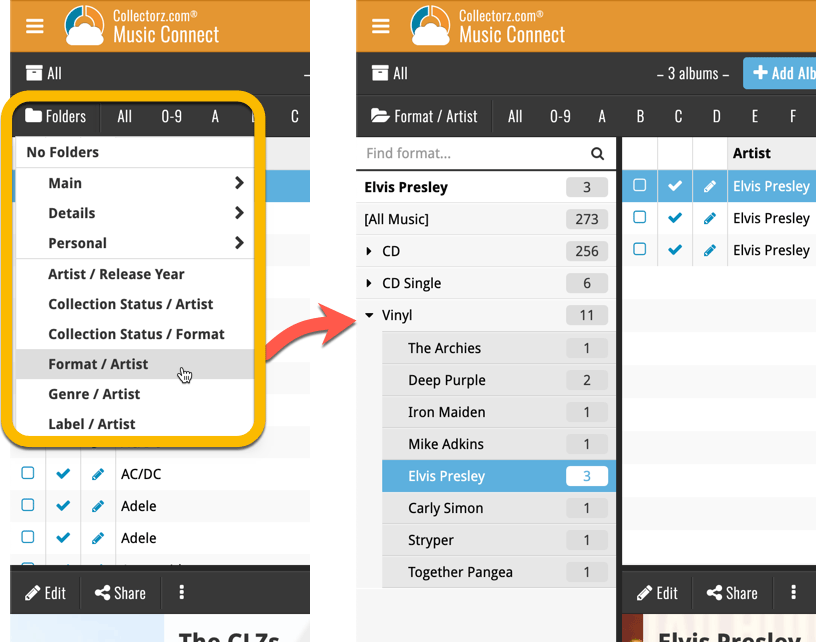
Roughly a month ago we introduced the ability to use multiple levels of folders in the folder panel. At the time, limited to several built-in field sensible field combinations.
Today we’re giving you the next logical step: the ability to create and save your own multi- and single-level favorites for the folder panel.
The Favorites are shown at the top of the Folder menu, with the single-field options still available at the bottom.
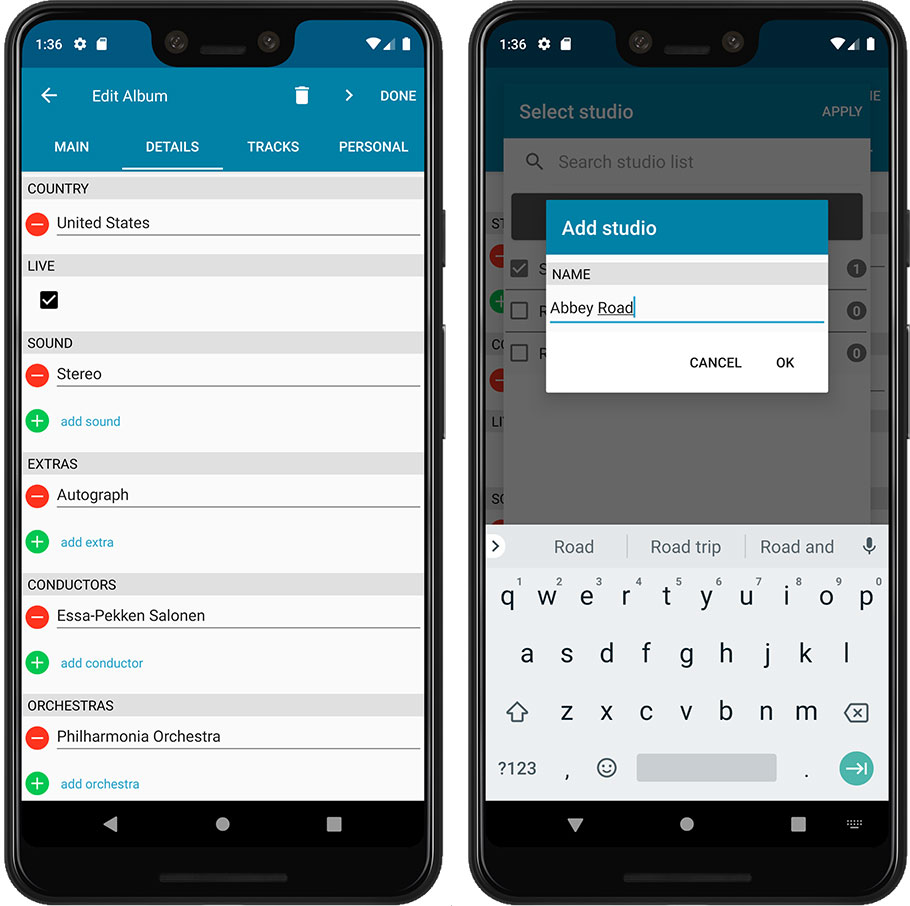
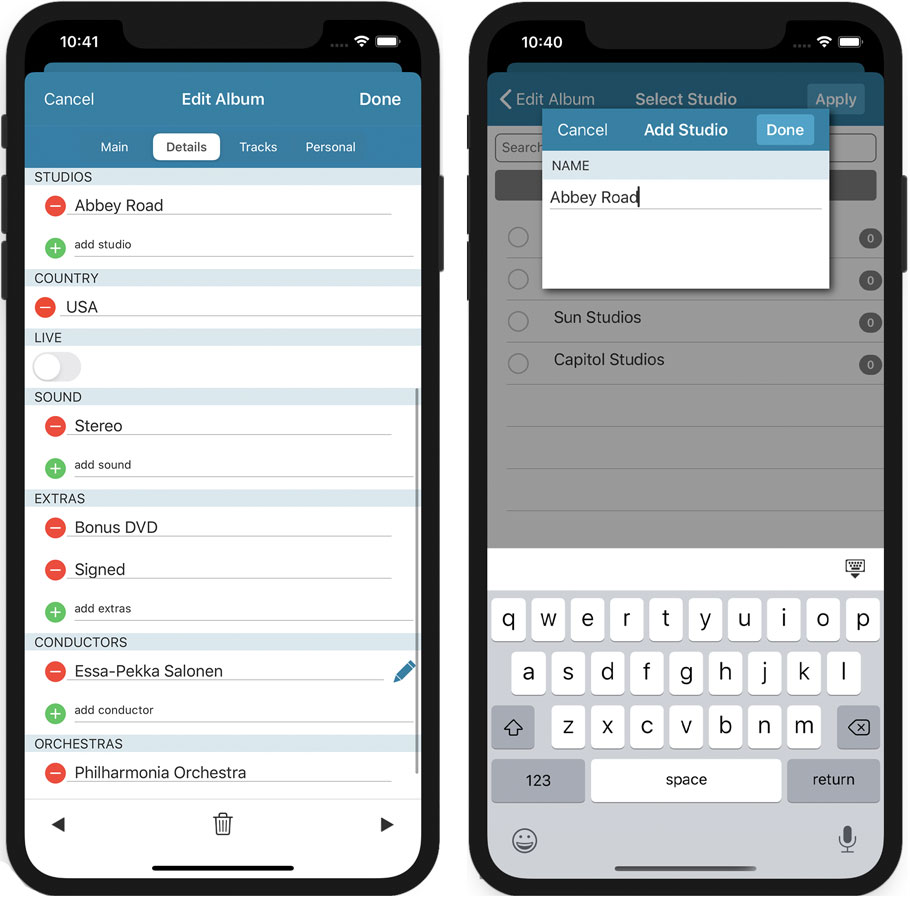
A big step forward for the CLZ Music app today, in which we add more new editable fields:
- Recording Date
- Studios
- Live (yes/no)
- Extras
- Conductors
- Orchestras
Of course, all the new fields sync to/from the CLZ Cloud too.
A big step forward for the CLZ Music app today, in which we add more new editable fields:
- Recording Date
- Studios
- Live (yes/no)
- Extras
- Conductors
- Orchestras
Of course, all the new fields sync to/from the CLZ Cloud too.
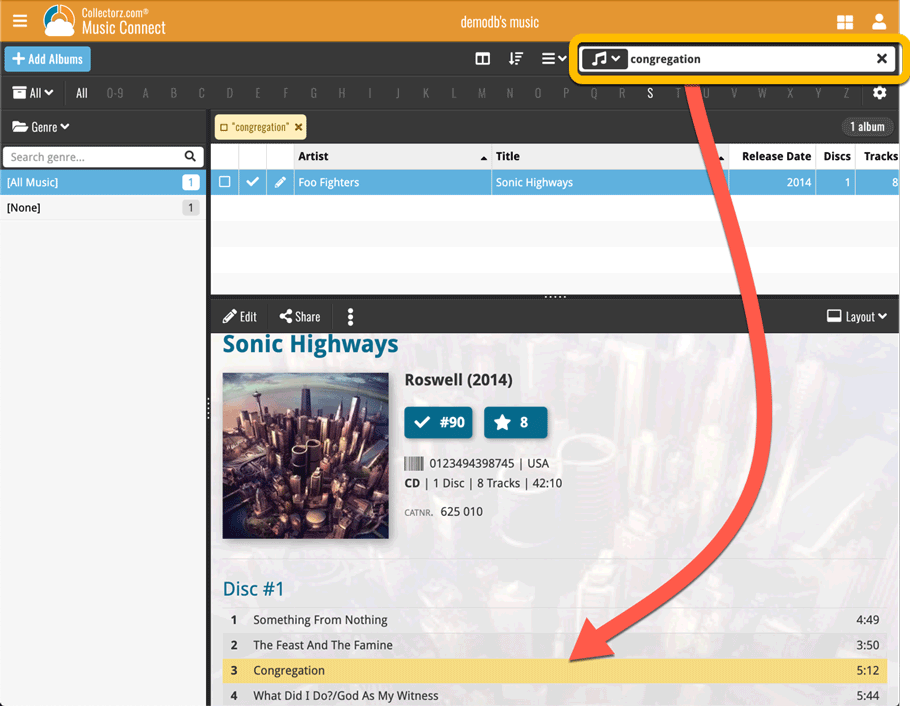
Wait what? Track searching in Music Connect? Yes, it is finally here!
For many years, the most requested missing feature for Music Connect and CLZ Cloud has been the ability to search for track titles and track artists. The main reason for the lack of a track search has always been performance. Searching a cloud database with over 500 million (!!) songs is not an easy task 🙁
However, a few months ago we finally decided to start on this huge and challenging project.
And I am happy to announce that we found a solution that works! We have created a humongous new search index for the music cloud data, that now includes track titles and track artists. A new flexible search engine is now available behind your familiar search box that lets you search album details, track details or both.
As of today, the new search engine is live in your account, and it is FAST!
Choose between 3 Search Types
Use the new “search type” selector on the left of the search box to choose to search:
- Albums
- Tracks
- or both: Albums & Tracks
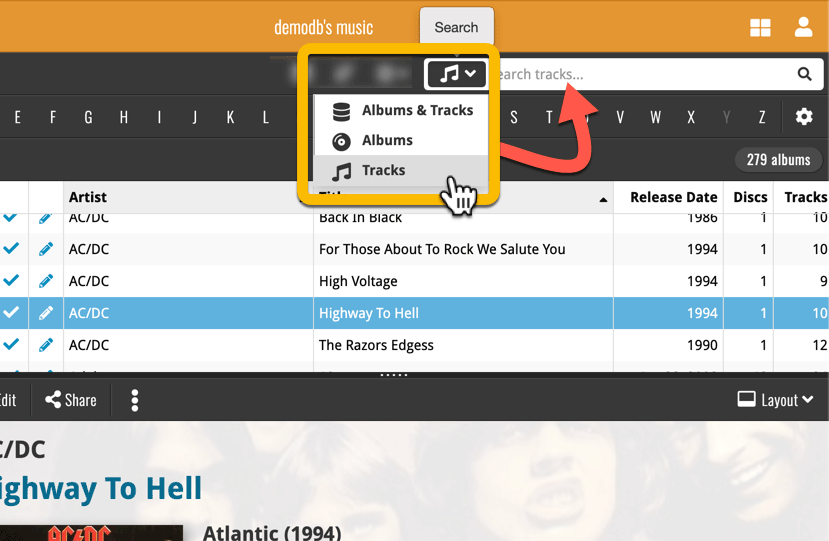
Track highlighting
After searching for tracks, click one of the resulting albums and the track that match will be highlighted in your album details panel.
Two updates for your Connect software today. An improved Statistics screen, with cool new charts and lists, plus a re-designed toolbar that clearly shows your currently selected folders and filters.
Fixed:
- Custom images were uploaded too often
Fixed:
- Custom images were uploaded too often
- Add by Barcode: Barcode wasn’t showing in the result
A very cool and useful addition to your Music Connect software today: the folder panel on the left now allows multiple levels of folders!
This is a powerful way to browse your music collection, e.g by Artist, then Release year.
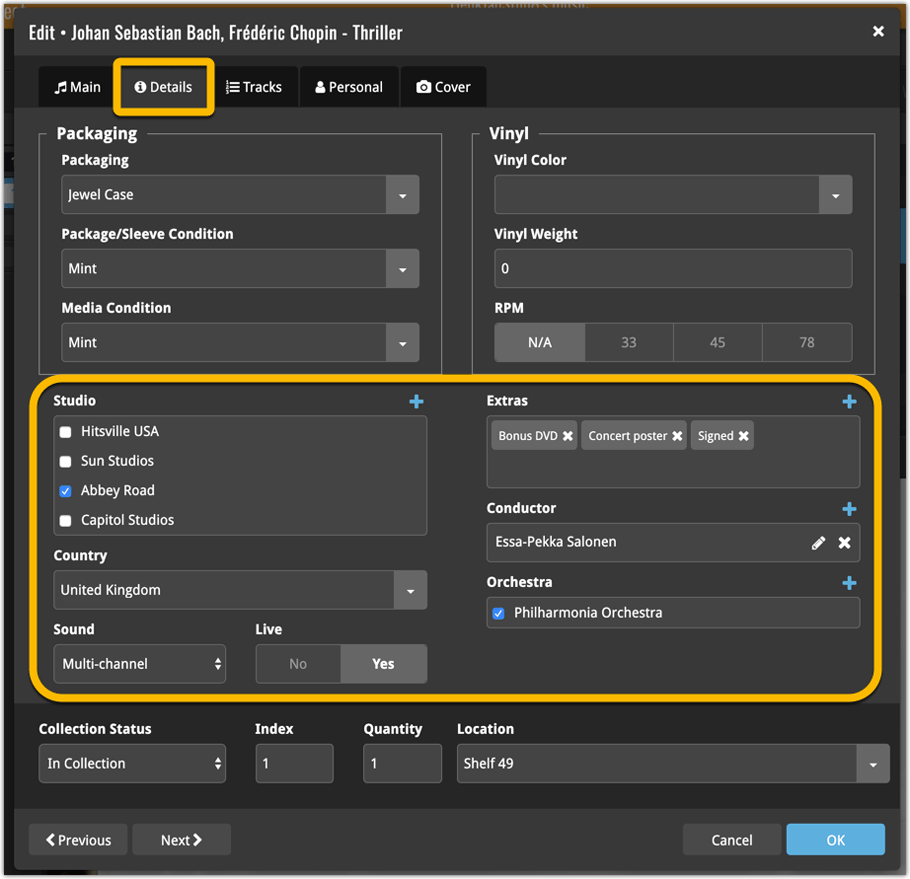
A big step forward for the Music Connect software today, in which we add many new editable fields and Back Cover images.
Many new fields
Today we have added many fields to the software, all now editable in the Edit Album screen.
- Conductor
- Orchestra
- Studio
- Composer (you can now add multiple instead of just 1)
- Extras
- Recording Date
- Live: Yes/No
- Sound: Mono/Stereo/Hi-Res Stereo/Multi-channel
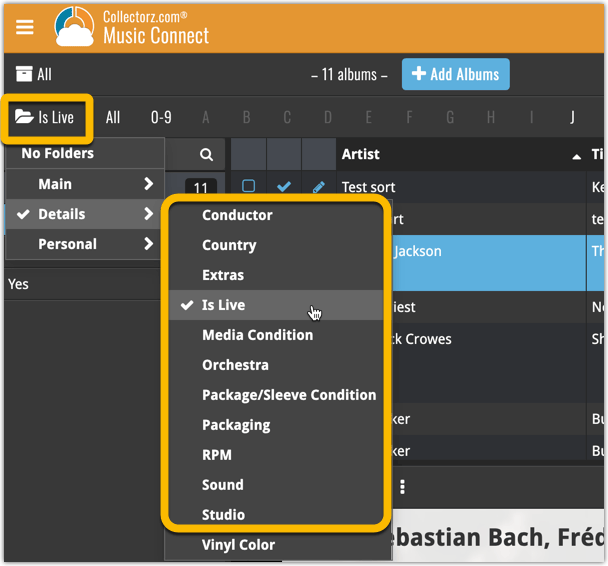
Of course, the pick list fields are immediately available as folder fields too, so that you can browse your collection in folders by Studio, Orchestra, Live, etc…
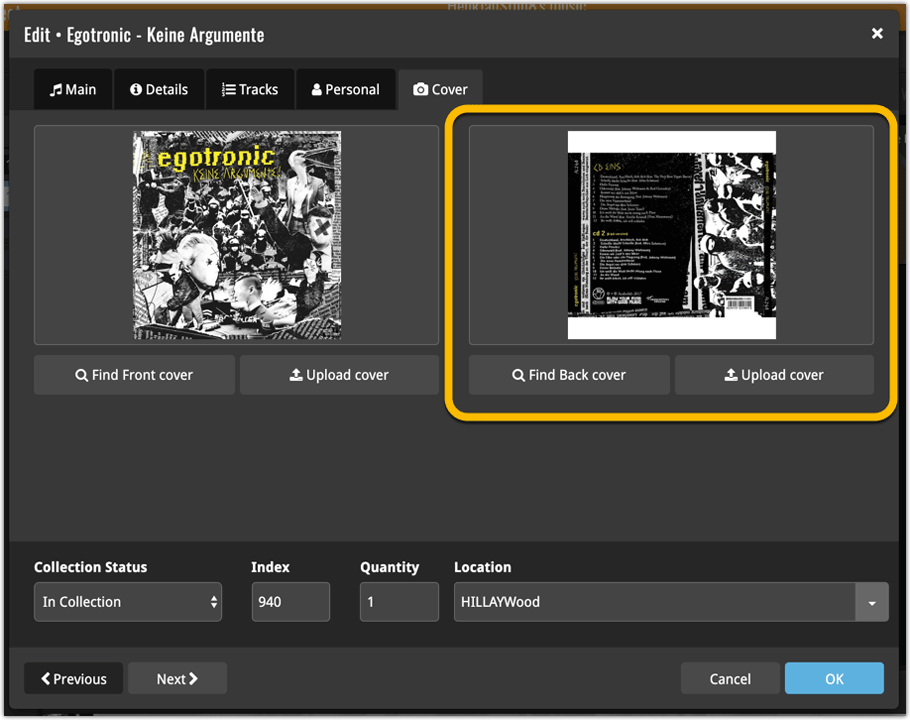
New: Add your own back covers
With this big update for Music Connect we have another surprise for you: Back Covers! That’s right, a brand new back cover field you can modify yourself.
Use the “Find Back cover” button to find one, or upload one yourself:
Changed:
- Add by barcode: Swipe to remove a single barcode wasn’t working. To remove a single barcode now, just press and hold on it!
Fixed:
- When changing a cover, the list and images view wasn’t updated correctly
- Date pickers weren’t showing correctly
- Some colours were wrong (tabs/switches)
Instead of working on new features, we decided to take a few weeks to look at existing screens and functionality and see where things could be improved, of course all based on your feedback.
Today’s update brings you the first batch of user interface improvements that we implemented (more coming up!), plus it bring the app fully up-to-date with the new iOS 13 “sheet-style” popup screens!
Fixed:
- Crash in Field Defaults screen
- Edit screen: Edit pencil buttons were broken
- Custom covers could upload too often
- Some further modifications to the Manage Pick List screen and pick list pop-ups in the edit screens
Instead of working on new features, we decided to take a few weeks to look at existing screens and functionality and see where things could be improved, of course all based on your feedback.
Today’s update brings you the first user interface improvements we implemented (more coming up!):
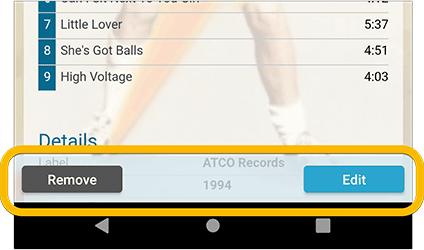
Easier to find Edit and Remove buttons on album details screen (phone only)
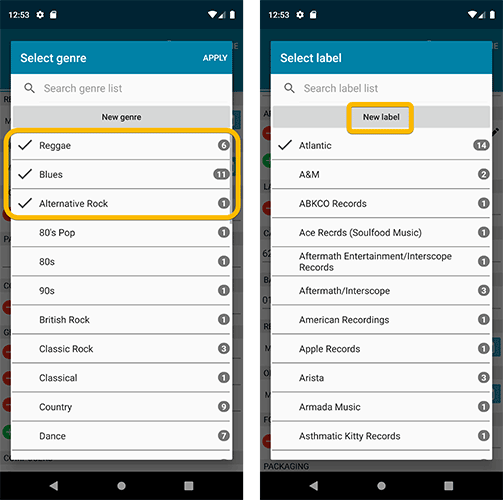
Easier editing of pick list fields, especially multi-value fields
- Selected/checked values are now always at the top
- For multi-value fields (like Genre), check/uncheck multiple values in one go!
- Easier to find big button at the top for adding NEW values..
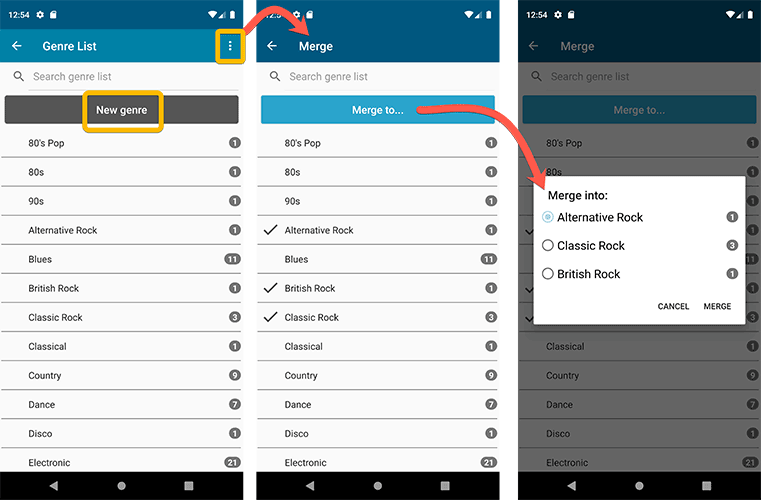
Complete Re-design of Manage Pick List screen
- Easier to find big button at the top for adding NEW values.
- Remove Unused and Merge action have now been moved to action (…) button top right.
- Easier to use Merge mode.
Add by barcode: New Clear Queue button and new “Scanning tips” popup
![]()
Fixed:
- Re-introduced a “sync changes pending” icon to the “Sync with CLZ Cloud” menu item
Fixed:
- Fix for a crash that some iPhone users experienced after adding/editing entries
Several small tweaks for your CLZ Music app today:
- iPhone: details page now has clearer Edit and Remove buttons at the bottom
- “Sync with CLZ Cloud” menu now indicates whether there are sync changes pending.
If you are always adding your albums by Artist and Title, you will certainly enjoy today’s little tweak to the Add Albums screen. A new All / CD / Vinyl selector lets filter the artist/title results by Format.
For example:
All Nirvana / Nevermind results on CD:
All Nirvana / Nevermind results on Vinyl:
Fixed:
- Issue where users could not sign up for a new CLZ account.
- Improved error handling in the Add-screen.