What's new in CLZ Comics? (page 16)
New:
- Added in-app getting started tips for new users (tap “dismiss” to dismiss)
Fixed:
- Fixed: adding items did not work for users that were not logged in
In this update, we try to tackle a problem that we often see in our support system:
Users changing phones without updating their CLZ Cloud first. Or even worse, without even having a CLZ Account yet.
Which of course cause data loss (and a lot of sadness).
So in this version, we are trying to create more awareness of:
- The importance of creating a CLZ Account, so that you can Sync with CLZ Cloud.
- The importance of keeping your CLZ Cloud up-to-date by actually Syncing with CLZ Cloud.
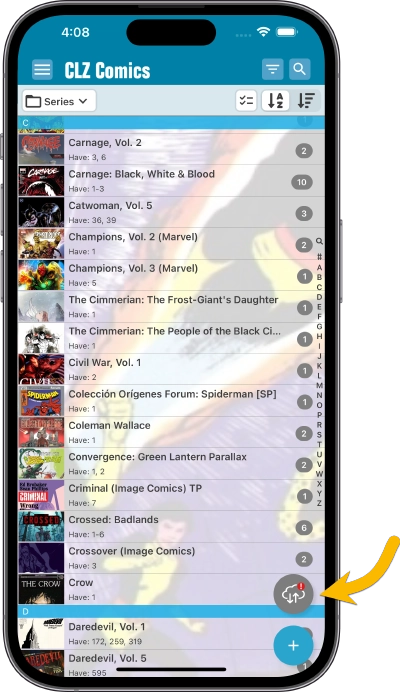
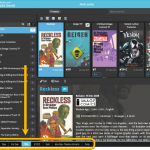
New Sync button in main screen
When not in sync with CLZ Cloud, a new Sync button will appear on the main screen, above the Add button. This way you will always know if there are still items to sync up to CLZ Cloud or down from CLZ Cloud (even when you use auto-sync).
(Don’t like this button? In the Settings screen, switch OFF the setting that says “Show on-screen sync button”)
New “Sync with Cloud!” bar when not logged in
When using the app while not logged in to a CLZ Account, a new bar will appear at the bottom of the main screen that says “Sync to CLZ Cloud for an online backup”.
Hopefully that will help prevent future data loss.
(Don’t like this bar? In the Settings screen, switch OFF the setting that says “Show backup suggestion bar”)
New 5-comic “Demo Mode” for new users
For new users who just downloaded the app, we introduced a new “Demo Mode” that lets you add 5 comics before committing to the actual 7-day free trial subscription.
Fixed on iOS:
- When adding comics and you were prompted to change the collection status of an existing item, pre-fill data was ignored.
Fixed on Android:
- Edit Comic: When you’ve edited something, and you tapped “Next”, it would skip an item.
First, what is Core?
CLZ Core is our central online comic database, that is the database that you search when adding comics by barcode or title, the database that provides you with automatic issue details like variant, variant description, release dates, cover art, creator lists, character lists, etc…
(Not to be confused with CLZ Cloud, which is your database, stored in the cloud. Cloud is what you sync with, to make online backups of your data and to sync your data between devices.)
 After the CLZ Comics 8.5 release, we have seen some common questions, by email and in this group. So let me answer the most common ones here:
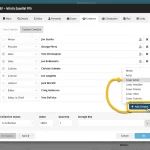
Q: Will my changes to creators/characters automatically affect Core?
A: No, they will not. Just like with any other change or correction you make: if you want to change it in Core too, you need to use the Submit to Core command.
In version 8.5 of the app, the Submit to Core feature has been expanded to also upload your custom creator/character list to the Core submit form.
Fixed:
- When using Update from Core it would keep coming back with updates (even though there weren’t any further updates)
Fixed:
- When tapping “Edit” the app could crash
I know it was a long wait, but here it finally is: CLZ Comics 8.5, with the long awaited editing tools for your creator and character lists!
The entire CLZ development team has been working on this major feature for several months. A huge project that we have been postponing for many years, because of the complexity and the enormous amount of work. But today we can finally go public with it, resulting in a major 8.5 update for the CLZ Comics mobile app:
As of today, it is finally possible to modify the CREATORS and CHARACTERS lists of your comic entries! And of course, to sync your customized lists to and from the CLZ Cloud.
 The entire CLZ development team has been working on this major feature for several months. A huge project that we have been postponing for many years, because of the complexity and the enormous amount of work. But today we can finally go public with it, resulting in a major update for the Comic Connect web-based software:
As of today, it is finally possible to modify the CREATORS and CHARACTERS lists of your comic entries!
Also, once the upcoming version 8.5 of the CLZ Comics app is live (early next week), it will be possible to sync those customized cast and crew lists to the CLZ Comics mobile app.
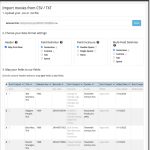 Continuing with our quest to revamp and re-design features and screen of the Connect web-based software. Today we took on the Import from CSV/TXT screen.
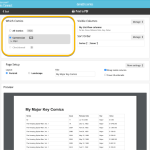 Connect and CLZ Cloud users often ask us about printing or exporting only a part of their collection, e.g. “how do I print just my wish list?” or “how do I export a list of just one series?”.
Now, this was possible, but it took a few steps that were not intuitive for many users. You had to:
- Make the selection in the main screen first, e.g. by using folders, the collection status filter or the search box
- Checkbox all comics in the selection, using the checkboxes in the list
- Then use the Print or Export button on the special blue action toolbar above the list
With today’s update, we are making this a lot easier. And while we were at it, we also freshened up the user interface of the Print to PDF and Export to CSV screens.
 Great news for all our German-speaking customers: starting today the Connect web software is also available in German!
Our programmers have been working for months to make the Connect software available in other languages (other than English). This meant:
- Make the Connect software translatable, to ensure that all interface texts come from a translation database.
- Making a nice and easy translation tool for our translators, so that they can translate all texts efficiently and also maintain the translation when new functionality is added.
- And of course, to do the actual translation.
And today we can take the next step: Connect is now available in German!
 Coming up soon: the ability to add and edit the creators and characters lists, in both the CLZ Comic mobile app and the Comic Connect web-based software. And of course, the syncing of these custom lists between the desktop, web-based and mobile editions.
Read more
Fixed:
- When adding an issue for a new series, the series sort name was not downloaded from Core
- Updated the link to the online manual in the app menu
- The search filter in multilevel folders wasn’t always remembered when navigating back out of a folder
Fixed:
- Adding: the app could crash while adding a comic
Fixed:
- When using multi-level folders, the folder panel search text would sometimes copy over to the next folder (and not be remembered when going back)
- After syncing, the main screen did not always refresh
- A crash could occur when entering Selection Mode in Card View if no cards were available
- A crash could occur when selecting folders
- When switching between collection statuses while in multi-level folders, the app could show a wrong selection of items
- The app crashed on devices with iOS13
- iPad: The folder panel search did not have an “X” to clear the search
- iPad: Cover Flow: A crash could occur when using the Select Random Item button.
Fixed:
- Shake to Shuffle could cause a crash in some cases
- Opening an item, swiping to the next, then edit “in-details-panel” would reset the details to the first item
- Add Screen: Scanning a barcode: When the device was rotated, the barcode scanner could stop working
- Add Screen: Tapping between results could end up showing a different result
- Multi-level folders: When using the “Show sort names” feature, the breadcrumb at the top could show strange sort names for certain folders
Fixed:
- Fixed a possible Crash on startup
Fixed:
- Main screen: Tapping a Series from the search suggestions would not show the Series.
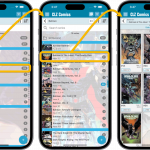 A huge update for your CLZ Comics mobile app today, which introduces a powerful feature for browsing and filtering your comic collection: using nested folders.
Previously, it was only possible to use one level, so either Series folders OR Tag folders OR Series Group OR Storage Box folders, etc… But starting with this version, you can use nested folders, so for instance, use Series Group folders, then within each series group folder have Series folders.
 A nice update for all Connect users who use multiple collections, especially for those who have a LOT of collections.
New in this re-design:
- Single row tab-bar. No more lost screen estate caused by multiple rows of tabs.
- Got more tabs than fit on screen? Scroll the bar horizontally.
- Or use the next/prev buttons on the right to jump page by page.
- Alternatively, click the menu icon on the bottom left to pick a collection from a menu.
- The menu also provides quick access to the Manage Collections screen.
- Drag tabs to change their order.
- Double click a tab to rename a collection.
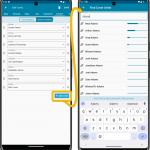
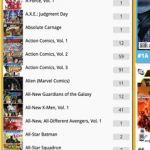 In the CLZ Comics mobile app the Series list has always been a special case folder option, not showing the regular textual folder entries, but instead a nice layout with the cover art of the first or last issue.
So we decided to bring that same look to the Series folder panel in Comic Connect:
 A big project our web-dev team has been focused on the past few months is making our Connect web-based software available into other languages. A huge project that consists of:
- Making the software translatable, basically ensuring that ALL UI text is retrieved from a translation database.
- Creating a nice and easy web-based CMS tool that translators can log in to and translate text, preview in Connect, etc…
- Doing the actual translations of all UI texts.
And today we can finally show the first results: Connect is now available in Dutch!
v8.3.2: Fixes for downloading values, sorting by values and slab label colors
Fixed:
- Sorting by value didn’t work for raw comics without a grade set
- Adding or Updating values for comics without grade didn’t fetch a value
- Fixed colors for generated slab label of Qualified Grade, Signature Series Restored, Signature Series Conserved
 Version 8.3 is here, a big update that is all about slabbed comics!
More and more CLZ Comics users are using the app to catalog slabbed comics (CGC, CBCS, PGX, etc..). So let’s take our slab support to the next level!
Here’s what’s new in CLZ Comics 8.3:
- A cool new look for your slabs in Card View and the comic details page.
- Three new slab-related fields: Label Type, Page Quality and Custom Label.
- Four new options for the Grade field: NG, PG, CVR and ART.
- A new setting “For raw comics, show Grade as letters”